 |
| About Alan |
| Tutorials |
| Free files |
| Win9x FAQs |
| E-mail Alan |
| |
| Articles |
| BIV articles |
| Archive |
| Other articles |
| Archive |
| |
Burning CDs from LPs and Tapesby Alan Zisman (c) 2003Part 1- Getting Connected |
||||||||||||
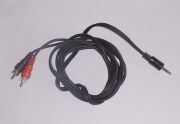
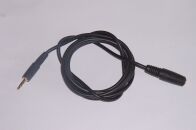
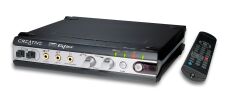
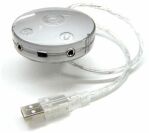
One of the things that many people want to do with the CD-burner on their computer is create audio CDs from their library of cassette tapes, 8-tracks, and vinyl (LPs). While it's relatively straightforward to copy audio CDs or create compilation CDs from tracks from other CDs, it seems scarier to make CDs from other media. I'm not a pro, but here are some tips that I've learned the hard way. An aside: you may want to take a look at David Pogue's 2007 New York Times article The Sermon on the Tapes with information on digitizing audio tapes, vinyl records, videotapes, and film. (Free, registration with the NY Times required). In July 2008, PC Magazine published a short article on the subject, which is a good introduction. Assumptions1) I assume you have a CD-burner (or DVD-burner) on a PC or Mac, and are relatively familiar with burning an audio CD... I'm not going to focus on this end of the process... instead, my emphasis is going to be on getting burnable audio files onto your computer from your tapes and LPs. 2) I'm assuming that you have an audio system-- a stereo, with a turntable and a tape-deck. Further, I'm assuming that your tape-deck or stereo has a set of output plugs-- either Tape Out plugs on the back of a tape-deck, a line-out plug on the stereo, or (worst-case scenario) a headphone jack. If you can't get an audio signal out of your system, you can't record anything into your computer! 3) I'm assuming that you're comfortable enough with your computer and with software in general that you can experiment... you're probably using different hardware than I used, and different software. As a result, my instructions and illustrations won't exactly match what you'll see in real life. Be prepared to experiment! Feel free to e-mail me with questions, if you're stuck... but I can't guarantee that I can help! Getting Set UpThe first thing you'll it is to be able to connect your audio components to your computer. Obviously, this is going to be easiest to do if your audio equipment and computer are reasonably close to each other-- at least in the same room. There are a lot of variables here, so bear with me. First, start at the audio-end. On the computer, you'll see several 1/8" Mini connectors, either on the sound card on the back of the computer, or on the body of the case... most times, you'll have a cord going from one connector to your computer's speakers, but it's not always clear which one to use. You may have four (or more) plugs: These plugs may be identified with icons: a picture of speakers, a picture of a microphone, and maybe an image with an arrow pointing in, and one pointing out... these could refer to Line In and Line Out. For better or worse, it may take some experimentation to find the right place to plug the cable into your computer. The sound-quality of your recordings is limited by the quality of your computer's sound card. This can be a relatively crappy component, especially if built-into the motherboard of desktop PCs or notebooks. An alternative is a USB sound device, which can provide a cleaner, better quality way to get sound into the computer. Moreover, some recent Mac models had sound outputs but no built-in sound inputs. Two examples of USB sound devices are the Creative Extigy , a US$149 external sound unit (PC-only) If using this, connect the cord from your stereo to the Extigy's Line-In plug on the front of the unit. Simpler and more affordable, but still offering good sound quality is the US$35 Griffin Technology iMic . Despite its Apple-influenced name, it works with both Macs and PCs running Windows or Linux. Note if using an iMic... for reasons that I don't understand, this unit has icons that work backwards from what I would expect. Plug in to the plug labelled with a speaker icon, not the microphone icon.
Other gear that can be (optionally) used: the ART USBPhonoPlus (US$129) adds a pre-amp to a USB music interface, letting you get good results plugging in your turntable. Or the ION TTUSB (US$99) is a complete turntable with USB output, to plug into your computer for recording; line input jacks let you plug your tape recorder or other sound source into it as well.
Notebook users wanting to improve on the sound quality of their built-in sound card may want to check out Creative's Sound Blaster X-Fi Xtreme Audio Notebook SB0710EF (US$79)- it's Windows only and requires a recent-model notebook with an ExpressCard slot, not the older PCM-CIA slot. If you've got your audio gear wired up to your computer (one of these ways!) it's on to Part 2: Getting set on your computer. There are two versions of this- one for Windows users, one for Mac users. You may also want to check out c-net's tutorial: Weekend Project- Turn LPs and Cassettes into digital media files. Another good source for information on this topic is Jakeludington.com. Last updated: July 18 2008 The complete Burning CDs from LPs and Tapes series: Note: If you are using Windows XP and the Microsoft Plus! Analog Recorder to digitize your audio collection, check out Jake Ludington's Digital Lifestyle guide. |
||||||||||||
|
|
||||||||||||
|
|
||||||||||||
| Alan Zisman is a Vancouver educator, writer, and computer specialist. He can be reached at E-mail Alan |