We are going to be
creating a homepage
for a fantasy
school.
In order to work on this
web page,
you should have a set of graphics files including the following:
baseball.gif
books.gif
computer.gif
lunch.gif
music.gif
pumpkin.gif
paper.jpg
skeleton.jpg
If you do not have
them, you can
download them as a compressed PC
or Mac
file by
clicking on the links... then double-clicking on the downloaded files
to
copy them to the location of your choice.
This practise is
designed to be used with Netscape Composer-- part
of the Netscape
Communicator suite of programs on PC or Mac. With minor
modifications, it could be used with the older Netscape Gold, with
Microsoft FrontPad, or with other graphical web design programs.
(FrontPage, DreamWeaver, PageMill, etc). (Update 2013 - you might prefer the more modern version, Kompozer, available for Windows, Mac OS X, Linux, etc - using it should be similar to these older instructions)
Open Netscape Composer
(or startup
Netscape Navigator, click on the Communicator menu, and choose
Composer). You should be looking at a blank screen.
Become
familiar with the Composer toolbar-- we'll be using the following items:
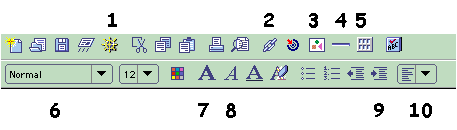
1. Preview in browser
2. Create or edit a link
3. Insert a graphic
4. Insert a horizontal line
5. Create a table
6. Select a paragraph style
7. Bold text
8. Italic text
9. Increase indent
10. Alignment
Click on
the Format menu, then on Page Colors and
Properties.
Make sure youíre looking at the General tab, and fill in
information for Title, Author, and Keywords. Click
OK and check
on the title bar on top of the window to see that your title has
appeared there.
Save your
file, as Index.htm Note that the names
'index.htm' and
'index.html' have magic properties on most web servers. Find out the
magic name for yours-- and note that in some cases, capitalization
matters. Also-- NEVER save web files or graphics
spaces in their
filenames. 'mylongname.htm' is OK, as is 'My_long_name.htm', but not
'my long namee.htm'. While Composer will save the file that way, when
you load it on your server, you'll be unable to accessthe page across
the Internet.
Go back to
the Format/Page Colors and Properties menu, and go
to the Colors
and Background tab. While you could use that to change
background
(and text) colours, resist temptation. Select the [
] Use Image
option, click on the Choose File button, and browse
to your
sample files. Select the file paper.jpg. Click OK.
How does
your page look?
Notice that
your text cursor is at the left-hand edge of the pageÖ if you
type, it will be hard to read text over top of the spiral rings of your
background graphic. Click on the Increase Indent toolbar
button (#9)to
indent all your text. Repeat as needed. (This is a good idea even for
pages without a background graphicóthey look more
professional
if the text isnít right up against the edge of the screen).
In the Paragraph
Style box (#6), click the down arrow, and
pick Heading 1.
Use the Alignment tool (#10) to center-align
your
cursor. (Click the down-arrow then choose the middle option).
Type a
title for your school webpage such as YourSchool
Home Page.
Press Enter.
Notice that
your style has returned to Normal. Resist the
temptation to set
font and size as you would in your word processoróthe
results will look different on different computers. Instead, limit
yourself to
the pre-set styles.
Click on
the Table tool (#5). Use it to
create a table with four
columns and three rows. Look where it's currently set to a width of
100%
of window... click on the arrows next to the % sign, and change that to
pixels and change the value to 600.
Remove the
checkmark from the Equal Column Widths option.
Click OK or INSERT.
Click in
the upper-left-hand table cell, then click on the Image
tool.
Click on the Choose Filebook.gif
file. Click Open and then
OK to import that picture onto your page. Repeat for the other cells
down the left-hand column, importing the files baseball.gif,
computer.gif. Add lunch.gif, music.gif, and
pumpkin.gif to
the three cells in the third column. button, and navigate
to your
sample files. Click on the
In the top
cell of the second column, write a sentence or two about your school
library. In the second cell, write about school sports, in the third,
about technology at your school. In the right-hand column, write about
nutrition, the music and art programs, and about student writing and
art.
Click on
the book picture, then on the Link tool (#2)Ö
enter
the following fictitious web address for the link: http://myschool.vsb.bc.ca/library
and click OK (or enter a real address of your choice!). Save and Preview
in Browser (#1). You'll see a blue border around the picture.
Return
to Composer.
Highlight a
word or two in the cell describing the library, and click on the
Link
tool , and enter the same address. Click OK. Note that the text is now
underlined. This is why you should never use underlined text when
designing a web pageóit will be mistaken for a link. Note
that
the links do not work when youíre in ComposerÖ you
will have
to open your page in a browser to test them. Resist temptation to leave
out the http:// when writing a linkóthey
wonít
work if you take the lazy way out!
Repeat in
the other cells, adding links to the graphics and a word or two of the
text for each school activity. Save your file.
Click on
the Preview button to load your saved page into
your browser
again. If you were doing it for real, you might want to test your
links.
(Since you didnít use real links, donít bother
now!) How
is your page looking? Go back to Composer.
You
donít like the border around the table cells. Right-click
anywhere in your table (Mac users, click and hold down the mouse
button)Ö a menu will pop up. Choose Table Properties.
Go to
the Table tab and remove the checkmark next to Border
Line
Width. Click OK.
You
donít like how the text is floating in the middle of the
cellsÖ so right-click in one of the right-hand cells, and
again go
to the Table Properties dialogue box. This time,
go to the RowVertical
Alignment to Top. Click OK. Does it look
better? No? Set it
back.tab, and set the
Click
underneath the table. Click on the H. Line tool (#4)
to
insert a horizontal line.
Click on
the Italic tool (#8), and type
(below the horizontal
line), the words:
Webpage
created by (yourname). Highlight your name, and make it an
e-mail
link by clicking on the Link tool. In the link
field, type:
mailto:yourname@youraddress.com
(use a real
or fictitious e-mail address). Save your file.
Youíre
done! Notice that if youíve saved to a location different
from
where your graphics were originally located, the graphics files you
used
were automatically copied to the new location.
Your page should look
something
like this:

You can see it full
sized here:
|