ALAN ZISMAN ON
TECHNOLOGY
Don't save, print, or bookmark websites - create shortcuts instead.
By Alan Zisman © 2020-07-16
Polish translation by Marek Murawski, Macedonian translation by Katerina Nestiv, Norwegian translation by Lars Olden, Croatian translation by Milica Novak
How do you find and return to a web page that you found useful? There are a lot of standard ways, but there are also problems. How many of these have you tried on your laptop or desktop computer? You could (for instance):
What's a shortcut, you ask?
Shortcuts (called 'aliases' on Macs) are little files that reference another file. They direct the computer to the main file - which may be located elsewhere on your computer's drive - or in the case of Internet shortcuts, can direct your web browser to a file somewhere on the Internet. Bookmark lists are simply folders full of shortcuts. The Windows Start Menu is simply a tricked-up way of displaying a couple of folders full of shortcuts to installed applications. You can have shortcuts to documents, music files, whatever - and put them wherever is convenient to you.
There are several ways to create shortcuts/aliases - including one very simple way that only works with websites. I'll be getting to that one at the end. But here are two ways to create shortcuts/aliases to other files (or folders).
Maybe there's a file or folder on your computer's drive, and you want an easy way to access it from another location - perhaps it's a folder (or file) that's buried deep in your folder structure but you want to get to it quickly while you're working on a particular project - it might be handy to put a shortcut/alias on your Desktop. (Assuming your Desktop is not so cluttered with junk that you can never find anything there!). For instance, in my Documents folder, I have a Recipes folder. Within that, there's an Italian folder with recipes for Italian dishes. I want to make one of them tomorrow, and it would be handy to have a shortcut to that recipe on my Desktop. I could:
But there's an easier way - and this works on both Windows and Mac computers. Open the website you want in your browser - whichever browser you use; this works with all of them. Look up near the top at the Address Bar - the space where the website address appears. You'll see something like this (from Chrome on Windows):

See that little circle at the left-end? In some cases, you might see a little image. That's what you want to 'grab' with your mouse/trackpad arrow. Pull it to the Desktop - and bingo, there's your shortcut. Double-clicking it will open it in my default web browser, taking me right back to that web page.
There's one rub. In order to that, you need to be able to see a bit of your Desktop. If your browser window is 'maximized', it's filling the whole screen - well maybe leaving your Windows Taskbar or Mac Dock visible. But in that case, you won't be able to see any of your Desktop to drag to.
 If
that's happening, change your window so you can see some of the
Desktop. In Windows, look in the top-right corner. You'll see a set of
three boxes. On the right, there's a box with an X - to close the
Windows. Don't do that. Beside it, you'll see a box with two
overlapping squares. That's the one you want - the so-called Restore
box. (The little box on the left is the 'Minimize' box - which shrinks
your program window down to its Taskbar icon).
If
that's happening, change your window so you can see some of the
Desktop. In Windows, look in the top-right corner. You'll see a set of
three boxes. On the right, there's a box with an X - to close the
Windows. Don't do that. Beside it, you'll see a box with two
overlapping squares. That's the one you want - the so-called Restore
box. (The little box on the left is the 'Minimize' box - which shrinks
your program window down to its Taskbar icon).
When you click the Restore box, the window shrinks a bit - it may still be too large. (The icon in that box changes to a single rectangle, and the box's function changes - clicking it now will Maximize the window, filling all the available space). Now, you can resize the window, by dragging any of its corners or edges in or out, or move it - by dragging the title bar at the top of the window. Do whatever's needed so that you can see some space on the Desktop, to allow you to drag that little circle on the left of the browser's Address Bar and create a shortcut.
(Mac users can do the same sorts of things - in their case, there are three gumball-coloured balls in the top-left corner of the program window).
You can rename the shortcut if you want. Click once on its title, wait 3 seconds (or so) and click again - the title will be highlighted, and whatever you type will replace the highlighted text.
If you want, you can file that new shortcut away - for instance, I receive emails from cooking websites - I might open a link to an interesting-looking recipe and save a shortcut to my Desktop. Ultimately, though, I want that shortcut to end up in my Documents/Recipes/Whatever folder, removing it from my Desktop if I'm not going to make it in the next day or two while putting it in a place where I can easily find it when I do want to work with it.
Older blog postings....
Don't save, print, or bookmark websites - create shortcuts instead.
By Alan Zisman © 2020-07-16
Polish translation by Marek Murawski, Macedonian translation by Katerina Nestiv, Norwegian translation by Lars Olden, Croatian translation by Milica Novak
How do you find and return to a web page that you found useful? There are a lot of standard ways, but there are also problems. How many of these have you tried on your laptop or desktop computer? You could (for instance):
 Check your web browser's History
- this used to be more often done, I suspect, a few years back when the
design of browsers like Chrome, Firefox, Internet Explorer and Safari
included easy to access menu making it simple to find History. Clicking
that popped up a list of recently accessed websites - you could scroll
back in time for at least a while.
Check your web browser's History
- this used to be more often done, I suspect, a few years back when the
design of browsers like Chrome, Firefox, Internet Explorer and Safari
included easy to access menu making it simple to find History. Clicking
that popped up a list of recently accessed websites - you could scroll
back in time for at least a while.
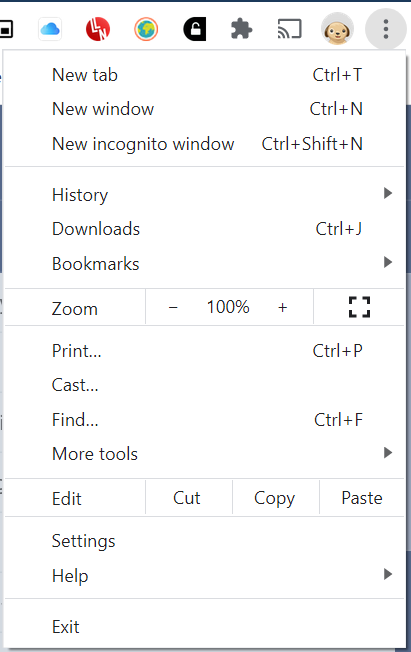
In today's Windows and Macintosh browsers, what were once easy to find menu items are now somewhat hidden - in Chrome (for Windows), look to the top-right and you'll find three vertical dots - a design element taken from Google's Android smartphone operating system. Click the dots to open a drop-down menu with all sorts of potential useful features - Print, for instance. Or Settings. Or even Exit. And the aforementioned History - with an arrow beside it indicating that clicking it will open another list.
A couple of problems using the History list. First, it's organized in reverse chronological order, and jam-packed with websites you've visited. Finding the one you want means scrolling through a long lst of other site names that you don't want. As well, if you visited the website a week or a month or a year ago, good luck finding it! Add the site to your browser's Bookmarks or Favorites: In the past, many people got in the habit
of 'bookmarking' websites that they thought they might go back to.
Again, this used to be an easier thing to do than now - it's still
possible, but how to do it is kind of hidden - and it varies between
different browsers. In Google Chrome, for instance, if you look at the
right-end of the address bar (up at the top), you should see a star. If
the star is coloured in, you've already bookmarked that page. If it's
not coloured and you click it, a dialog box pops...you can edit the
bookmark's name (maybe 'BBC News' would be more useful, taking out the
word 'Home...'). And you can edit where among several choices for
Bookmarks you'll find it - and that's part of the complication...
there's a Bookmarks bar near the
Add the site to your browser's Bookmarks or Favorites: In the past, many people got in the habit
of 'bookmarking' websites that they thought they might go back to.
Again, this used to be an easier thing to do than now - it's still
possible, but how to do it is kind of hidden - and it varies between
different browsers. In Google Chrome, for instance, if you look at the
right-end of the address bar (up at the top), you should see a star. If
the star is coloured in, you've already bookmarked that page. If it's
not coloured and you click it, a dialog box pops...you can edit the
bookmark's name (maybe 'BBC News' would be more useful, taking out the
word 'Home...'). And you can edit where among several choices for
Bookmarks you'll find it - and that's part of the complication...
there's a Bookmarks bar near the 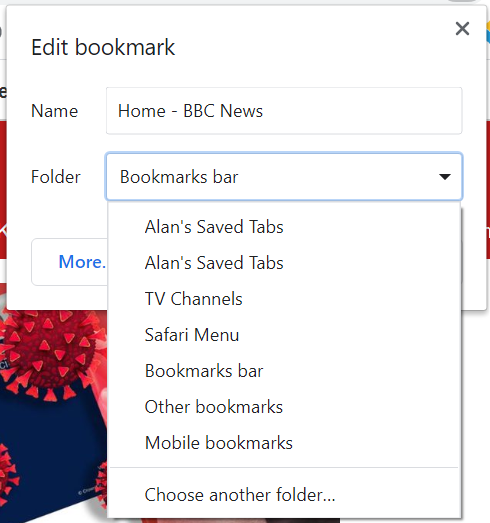 top
of the browser window. (It may be hidden - in Chrome, you'll need to
open the mystery menu (with the 3 dots, remember?), then go to
Settings, then Appearance, and turn on the option to Show Bookmarks
Bar). Or it might be in the main - now hidden, but once just a menu
item away - Bookmarks list. (Click the 3 dots, choose Bookmarks from
the list). Or it may be in a sub-folder within that Bookmarks list...
I've got a relatively long, confusing list of possibilities, ending
with Choose another folder, which allows me to create yet another
sub-menu in the list.
top
of the browser window. (It may be hidden - in Chrome, you'll need to
open the mystery menu (with the 3 dots, remember?), then go to
Settings, then Appearance, and turn on the option to Show Bookmarks
Bar). Or it might be in the main - now hidden, but once just a menu
item away - Bookmarks list. (Click the 3 dots, choose Bookmarks from
the list). Or it may be in a sub-folder within that Bookmarks list...
I've got a relatively long, confusing list of possibilities, ending
with Choose another folder, which allows me to create yet another
sub-menu in the list.
That's fine if you have a relatively small set of saved bookmarks - websites that you frequently access. I can fit ten or eleven website names that I regularly go to on my Bookmarks Bar - dragged into alphabetical order, with some of the names edited to shorten them: Vancouver Public Library to VPL, for instance. (Right-click on a menu bar item to Edit it's name in Chrome).
But many people who've been online for years have a huge number of items in their Bookmarks list - often in random order. Once again, it can be so hard to actually located what you want, that they've stopped bothering - and the more you add items to your Bookmarks list, the harder it gets to organize them or to find anything.- Try to Save
a website onto your computer's drive for future reference. Saving a
website can be problematic - something that looks like a single page as
viewed in your browser is typically a large group of files. This
relatively simple page, for instance, has, online, the main file
consisting of the text making up the content plus formatting
instructions - the HTML file. That file references separate graphics
files, one for each image on the page, as well as the background image
for my blog pages. These images are in various folders on the same web
server as the HTML file, but they could just as easily be on different
web servers scattered across the Internet. There might be embedded
video or music files, or lots of other stuff.
 If I click Chrome's 3 dots and then click Save - wait, I don't see Save! I need to click More Tools > and then Save Page As....
and I get what looks lke a standard Save dialog, but if I drill down a
little, I get some confusing options. The options are in the Save as Type
option near the bottom - clicking that gives three options. The default
is labelled 'Webpage, Complete (*.html)', but there are also options
for 'Webpage, HTML Only' and 'Webpage, Single File (*.mhtml)'. I tried
all three, from the same BBC News article.
If I click Chrome's 3 dots and then click Save - wait, I don't see Save! I need to click More Tools > and then Save Page As....
and I get what looks lke a standard Save dialog, but if I drill down a
little, I get some confusing options. The options are in the Save as Type
option near the bottom - clicking that gives three options. The default
is labelled 'Webpage, Complete (*.html)', but there are also options
for 'Webpage, HTML Only' and 'Webpage, Single File (*.mhtml)'. I tried
all three, from the same BBC News article.
'Webpage, Complete' created a 4.7 MB folder on my Desktop, with 124 files in the folder - the core HTML file, plus all the various graphic files and other support files for that page. It's a confusing jumble of stuff - it's not clear to me which of the many files to click to open it, but presumably if I found the right one, I would see a page in my browser just like what I saw online.
The 'Webpage, HTML Only' option saved a humble 183 kilobyte file - just the bare code. Double-clicking it opened it in my browser - and it looked just like the original online page - the HTML code included instructions to find the graphics at other stuff online. Not bad. (But we'll see how we can do better).
The 'Webpage, Single File' option produced a 1.60 MB single, MHTML file - double-clicking it opened it in the old Microsoft Internet Explorer browser (still installed, though hidden, in Windows 10) - not Chrome. It looked like the original online page, but the graphics were fuzzier - they'd been compressed to save space. There were several large white spaces where the on line original had links to other BBC articles expanding on the topic. There were probably other differences. Again, scratch this option. - Print the webpage or 'print' to PDF: Yet again, the Print option is hidden in Chrome's 3
dot menu. The old Control+P (Command+P on Macs) keyboard shortcut
works... it brings up Chrome's Print dialog box. Printing webpages can
often be problematic - you can end up with lots of paper used up, much
of it wasted on ads and other things on the page that you didn't want.
Often you'll get mostly blank pages with just a small design element
(that you didn't need) printed at the top. And how are you going to
store and organize all those print-outs?
But the print dialog, both in Windows 10 and on Macs allows users to create PDF files - and these can be a useful alternative. (For details, see my blog post: You don't need expensive software to create PDF files)
The PDF file I created was 1.4 MB in size and opened in the software set on my computer to read PDFs. It didn't try to duplicate the look of the online page - it left out the BBC logo on top for instance. But included the items that the MHTML file had left out. If printed, it would have been 13 pages long, with the actual story only taking up 4 of those pages.
I sometimes create PDFs from web pages, most often for pages that I know I may have problems accessing in the future. For instance, I don't have a subscription to the New York Times and as a result am allowed free access to 5 articles a month - if I want to save something from there, I might save it as a PDF, which I can always read, without being locked out by their paywall or having it count as one of my 5 articles again if I access it in a different month.
What's a shortcut, you ask?
Shortcuts (called 'aliases' on Macs) are little files that reference another file. They direct the computer to the main file - which may be located elsewhere on your computer's drive - or in the case of Internet shortcuts, can direct your web browser to a file somewhere on the Internet. Bookmark lists are simply folders full of shortcuts. The Windows Start Menu is simply a tricked-up way of displaying a couple of folders full of shortcuts to installed applications. You can have shortcuts to documents, music files, whatever - and put them wherever is convenient to you.
There are several ways to create shortcuts/aliases - including one very simple way that only works with websites. I'll be getting to that one at the end. But here are two ways to create shortcuts/aliases to other files (or folders).
Maybe there's a file or folder on your computer's drive, and you want an easy way to access it from another location - perhaps it's a folder (or file) that's buried deep in your folder structure but you want to get to it quickly while you're working on a particular project - it might be handy to put a shortcut/alias on your Desktop. (Assuming your Desktop is not so cluttered with junk that you can never find anything there!). For instance, in my Documents folder, I have a Recipes folder. Within that, there's an Italian folder with recipes for Italian dishes. I want to make one of them tomorrow, and it would be handy to have a shortcut to that recipe on my Desktop. I could:
- Locate the original version of the file or folder using your Windows File Explorer or Mac Finder. If using Windows, right-click on the item - a 'context' menu pops up. Create Shortcut
is about 2/3 of the way down the menu. If I (left) click on that, a new
file with the same name plus the word Shortcut appears in the folder.
Drag the new shortcut to the Desktop.
Mac users can do almost the same thing. Macs are right-click challenged, but (little known fact) can get a pop-up context menu by holding down the Control key and clicking. Ctrl-click on an item in the Finder and a 'context' menu pops up, with the option to make an Alias. Drag the new alias to the Desktop. - (Windows-only) Alternatively, on a blank spot on your computer Desktop, right-click. A menu pops up - choose New > then Shortcut. A dialog box asks you for the location of the original item - since you don't have that memorized, click the Browse button and navigate through File Explorer-like windows to find the original. Soon, you'll have a shortcut on the Desktop. (Personally I find this less intuititive than the first option.
But there's an easier way - and this works on both Windows and Mac computers. Open the website you want in your browser - whichever browser you use; this works with all of them. Look up near the top at the Address Bar - the space where the website address appears. You'll see something like this (from Chrome on Windows):
See that little circle at the left-end? In some cases, you might see a little image. That's what you want to 'grab' with your mouse/trackpad arrow. Pull it to the Desktop - and bingo, there's your shortcut. Double-clicking it will open it in my default web browser, taking me right back to that web page.
There's one rub. In order to that, you need to be able to see a bit of your Desktop. If your browser window is 'maximized', it's filling the whole screen - well maybe leaving your Windows Taskbar or Mac Dock visible. But in that case, you won't be able to see any of your Desktop to drag to.
If
that's happening, change your window so you can see some of the
Desktop. In Windows, look in the top-right corner. You'll see a set of
three boxes. On the right, there's a box with an X - to close the
Windows. Don't do that. Beside it, you'll see a box with two
overlapping squares. That's the one you want - the so-called Restore
box. (The little box on the left is the 'Minimize' box - which shrinks
your program window down to its Taskbar icon).When you click the Restore box, the window shrinks a bit - it may still be too large. (The icon in that box changes to a single rectangle, and the box's function changes - clicking it now will Maximize the window, filling all the available space). Now, you can resize the window, by dragging any of its corners or edges in or out, or move it - by dragging the title bar at the top of the window. Do whatever's needed so that you can see some space on the Desktop, to allow you to drag that little circle on the left of the browser's Address Bar and create a shortcut.
(Mac users can do the same sorts of things - in their case, there are three gumball-coloured balls in the top-left corner of the program window).
You can rename the shortcut if you want. Click once on its title, wait 3 seconds (or so) and click again - the title will be highlighted, and whatever you type will replace the highlighted text.
If you want, you can file that new shortcut away - for instance, I receive emails from cooking websites - I might open a link to an interesting-looking recipe and save a shortcut to my Desktop. Ultimately, though, I want that shortcut to end up in my Documents/Recipes/Whatever folder, removing it from my Desktop if I'm not going to make it in the next day or two while putting it in a place where I can easily find it when I do want to work with it.
Older blog postings....
| About This Blog... I've been writing about computers, software, Internet and the rest of technology since 1992, including a 17 year (1995-2012) stint as 'High Tech Office' columnist for Business in Vancouver. This blog includes thoughts on technology, society, and anything else that might interest me. Comments, emailed to alan@zisman.ca are welcome - and may be published in whole or part. You can follow me on Facebook for notice of new blog postings. |
 |