Anyplace where there
are more than
one computer-- home, office, school, wherever, their usefulness can be
greatly enhanced by creating a local area network. Prior to the release
of Windows 95, PC users had their work cut out for them, however, and
often had to purchase additional and expensive networking software.
(Mac users have had basic, easy-to-use networking built-in to the Mac
OS almost from the beginning). Starting with Microsoft's 1994 Windows
for Workgroups, and continuing with Windows 95, Microsoft added
everything needed to create a basic network right into Windows.
If you're in a
Vancouver school,
your machines are connected to the VSB’s Wide Area Network;
the
hard
part of networking your computers has already been done for
you—they
have a working network interface card (NIC), are cabled to a hub, the
TCP/IP protocol is installed with a valid IP address—and you
know
all
this works!
After that, it will
take only
minimal work to create one or more simple peer-to-peer networks.
We’ll also
look at what it
will
take if you’re starting from scratch, however—in
case you
have other
machines that you want to add to the network.
We’re going
to look at setting up and using a simple, peer-to-peer network, using
software built into Win95/98. For questions about connecting to more
complex, server-based networks, you will have to go elsewhere... a good
starting point is the Windows 95 Resource Kit,
available as a
(US$50) book from Microsoft Press. The complete text is also available
for free, as a Windows HELP file, buried deep on your Win95 CD...
specifically, at D:\Admin\Reskit\Helpfile\Win95rk.hlp
Win98
users
can access that version of the Resource Kit as: D:\Tools\Reskit\Help\
Rk98book.chm
Note:
I’ll be referring to Windows 95 or Win95 or W95—in
all
cases, Windows
98 or ME is identical. The older Windows 3.1 or Windows for Workgroups
3.11 are different-- and are not covered in this tutorial. Neither are
the NT-family of operating systems, currently Windows NT, Windows 2000,
and Windows XP. Windows XP (Home and Professional) users may want to
take a look at Microsoft's: How to Configure File Sharing in
Windows XP page.
1)
What do I need to create a
simple network
connecting Windows95 machines?
Not much-- most of
the software
you need is already included with Windows 95. You will need a Network
Interface
Card (NIC) for each computer.
Get either a
reputable name brand, or a lower-priced no-name brand clone... but if
you go generic, make sure it supports the NE-2000standard.
And you'll
have
to make a decision about cabling. In general there are two standards-- coax
cable (like your TV uses but different) with BNC
connectors
(also
known as thinnet or 10-base-2),
or twisted pair
(like your telephone cable, but different) with RJ-45
connectors
(also known as UTP or 10-base-T).
Almost everyone uses
twisted pair, these days.
If you use
coax, you'll need a T-connector for each machine,
and two
terminators-- one for each end of cable-chain. Make sure
you've got
cable for Ethernet-- Arcnet cables look virtually identical, but will
work at best, intermittently!
If you use
twisted pair, you need a hub, to plug each machine
into.
Plugging into a WAN drop connects you to a hub, usually in the
server-room.
(A handy
trick-- if you have a single drop in a classroom, you can connect
multiple computers to it by purchasing a mini-hub with 4 -8 Ethernet
ports ($50 or less). Plug the mini-hub's WAN or Uplink port into your
drop, and the computers into the hub's other ports. Note that some
mini-hubs don't let you use Port 1 if you're using the WAN/Uplink
port--
or have a switch you need to set so the WAN/Uplink port will be active).
2)
If I need to add a NIC,
how do I install the
hardware?
Installing network
cards is no
different from installing other hardware under Win95. If your cards are
not plug-and-play, make note of the default IRQ and IO settings, and
run Control Panel/System/Device Manager, and check
that those
settings are free, making changes to your NIC or other devices if
necessary.
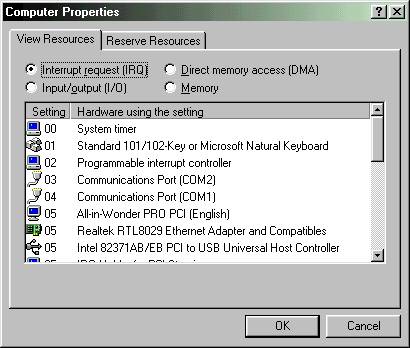
(If you right-click
on the
Computer icon on the top of the list in Device Manager, you can see how
IRQs (etc) are being used).
Shut down
the machine (very important!), open the case, and insert the card.
Close it up, and restart. Win95 may notice the new hardware on
startup... if it doesn't, run the Control Panel/Add New Hardware
wizard.
In either case, if Win95 is unable to identify the new hardware, you
can
identify it manually to the wizard. Either select the card's
manufacturer and model, or click on the Have Diskbutton
to
point
the installation to use drivers provided on disk with your card.
Afterwards, you may have to restart your machine. Check Device Manager
again... if your network card is conflicting with another device, it
will be identified with a coloured warning triangle. Otherwise, you
should be okay!
3)
How do I install the
software?
The key here is Control
Panel/Network. (Also accessed by right-clicking Network
Neighborhood and picking Properties from
the popup context
menu):
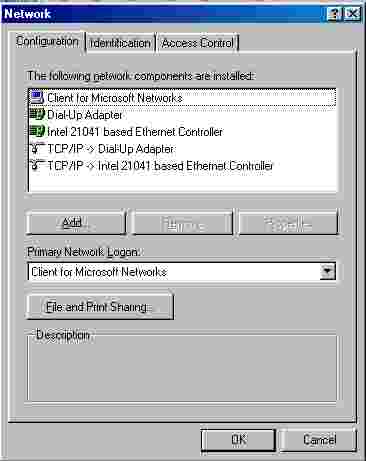
For a Win95 network,
you'll need
an installed network adapter, a networking client, and a networking
protocol, all bound to one another (so that they can communicate),
along with at least one machine set to share files with the others.
You should
already have a network adapter listed-- the NIC you just installed.
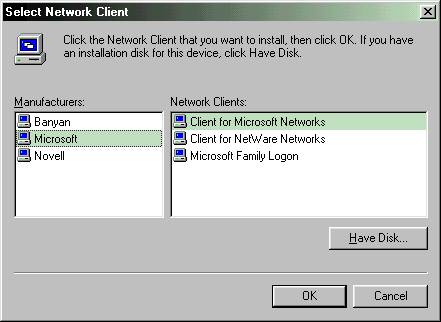
Click on the
Control Panel/Network Add button, and choose Client,
then Microsoft,
then Client for Microsoft Networks (which has
nothing to do
with
Microsoft's same-named on-line service). Click OK.
(Some
systems configured for Internet access may need to have the Client
for Microsoft Networking added in order to connect to your
network).
Similarly, if your
computer is not
already on the WAN, Adda Protocol.
Select Microsoft,
and TCP/IP. Click OK. If you got SPX/IPXinstalled,
remove
it--
unless you're connecting to a Novell Netwarenetwork
or to a network printer or print-sharing device. Similarly, remove the NETBEUI
protocol. (Extra, unneeded protocols just reduce performance!--
however,
if you're having problems connecting with your network, experiment by
adding Netbeui back in!)
Click on your network
adapter,
then choose Properties, and look on the Bindings tab.
Add a checkmark if
needed, to bind
it to TCP/IP. Similarly, check the TCP/IP
Properties
and Bindings...
it should be bound to Client for Microsoft Networks...
If your machine is
already
connected to the WAN, you shouldn’t have to deal with the
other TCP/IP
Properties but if not, take a deep breath!
Open Control
Panel/Network
on an already connected machine, click on TCP/IP
and then on Properties(in
fact, do it for all the computers in the school and list the IP
Addresses) & you should see:
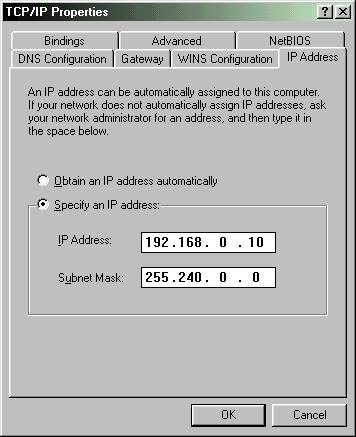
On the new machine,
make it
similar—changing the last digit(s) of the IP address, so
create a
new
address.
All machines should
have a Subnet
Mask of 255.240.000.000.(aka
255.240.0.0)
Important tip:
if you are connecting
to a router
or a gateway computer with DHCP, it will
automatically do the
messy IP address assignment-- if you know this is the case, select the
[
] Obtain an IP address automatically option... it
will make
life
much easier!
Go to the DNS
Configuration and Gateway tabs, and copy
what you see in
the
connected machine.
4)
How do I share files and
printers?
On each machine that
you want to
use to share files and/or printers (i.e. act as a server to the rest of
the network), on that same Control
Panel/Network/Configuration page,
click on the File and Print Sharing button.
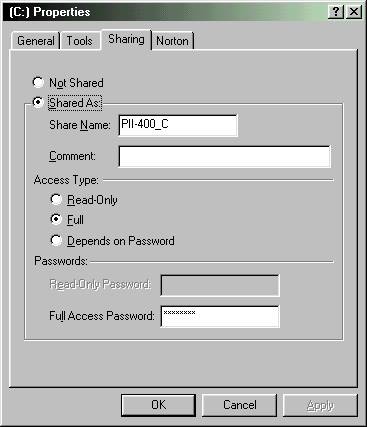
Choose:
[x] I
want to be able to give other access to my files
[x] I want to be able to allow others to print
to my
printers
as you
desire. Click OK.
Next, go to My
Computer or Explorer, and select a drive
icon or folder
that
you want to share (sharing individual folders rather than an entire
drive keeps students from having access to the rest of your drive).
Right-click and choose Sharing from the pop-up
menu. Give the
folder or drive a share name, and decide about the other options. Click
OK.
Notice that the icon
for that
drive now has an arm and hand holding the drive icon, indicating that
it
is shared.
Similarly, in the Printer Control
Panel,
you
can right-click on a printer icon to share that printer, if
printer-sharing has been enabled.
You can require a
password in
order to access a shared resource—for instance, I have set a
password
on my shared colour printers, but not on my black and white printer.
Important tip:
Very few
of your systems need to have sharing turned on... only the systems that
are acting as peer-to-peer file or print servers
need this.
Most
of your systems will be network clients-- accessing
shared
files
and printers, but not sharing anything of their own. While this would
be
greedy, uncooperative behaviour in a school playground, it's the way
networking works-- if you turn on sharing on all your computers,
network
performance will be awful, as each computer is continually checking
each of the others.
5)
How do I make sure my
computers recognize one
another?
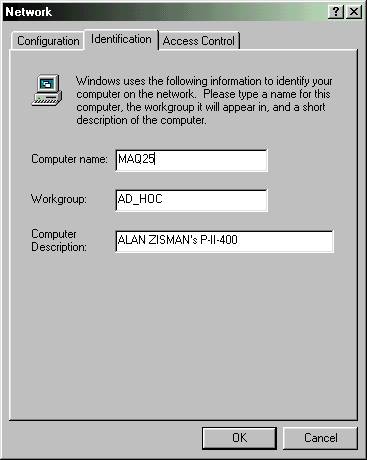
Back to the Control
Panel/Network icon... Click on the Identification
tab.
Each computer
on the network needs a different, unique name, but needs to be
identified as a member of the same workgroup. Make
sure that
the
workgroup is exactly identical-- failures to connect as expected are
most often due to minor differences in the workgroup names. However,
the
Workgroup name is not case sensitive: ‘Lab’
is the same
as ‘lab’ is the same as 'LAB'.
If you have
trouble getting the
computers to show up in Network Neighborhood automatically, go back
into Control Panel/Network. Click on File and Print Sharing
then
on Properties then on Advanced.
Make sure only one
computer has Browse Master
enabled—usually your main
server.
And
make sure that one is fully booted before you turn on the other
machines.
Another
trick-- sometimes, a computer you know is sharing resources on the
network simply doesn't show up. I don't know why this happens, but
adding a second network protocol (IPX/SPX or Netbeui) to both the
'server' and all the clients has always fixed this problem in my
experience.
6)
What about passwords and
logon?
Creating this network
will change
the primary network logon to Client for Microsoft Networks
in
the Control Panel/Network/Configuration page. You
may want to
change the Primary Windows Logon item back to Windows
Logon.
When you’re start, you'll be asked for a name and password...
If
you
are not using multiple logons, leave the password blank. You'll be
asked
to confirm this; after you do so, you won't be asked for a logon again.
Having individual
users logon to a
fancy server-based network like Novell or NT provides important
security. Windows 95 peer to peer networks do not provide strong
user-based security—there is not need for a network logon on
these
systems—whether or not you have separate Student/Teacher/etc
logons and
user profiles with your Windows logon.
Note however that if your shared folders or printers are on a Windows
NT, Windows 2000, or Windows XP system, you will need to keep the
Microsoft Networks log-in-- and you will have to log-in with a
user-name
and password that are listed as registered users on the NT/2000/XP
system in order to access the shared resources.
7)
Look at Network
Neighborhood...
You're finally ready
to view your
network. Double-click on the Network Neighborhood
icon on the
Desktop. You may see your other computers, or you may just see an icon
for your computer, plus a globe for the Entire Network.
Double-click on the globe, and you should see an icon with your work
group name... double-clicking on that should get you a list of all
members of the network with shared resources—remember,
you
don’t
need
to set up your workstations for sharing, so they needn’t
appear
in
Network Neighborhood—doing so if not needed will just slow
everything
down!
8)
How can I access files on
another computer more
directly?
If you 'map'
the network drives, they will appear as simply another drive in My
Computer, Explorer, and your applications OPEN and SAVE
dialogue boxes. To do that, view the shared drives/folders in Network
Neighborhood. Right-click on a drive, and choose Map
Network
Drive from the popup menu.
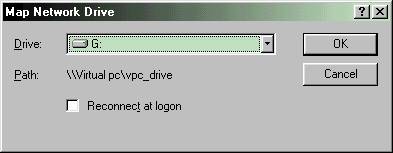
Choose a drive-letter
to use, and
click on the [x] Reconnect at logon option if
desired.
(If you choose that
option, if the
other computer isn't already up and running at startup, you'll need to
click an error message when you're unable to connect to its drives-- in
other
words,
you must start your 'servers' first, before starting up
the client systems!)
Repeat for
each drive/folder
you want to map.
9)
How can I use a printer
across the network
First, you need to
set a printer
as shareable-- you do this the same way as for a drive; open Printers
in
Control Panel, My Computer, Explorer, or the Start Menu's
Settings/Printers option. Right-click, choose Sharing from the popup
menu, and give it a Shared Name.
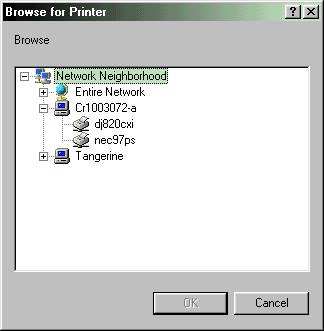
Then, on the
other computer, go to Printers, and choose the Add Printer option.
Choose to add a Network Printer, and you can browse to find your shared
printer on the network... you'll get a mini-network neighborhood list,
letting you choose the computer with the printer you want... clicking
on
the [+] sign next to that computer will drop down a list of shareable
printers. Pick the one you want-- a nice touch is that in many cases,
the wizard will simply copy the drivers needed from the other
computer.(With HP LaserJets, however, you may need to trick the
installation, telling it the printer is connected to LPT1: Ignore the
error message when if fails to find the printer.
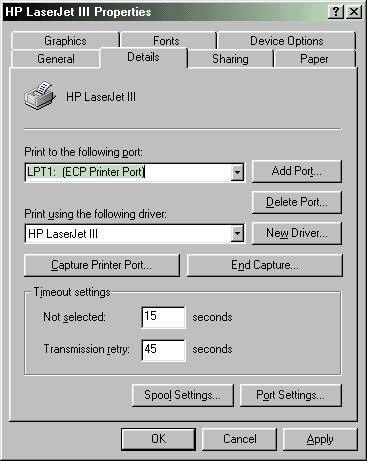
If the
printer is already installed on your computer, you can change its
connection setting, to point to the network: right-click the
printer’s icon (in the Printer Control Panel), and choose
Properties
from the popup menu. Go to the Details tab. Click
on the Add
Port button. Then click to Browse the
network, select
the computer the printer is connected to, and click on the
printer’s
share-name.
(Notice we’re
getting the same
dialogue box we did if we were simply adding a new, network printer!)
Note:
You can share
printers attached to workstations, but sometimes heavy printing will
bog
down use of that machine—or error messages popping up will
confuse
students. As well, some programs, when running on that
computer—DOS
programs especially, will slow down or completely shut down printing
(Word Rescue does this). A good thing is to connect printers to a
dedicated print server computer—you can use an old, donated
486
for
this—the print server doesn’t have to be a fast,
new
machine. Even
better is to spend $1000 or so and get a real network printer, with a
built-in Ethernet port, such as the Lexmark Optra S1620. You can also
connect the printers you already have with a network printer sharing
device such as the Hewlett Packard JetDirect series—a $440
model
lets
you attach three printers to one device, which connects directly to a
single network drop. (Note—some people (included me!) have
had
problems
getting Win9x computers to recognize JetDirect printers…
apparently,
the
undocumented trick is that you need to install the IPX/SPX networking
protocol onto each machine in order to make it work.... with this
hardware, TCP/IP only works with Win NT/2000/XP systems).
10)
What are some things I can
do with my network?
- Use your
teacher’s computer as a (pretend) server. Create a folder
called Students
and set it shareable, and map it with a drive letter on all your
workstations. Within it, create folders for your individual divisions
and within those, for each student. (Keep names at 8 letters or less if
you want them to show up nicely in Win 3.1 programs like MS Works 3.0
or
KidPix—use Div01 instead of Division 01, and Katie_G instead
of
Katie
Gilhoolie. Long names show up as KATIEG~1 under Win 3.1 applications).
The fastest way to create a large number of folders is from a DOS
prompt—type: md Div01 [enter],
etc.(If you do use
long
file names, enclose them in quotation marks if working at a DOS
prompt—md
“Katie Gilhoolie”).With
practice, this can be
pretty fast—it
took me about 3 minutes to create folders for all the students in a
division. Now your students can save in these folders, rather than onto
floppy diskettes. Important Note: There is no
security on these
folders—note that students can see into other
folders—more
often,
accidentally, students move folders into the adjacent
folder—if a
student (or whole division’s) folder has seemed to disappear,
look in
nearby folders, and use Explorer to move it back! (Using passwords and
an add-in like Zedex (see below) makes this problem disappear).
Reset your
applications to look at
the shared drive by default—on my network, the shared Student
folder is
mapped on the workstations as the E: drive&
so I changed
the properties of the Start Menu or desktop icon that opens each
application, so that the Working Directory points
to the shared
drive; as a result, when students click on Save or
Open,
they see the list of their divisions.

- ·Install a single copy of All
the Right
Type on your ‘server’, and access it from
all the
workstations (see
appendix). It will be slower starting up, but it will run fine (I do
this with 28 workstations).Use ATRT’s Utility Center
to
create
your Divisions and lists of students—now students will be
able to
access
their records no matter what workstation they’re at, without
floppy
disks.
To do this,
here's what you need to do:
Install a copy
of ATRT on the server, in a shared folder/drive (with full read/write
privileges). Be sure to pick the Typical
installation option.
All
workstations must map the shared folder/drive to the same drive letter.
If any other
drive letter than (the default) F: is used for the
mapped
drive,
you need to edit the Utilcntr.ini file in the
folder on the
server where ATRT is installed-- change the CommonDrive
setting
to the correct drive letter.
Find the SetupWS.exe
program on your install disks, and run it on each workstation to
install
the program onto the workstation.
If needed,
create icons on each workstation for ATRT that point to the copy of Altrtype.exe
on the server. Make sure that the Start In setting
points to
the
folder on the server where the program is installed!
Create
Recordfiles on the server, using the Utility Center
program for
your divisions and students-- they should be available on all the
workstations.
(Optionally)
edit the C:\Windows\Atrt.ini file on each
workstation (and your
server) to point to a non-default word processor-- for instance, MS
Works. Edit the ini file with the following (adjusted for your setting):
[Word
Processor Options]
WordProcessor=c:\progra~1\msworks\msworks.exe
WorkingDirectory=e:\
(Instead of
manually editing the file on each workstation, do it once, then copy it
to your shared drive, and copy that to each workstation-- make a simple
DOS batch file to do it for you.)
(The new
All the Right Type 3.0-- which is provincially licensed for all public
schools in BC-- is much easier to run across a network-- but the
network
data must be on a computer with a fixed IP address, rather than one
assigned by DHCP).
- Teachers
with computers in a classroom can be set to join your lab’s
workgroup—this will enable them to access their
students’
saved work,
or
to print from your shared printer (nice as a backup if they
don’t
have
a
printer in their classroom, or it’s broken).
- Set up a
small network for your office and administrators’
machines—by making
them all members of a workgroup, for instance, Office.
This
will
let your principal print from the office’s laser printer (and
not
need
a
printer in her/his room). As well, you can map the drive on the machine
where TurboSchool is installed, and with a simple
modification.
Let the other computers on the workgroup access the single copy of
Turbo—giving your principal or VP instant access to that
information.
Doing this will score you mega-brownie points with your administration.
If they’re paranoid, password-protect these shared resources.
(Probably
a good idea in any event—and for extra protection, use Poledit
on non-office computers to remove access to The Entire Network in
Network Neighborhood—this will make it impossible for
students to
access a workgroup different from their own).
Your current
office computer starts Turbo using a file: c:\goturbo.bat.
Create a second, similar batch file on that drive:c:\goturbo2.bat,reading:
@echo off
e:
echo Loading Turbo School
cd \main650
newmenu e:\data650
cd \
c:
exit
Make
shortcuts to that batch file on the other machines on the office
network. Note that the first machine that opens Turbo will have
read/write access-- other machines that open it will have read-only
access.
- Share
other applications across the network. Note that this can be a major
drain on your network, and if you only own a single copy of an
application, you can’t legally run it on a bunch of
workstations
at
once—but you can (usually) legally set it up so it can run on
multiple
machines—one at a time.
Again, DOS
batch files can be used to ensure that only a single copy runs at a
time. (Who said DOS is dead?) For each such program, create a dummy
file-- perhaps an empty text file. Let's pretend we're sharing the
programMyprogram.exe and have created a dummy M.txt
file,
in Myprogram's folder on the server. Let's also create a folder called Junk
on the server. On each workstation, copy a batchfile:
@echo off
if exist e:\junk\m.txt goto warning
e:
cd \myprog~1
copy m.txt e:\junk
start /wait myprogram.exe
del e:\junk\m.txt
goto end
:warning
echo Only one person at a time can run this
program...
echo Please try again later. Thank you.
:end
exit
Temporarily,
copy the installation files for a program into a shared folder (best on
a mapped drive), and go from workstation to workstation, running the
Setup program across the network. If your program is on multiple
diskettes, create folders: Disk1, Disk2, etc& most programs
will
automatically find the next disk when needed.
If you are
comfortable with DOS batch files, you can create batch files to
automatically install programs, clean up the Start Menu, and perform
other administrative tasks& save them to the shared
drive/folder,
and then use the Start Menu’s RUN command to run them on each
workstation& again, much faster than running from a floppy
diskette.
(A workshop on DOS for ITSTs might be handy!)
- Use a
drive-imaging program like Ghost or Drive
Image to
create
an image of the hard drives of your various machine-types&
store
them on your server. If you need to restore a damaged machine, or if
you
get new computers, copy it across the network, and then run it to get
an
exact duplicate of your original machine.
Use the network
to synchronize the date/time on all your workstations at bootup. Make a
batch file such as C:\Settime.bat—
@echo off
net time
\\Maq00 /set /yes
<=change \\Maq00 to point to your server name
exit
Create an icon for it
in your
Startup Start Menu folder so it will run automatically at boot time.
Set
the properties to run it minimized and close when completed. No more
room full of machines, each with a different date/time.
- Let
students play networkable games across the network—in this
way,
students
can interact with one another in real time. A favorite on
Maquinna’s
lab
is X-Games Pro-Boarder snowboarding (developed in
Vancouver!)…
Let students
chat with one another across your classroom or lab
network—you
could
structure this as a formal assignment, or have them go at it freely.
Especially interesting with ESL students. Windows includes a WinPopup
utility, but it’s awkward to use to get a conversation going.
Much
better is the free T-4-2 program, which pops up a dual-paned window,
letting two users type to one another, and see what each other is
typing. Get
it here!
- Get a
license for Zedex
from http://www.zedex.net.
This affordable
(free for a school-wide license) add-on to Windows networking makes it
much more convenient to maintain secure network folders for each
individual student and teacher in a school-- even using the minimalist
Windows 9x networking. Works great using standard Win98 (etc)
workstation as a 'server'. Highly recommended for school networks!
A problem and a
solution...
Microsoft did a
stupid thing, in
my opinion (you might think they've done more than one stupid thing,
but
that's a different discussion...):
When you try to access
a shared,
but password-protected network resource (typically a drive, folder,
file, or printer), you're faced with a log-on screen... all that's fine
except that the default is to save the password. If you don't manually
turn off that option, you won't be asked for the password again when
you
access that resource. While this may seem convenient, it completely
defeats the purpose of password-protecting the resource, as anyone
sitting down at your computer now has free rein of the shared resource,
whether they know the password or not!
<>To change
this, run Poledit 95
(opening Admin.adm), click on the File/Registry menu (as described
above)-- but instead of opening theUser icon,
double-click on
the Local
Computer icon. Open the Network section,
then Passwords,
and check the option to Disable Password Caching.
After saving
your changes, when you access password-protected network resources, the
log-in dialogue box will no longer have an option to remember the
password. (Thanks to Vancouver teacher Luigi Tallarico for
this
tip!)
For more on using Poledit-- the
Windows
System
Policy Editor to set security on standalone or
networked workstations, take a look at my Poledit
Tutorial.
Windows
2000/XP issues
Windows NT, 2000, and
XP can
participate in
Win9x-style peer-to-peer networks; Microsoft added a number of Wizards
to XP that are supposed to make setup easier-- but in my opinion are
actually
more awkward to access and use than what is described above. To access
them, open My Network Places, and click on the Set up a home or small office
network
item on the left-hand pane.
As well, Microsoft does
not make
it easy to add the NetBeui protocol to WinXP systems; in my experience,
adding NetBeui solves many mysterious networking problems. For example,
I recently tried to add a new WinXP system to my existing peer-to-peer
network. The XP system could see the peer-to-peer servers, but wouldn't
show the shared folders; it gave a "You Don't Have Permission..." error
message. Adding NetBeui made this work.
To add NetBeui, explore
your WinXP
(Professional or Home version) CD; go to the
D:\VALUEADD\MSFT\NET\NETBEUI folder. As the NETBEUI.TXT file in that
folder explains, you'll need to copy the NBF.SYS file to your
C:\WINDOWS\SYSTEM32\DRIVERS folder, and the NETNBF.INF file to your
C:\WINDOWS\INF folder (which is typically hidden-- use the My Computer
or Explorer Tools\Folder Options\View options to show hidden folders or
type the folder name in the Start Menu's RUN commend).
Once you've copied
those files,
right-click My Network Places and choose Properties from the popup menu
(or choose the Network control panel item). Double-click the Local Area
Connection button then click Properties. Click the Install button,
select Protocol and click Add... You should see NetBEUI listed as an
optional Network Protocol. (Whew!)
Note that there is no
guarantee
that Microsoft will continue to include NetBEUI in future Windows
releases.
As well, there is an
additional
problem you may encounter when using Windows 95/98/ME systems to try to
access folders or printers that are on a Windows NT/2000/etc system.
The defaults in Win9x
are for
share-based file sharing; when you set a folder as shared on a Win9x
system, it lets you set an optional password-- that's applied to the
folder; anyone on the network can work with that folder, if they enter
the password (if one is required).
The default serving in a WinNT-family OS is for user-based serving... a
user enters a recognized user name and password when logging in, and
then has access to all shared resources without having to enter a
password again.
In order to do that on a Win9x system, you need to set it up (using the
Network properties), so that the Primary Network Logon is Client for
Microsoft Networks. Then, when a user starts up or logs on, they need
to enter a user name and password that are listed as a valid user on
the server.
When that happens, they have access to all the shared resources on the
server.
Note that if your Win9x system is set to startup/logon using the
Windows Logon (which will work fine for Win9x peer-to-peer networking),
they will not be able to access shared resources on a WinNT-family
server.
(This doesn't seem to be an issue when accessing shared resources on a
WinXP system, however... )
Worth
Reading:
Two articles from PC
Magazine
(2002):
"Teaching Windows XP to Share": http://www.pcmag.com/article2/0,1759,5983,00.asp
"Win XP Home Networking: Two Steps Back": http://www.pcmag.com/article2/0,1759,2212,00.asp
By Alan
Zisman © 1999, 2002. Last revised, 24 October 2005