Netscape Gold is a version of Netscape Navigator
3.0
that includes e-mail and web page editing functions. Versions exist for
Windows 3.1, Windows 95/98/NT, and Macintosh. Netscape Version 4.0
replaced Netscape Gold with the Communicator suite, including the
Composer web page editor program.
Netscape Gold/Composer lacks advanced web page
editing
features, but it has several worthwhile features
- it’s
available in more or less identical Windows 3.1. 95, and Mac versions
- it’s
relatively
simple
to use—no knowledge of HTML code is needed.
With its relatively modest size and
requirements,
Netscape Gold remains a reasonable choice for older PCs and Macs and
can still be downloaded from:http://home.netscape.com/download/archive/client_archive3x.html
-- be sure to choose Navigator Gold rather than the
basic
Navigator version.
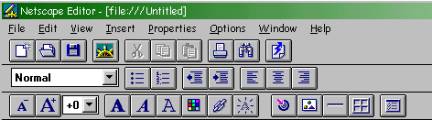
To edit an existing web page, open in Navigator
Gold,
then choose File/Edit Document. If the web page is on the Internet,
you’ll be prompted to save it first. To create a new web
page, choose
File/New Document—then Blank. Either way, your Netscape
toolbar will
change to give to several rows of editing tools—many of which
will be
familiar to word processing users:
To create a web page, you need to know about how
web
pages handle text, images, and links.
Text:
While a web page may look like a word processor
document, it has far fewer options. There’s no way of knowing
what fonts
will exist on the computer that’s viewing a page, so a basic
web page
won’t define fonts or sizes directly. Instead, basic styles
are
defined: Heading 1 (for a large headline), Heading 2 (for a subhead),
Normal, etc. (While you can define exact fonts and sizes,
resist the
temptation—too often they will end up looking different from
what you
expect—instead, use the basic styles from the drop-down list).As
well, spacing, tabs, and carriage returns (enter) work differently on
web pages— not as you may expect. Pressing Enter, for
example, skips two
lines, creating a new paragraph. (A trick—pressing
Shift+Enter goes
to a new line without creating a new parapgraph).
Other text options: Bold/Italic/Underline,
Right-Align/Center-Align work as word processor users might expect.
Also
useful are toolbar buttons for bulleted and numbered lists.
Images:
If you insert an image in a word processing
document,
the image is included in the single word processing file. When you
insert an image in a web page, you’re just adding a bit of
text
pointing to where the image is located. Images in web pages need to be
in one of several special Internet-friendly formats—GIF,
JPEG, or PNG.
You may want to get a program that will allow you to convert and
manipulate graphics—Windows 95/98 users may want the free
Irfanview, Mac
users may like the shareware (US$29) Graphics Converter, Win 3.1 users
may get a copy of the shareware Graphics Workshop. (Check my webpage at:http://www/zisman.ca/files
for
links to these and other useful programs).
As a result, if you send your web page to an
Internet
server, you need to also send any associated graphics—and
then check to
make sure that the links to the graphics actually work as expected.
Large graphics take a long time to appear on a
page—you may be better off to include small versions of your
graphics,
linking them to larger, optional versions. (Hint: resizing the
image
on the page doesn’t help—you still end up
downloading the big original,
then resizing on your computer, saving no time. Instead, use your
graphics program to save a smaller version of the image, and insert
that
in your page).
Links:
Anything can function as a link—text
or graphics. To
make something a link, select it, and click on thet Link tool
in
the toolbar. You’ll be asked to type in an address for the
link and
other information (more on that later!) If
you’re linking to an
external web page, type the entire address:http://www.vsb.bc.ca
rather than just www.vsb.bc.ca.
(If
you forget the 'http://', the link will work when tested on your
computer, but not after you send the page up to the Internet). If
you’re linking to another file, the easiest thing is to keep
it in the
same directory (aka folder) as your saved web page, and simply give the
filename. (These linked files can be other web pages, but also sound,
picture, or video clips).
Because text-web links are normally underlined,
don’t
ever underline any other (non-link) text on a web
page—you’ll just
confuse your readers.
Neat trick—you can also link to things
that aren’t web
pages—large versions of pictures, music files, files for
downloading,
etc… just type the path and file names and the files will
display, play,
or download automatically.
To make a link to an e-mail address, type it
like
this: mailto:someone@somewhere.com
(Note:
posting your
email address online is likely to get you lots of spam messages!)
When a user clicks on that link, it will open an
e-mail program, with that address already entered.
Let’s
Do It!
We’re starting with a Netscape Gold blank page, by choosing
File/New/Blank from the menu. Let’s start off by defining our
colours—that dull grey background is boring. Click on the
Properties/Document menu.
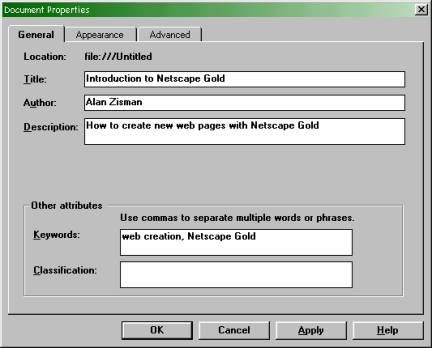
Give your page a title, and fill in the Author
and
Description information. Keywords are used by search engines to help
classify your page. Click on the Appearance tab.
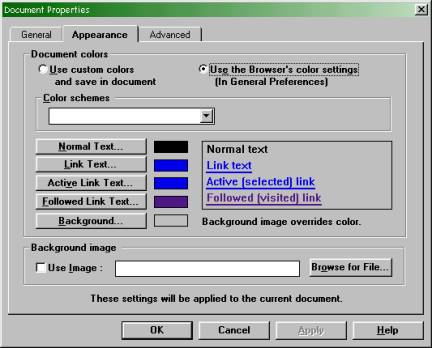
Let’s chance that ugly grey background
default colour
by clicking on the Background button. You’ll get a palette of
colour
choices, and can click to create a custom colour.
If you’ve picked a dark colour, normal
or linked text
may not be very legible—so change them if needed. You can
also pick a
background image—browse for a graphic file that will appear,
tiled,
throughout your page. This only works well with a very washed-out
picture (you can use your image-editing program for this), so most
times, avoid temptation with this feature as well!
The Advanced tab has nothing that we care (or
know!)
about. So click OK when you’re done.
Enter
Some Text:
Click on the down-arrow next to
‘Normal’ on the middle
toolbar 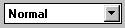 to change the
style—pick
‘Heading 1’ for a headline. Then click on the
Center Align tool to move
the cursor to the center of the page:
to change the
style—pick
‘Heading 1’ for a headline. Then click on the
Center Align tool to move
the cursor to the center of the page:  Type a headline for your page, then press
Enter. Notice that the style goes back to
‘Normal’—the way you’ll type
most of your text. Click on the Left-Align tool.
Type a headline for your page, then press
Enter. Notice that the style goes back to
‘Normal’—the way you’ll type
most of your text. Click on the Left-Align tool. 
Type a few lines of text. Alternatively, you can
Copy/Paste text from some other source.
Add
a Graphic:
When you insert a graphic, it appears where the
text
cursor is. Text doesn’t word-wrap around
graphics—you only get a single
line of text beside a graphic (there are tricks to fake your way around
that—we’ll see them soon). So press Enter once,
then click the Center
Align tool to move the cursor to the middle of a new line. Click on the
Insert Image tool: 
(You’ll be asked to save your
page prior to
inserting the graphic. Do it!)
You’ll see:
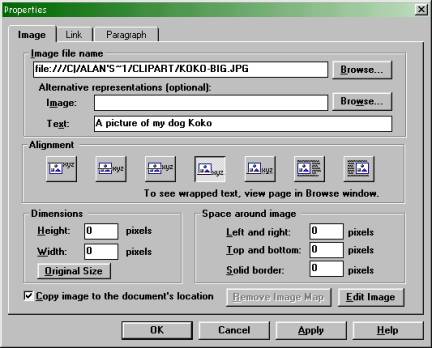
Click on the Browse button to select a graphic.
Be sure to fill a description in the Alternative
representation—Text area, This text will appear if graphics
are turned
off, or for people with visual disabilities browsing with text-only
browsers. If you know the graphics dimensions (from your image editing
program), entering them will speed up page loading. Note that you can
choose how text will align around your graphic (but the last
two wrap
options don’t work the way we might want!)
Be sure to leave the [x] Copy image to
document’s location option checked.
You can change in image’s properties
by right-clicking
on it, and selecting Image Properties from the popup menu.
Create
a Link:
Type some text that you want to turn into a
link. For
example, type the phrase:
Alan’s Tech Mentor Page.
Select it with the mouse, and click on the Link
tool:  You’ll see:
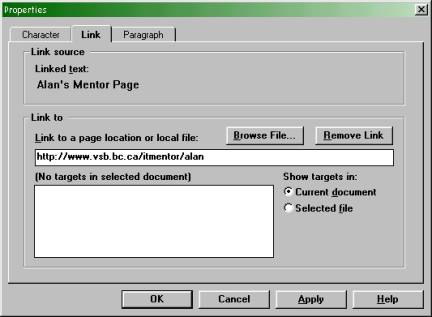
Type in the full address to the page—http://411.vsb.bc.ca/itmentor/alan
and click OK.
If you want to link to a file on your hard
drive—for
instance, another saved web page, a larger graphic, a music file, etc,
use the Browse File button to locate the file. (You’ll need
to play with
the List Files of Type options to select a non-webpage file).
You can make a graphic into a link by clicking
to
select it, then clicking on the Link tool, just as with text.
Tables—the
Big
Secret
Trick
The Table tool:  lets you
do
lots of neat things. You can
line up text in various ways, or fake having text and graphics wrap in
more complex designs.
lets you
do
lots of neat things. You can
line up text in various ways, or fake having text and graphics wrap in
more complex designs.
When you click on the button to create a table,
you’ll
be asked to define the table’s properties:
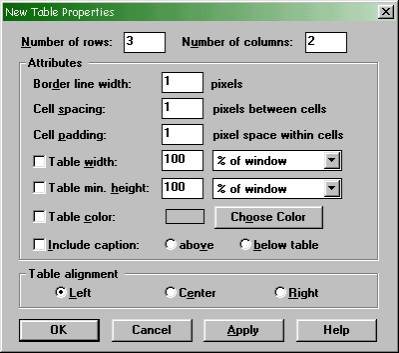
Note that Rows go across, Columns go up and
down.
Keep a border of 1 pixel (or more) while
you’re
working on a table—afterwards, if you want, you can change it
to 0
pixels to make the border invisible. After you’ve created
your table,
you can add text and pictures to the individual cells, which will
expand to hold the contents.
You can change the properties of the whole
table, or
an individual row or cell by right-clicking on the table (or cell) and
choosing Table, then another option from the popup menu. That menu also
lets you delete the entire table, or insert or delete individual rows
or columns if you change your mind. A neat trick, from the Table/Cell
options is to have an individual cell span 2 or more columns.
You can even insert a table inside a cell of an
existing table for real complexity. Most of the sophisticated designs
you see on the Web use some fancy tricks with tables to line things up.
Other
tools:
 Opens
your
page in the Navigator browser so you can see how it will really
look. You’ll need to save first.
Opens
your
page in the Navigator browser so you can see how it will really
look. You’ll need to save first.
 Makes
bulleted
and numbered lists. Each time you press Enter, you get a
new bullet (or the next number)
Makes
bulleted
and numbered lists. Each time you press Enter, you get a
new bullet (or the next number)
 Moves
the
indentation of
the entire paragraph out or in.
Moves
the
indentation of
the entire paragraph out or in.
 Decreases
or
Increases
the font size by one unit.
Decreases
or
Increases
the font size by one unit.
 Changes
the
font size of selected text—larger or smaller.
Changes
the
font size of selected text—larger or smaller.
 Changes
the
colour of selected text.
Changes
the
colour of selected text.
 Inserts
a
target at the cursor point… this is a
bookmark—a point that
you can link to, to move within a large page—useful for
tables of
contents.
Inserts
a
target at the cursor point… this is a
bookmark—a point that
you can link to, to move within a large page—useful for
tables of
contents.
 Adds
a
horizontal line across the page
Adds
a
horizontal line across the page
 Lets
you
edit the properties of the current selection.
Lets
you
edit the properties of the current selection.
 Lets
you
search for text on the page.
Lets
you
search for text on the page.
 To
‘publish’
your web page—sending the
page and associated graphics
(etc) to a web server. Note that this can’t be used with many
web
servers—you’ll need a separate FTP program instead.
To
‘publish’
your web page—sending the
page and associated graphics
(etc) to a web server. Note that this can’t be used with many
web
servers—you’ll need a separate FTP program instead.
That’s it! Good luck and have fun.