I'm assuming that you've successfully download a copy of OpenOffice.org
(OO.o)
1.1.x or 1.9 from OpenOffice.org (or Mac NeoOffice/J) or Star Office
and installed it onto your computer. Setup varies both according to the
version you've installed and the operating system you're working with.
I'm going to primarily focus on the Windows versions.
The Windows 1.1.x version is downloaded as a zipped file; inside is a
folder including a large number of files; near the end of the long list
of included files is a Setup.exe file. Running that will install
OpenOffice.org to your computer. The OO.o beta is also a zipped file;
inside is a smaller number of files, including a Setup.exe.
(If you double-clicking the downloaded file only gets you an error
message, you don't have a program installed to deal with Zip files; I
recommend the free QuickZip).
Before installing OO.o, however, you may want to make sure that you
have a Java program installed; the OO.o installation will look for a
Java installation, and complain if it doesn't find one. (Microsoft's
Java doesn't count). I haven't noticed any problems with OO.o on
systems that don't have an installed Java, but I'd recommend installing
it first anyway, just in case).
To check whether an acceptable Java is already installed, open your
Windows Control Panel; if you see an icon labelled Java Plug-in, then you're in
business. Otherwise, you can get the latest Java Plug-in from Sun: http://www.java.com/en/download/manual.jsp
.
With Java installed, you can proceed to install OpenOffice.org. Note
that if you are installing OO.o version 2, it will ignore an existing
OO.o 1.x installation; you can safely have both versions on your
computer at one time. However, any customized settings that you have
made to an OO.o 1.x installation will be have to be redone under the
new version. If you are installing OO.o version 1.1x onto a system with
an older OO.o 1.x installation, you'll get a choice whether to
overwrite the old installation (keeping that installation's custom
settings) or install a new, clean, uncustomized version. Generally, I
would recommend overwriting the older installation.
Here's what happens while installing OO.o 1.9.79 (beta) on my
Windows XP system:
1. You'll be asked to agree to a license. (In OO.o 1.1 installations,
you have to scroll to the bottom of the license text before you can
click that you agree). Unlike many software licenses, this one is
pretty short, basically say you agree to the GNU Public License. Since
it's unlikely you're aware of these terms, it includes a link to this
license. You can safely agree to this license.
2. You are asked for the user's name and organization and can choose to
install for the current user, or for all users of the computer.
3. You can choose a complete or custom installation; with the custom
installation, you can choose to install individual components. Unless
you are desperately short of hard drive space, I would recommend the
complete installation. A full installation takes up about 210 MB of
drive space.
4. A dialogue box lets you set up your computer so that OO.o will
automatically open Microsoft Office data files. By default, these
options are turned off; if you don't have the appropriate MS Office
programs installed, you may want to check some or all of these options.
(If you have MS Word installed, perhaps as part of the low-end MS Works
Suite, and want to continue using Word, you might choose to use OO.o to
open MS Excel spreadsheet and MS Powerpoint presentation
documents). Note that selecting these options does not set up OO.o to
save files in MS Office formats by default. We'll find out how to do
that later.
5. After these dialogue boxes, the actual install takes place. It may
take several minutes; be patient! When it is finished, you'll be able
to use OO.o right away; no reset is needed.
Starting OpenOffice.org
OO.o loads a little Quickstarter startup icon when
your computer restarts (or you log in again); this sits in the Windows
system tray, and speeds OO.o startup. It also allows you to open a new
OO.o document (of the various types) from the context menu that pops up
when you right-click on the icon. You won't see that little icon after
running the Setup program.
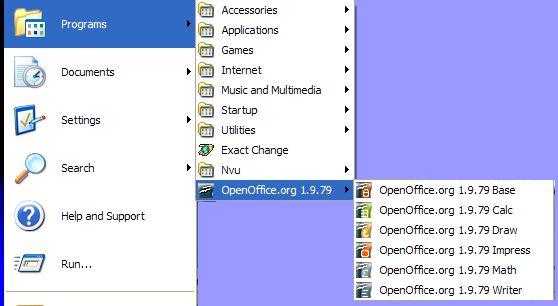
If the Quickstart icon is present, you can start your choice of blank
OO.o documents by right-clicking it; alternatively, look in your
Windows Start Menu. OO.o 1.9.79 (the OO.o 2.0 beta I installed) adds an
item to the Start Menu that includes options to start the various
OpenOffice.org components:
OO.o Base opens
a Database Wizard; this module is new to OO.o 2.0
OO.o Calc
opens a new spreadsheet; this module is the equivalent of Microsoft
Excel
OO.o Draw
opens a drawing program
OO.o Impress
opens a wizard to create a new Presentation; this module is the
equivalent of Microsoft Powerpoint
OO.o Math
opens a math formula editor
OO.o Writer
opens a blank word processor document
The Windows versions of OO.o 1.1.x use different names, referring to
Calc, Impress, and Writer as Spreadsheet, Presentation, and Text
respectively (though the 1.1.x Linux versions use the Calc, Imress, and
Writer names as do the various OO.o 1.0.x versions).
Note that startup time can be an issue, even with the Quickstart icon
loading at system startup. On my school's Celeron 600 MHz systems, with
128 MB of RAM (generally adequate for Windows 98SE), it takes 55
seconds for OO.o 1.1.4 to open up a new text document. On newer
systems, this is much less of an issue; on this 2 year old Dell
Inspiron 8200 notebook (running Windows XP with 512 MB of RAM), the
same task took under 4 seconds. After you have loaded OO.o for the
first time, it will generally take much less time to start up.
When you start up OpenOffice for the first time, you'll see an option
to register. You can choose to never register (unlike some other
software, that makes you lie and say you'll do it later). Unlike some
programs, it's not going to keep bugging you periodically. Or you can
send registration data to OpenOffice.org; you're not going to become a
spam target by doing so.
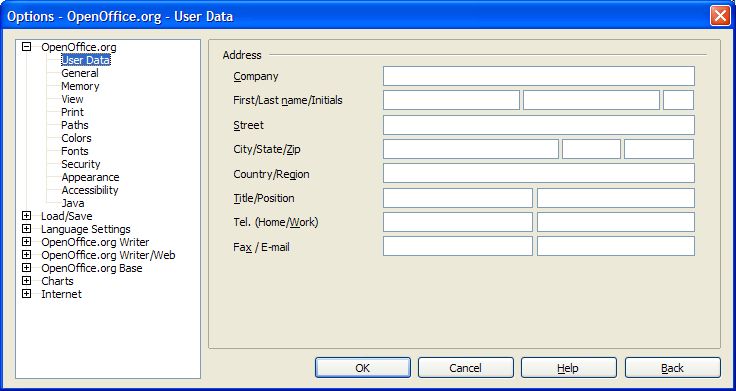
Configuration
Open a blank Writer (word processor/text) document, allowing us to take
a look at the configuration options. You'll find them by clicking on
the Tools menu and then
choosing Options. (Mac
NeoOffice/J users can also get the options by clicking the NeoOffice/J
menu and choosing Preferences).
You'll see something like:
There are a lot of options! You access a section by clicking the [+]
beside the section name (or double-clicking the section name); this
expands that section, allowing you to edit the default options for that
area. I am going to highlight the ones where I make changes.
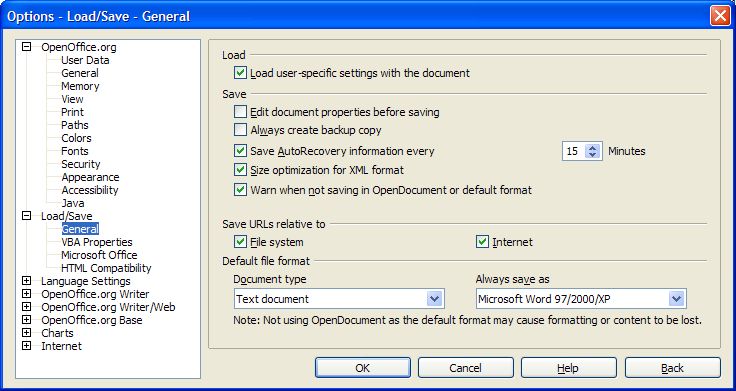
Load/Save- General:
this lets you choose to always create a backup copy, and to set the
time for autosaves. I tend to change the default Save Autorecovery information time
from the default (15 minutes) to 5 minutes, reducing the amount of data
I might lose in case of power failure or other problem. As well, I set
the Default File Formats for
Text document, Spreadsheet, and Presentation to Microsoft Word
97/2000/XP, Microsoft Excel 97/2000/XP, and Microsoft Powerpoint
97/2000/XP respectively. (The program may complain about these choices
after you click OK... just ignore it!)
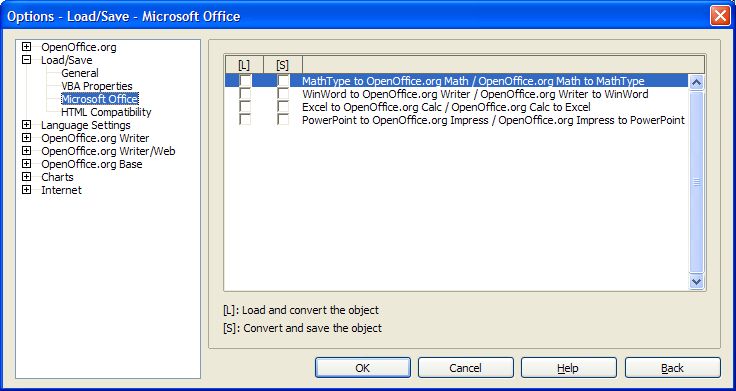
Load/Save- Microsoft Office:
I haven't figured out whether it makes any difference whether these
options are selected or not. Anyone know?
Language Settings-
Writing Aids: if you've downloaded alternative dictionaries (for
example, for Canadian English), you would tell OO.o about it here,
after copying the downloaded files into the appropriate folder (which
you can identify using the OpenOffice.org/Paths
option in this dialogue box). (I've had mixed results trying to add
alternate dictionaries). As well, you can turn real-time spell checking
on or off (the default is on), and set a number of other options that
check while you are writing.
OpenOffice.org
Writer- Basic Fonts (Western): here you can set default fonts
for new word processor documents. In MS Word, this is a pain to do,
requiring editing the Normal.dot template (which Word doesn't let you
do directly). It's really nice that OO.o lets you choose an alternative
default font with minimal muss and fuss!
OpenOffice.org
Writer- Print : among other print options, you can also set
whether footnotes appear at the end of a document, at the bottom of the
appropriate page, or not at all.
In OO.o 1.x, you can set options for all the modules at one time, in
the Options dialogue that appears when any module is open. In the new
1.9/2.0, you can only set options for the currently-open module. In the
Impress presentation module, I like to look at the:
OpenOffice.org
Impress- Print dialogue. I almost always only print presentation
handouts; I remove the checkmark from [x]
Drawing and add it to [x]
Handouts. As well, since I usually photocopy these handouts, I
set the Quality to Black and White, which removes fancy
coloured backgrounds and makes printouts that make clear photocopies.
You can always change these options at print time; setting them in the
Options in this way means that what I do most of the time is the way
will happen unless I tell the program to do otherwise.
Configuring the toolbars
Icons on a toolbar is a quick and handy way to
access commonly-used features. In many cases, though, default toolbars
are loaded down with icons that I never seem to need, while leaving out
icons for features that I would like to use frequently. I find that I
like to make a few changes to OO.o's word processor tool bars (while I
have fewer complaints about the other modules). To do that, open the
word processor (either with a blank document or a previously-saved
document), click on the Tools
menu, and click Customize.
(The menu item is named Configure
in OO.o 1.x). These look and work differently in OO.o 1.9/2.0 and in
the older 1.1; I'm going to describe what to do for each.
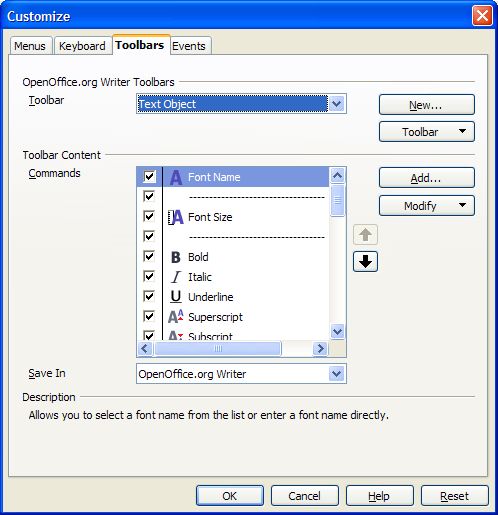
The new way:
Click on the Toolbars tab and
pick a toolbar to modify. I'm pretty content with the defaults for the Standard toolbar, but I tend to want
to change the Text Object
icons.
I don't want the option to Justify
text alignment; no word processor does a good job of this, and the
result is ugly text. I also don't need to change text direction from
left-to-right or right-to-left, since I'm not writing in Hebrew,
Yiddish, or Arabic. Removing these items (by removing the checkmarks
besides them) gives me room on the toolbar to add some options, by
clicking on the Add button.
The Add dialogue is complex-looking, with far too many possible
options; they're arranged in categories and include a huge list of
possible commands. Some have icons beside them, which will appear on
the toolbar, others have no icons. I like to add three items in the Format category: Line Spacing 1, Line Spacing 1.5, and Line Spacing 2, letting me easily
double, single, or line-and-a-half space all or sections of a document.
Note the instructions... you can drag a command to a desired location,
from this dialogue box right up to the toolbar.
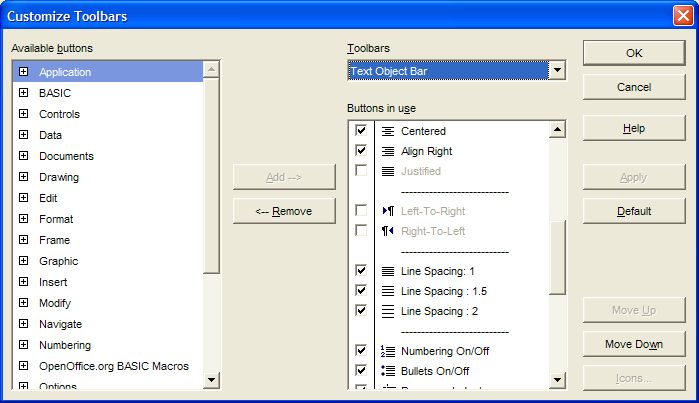
The old way...
In OpenOffice.org 1.1.x, to do the same thing, click on the Tools menu then Configure. Click on the Toolbars tab. Then click on Main Toolbar and click the Customize button. Next, look for the
Toolbars drop-down
list near the top-right of the new dialogue box; drop down the list and
select Text Object Bar.
Here, you can scroll down the list of Buttons
in use, unchecking items you don't want (like Justified), and
adding checkmarks besides the ones you wan to add (such as the three
Line-spacing items). When you click on one of the items, you can use
the Move Up or Move Down buttons to change the
icons location in the toolbar. Easy!
There are lots of other options in the Tools/Customize
or Tools/Configure
dialogues... you can edit menu commands, set up customized actions for
the various F-keys, and more. Personally, I haven't found a need for
any of these, but your mileage may vary!
Other settings
When I open an OO.o word processor for the first time, I set several
settings which then remain in effect each time I start up the word
processor. Some of the things I do:
Close the Styles box. I just find it in the way. On
the other hand, once you close it, it's hard to get it back... so be
sure! (If someone knows how to get it back, please let me know!). On
the other hand, in OO.o 1.x's presentation module (aka Impress), I find
the floating box with options like Insert
Slide... (etc) to be very handy, so I'm careful not to close
it... once again, I don't know how to get it back. (In Impress 1.9/2.x,
the interface has changed, getting rid of that floater).
I change the default view for the word processor.
Along the bottom, in the middle, you should see the current view--
probably 100%. Right-click on it to change the view. I like to choose Optimal, which even on an 800x600
display will show a somewhat magnified view.
Decide whether you want real-time spell checking on
or off. In OO.o 1.1, you'll see a row of icons along the left-side of
the window. Clicking on the ABC
icon with a red-squiggle underneath will turn real-time spell checking
on or off. (It's on if there's a square around the icon). OO.o 1.9/2.x
lacks the icons on the side; instead, you'll find the same icon in the
top toolbar row.
OO.o's word processor has a word-completion
function... it watches what you type and tries to predict what the word
will be. You may find this helpful-- it can be especially useful for
some special-needs children with writing difficulties. I find it
annoying. To turn it off click on the Tools
menu and select AutoCorrect.
Go to the Word Completion tab
and remove the checkmark beside Enable
Word Completion.
If you make these changes to a blank document, when you go to close the
program, you'll be prompted to save the document. You can click Cancel and not save... these
settings will remain for all future documents.
April 10, 2005
Alan
Zisman is a Vancouver educator, writer, and computer specialist. He
can be reached at E-mail Alan