Using Windows Movie Maker to make videos for the Webby Alan Zisman (c) 2006
Polish translation by Marek Murawski. Turkish translation by Zoltan Solak Before you start, you may want to look over my tutorial: Adding Video to Your Website (without fancy streaming servers). Windows Movie Maker is a simple application that is included with Microsoft's Windows ME and XP versions. It isn't available for download for use with other Windows versions, however, other software for making videos is often included with hardware such as DVD burners or Firewire add-in cards. (These programs, such as ULead Video Studio and CyberLink Power Producer are often older versions of commercial products; they are usable and often have more features than Windows Move Maker but are often harder to learn and use). Many people (including schools, teachers, and students) have access to a digital camcorder. Getting video from a digital camcorder into any of these programs is easy-- as long as your PC has a Firewire connector. (This is sometimes referred to as IEEE 1394 or iLink on Sony computers). This may be built-into your computer; if not, you can add it with a PCI card for desktop models (about $35) or a PC Card (also known as a PCMCIA Card) for laptops. Virtually all digital camcorders have Firewire ports for connection to computers; it is more difficult to connect up to older (non-digital) camcorders. Assuming that you have a digital camcorder, a PC with Firewire ports, and Windows ME or XP, you can connect your camcorder to your computer using a Firewire cable. Be aware, however, that there are small (4-pin) and large (6-pin) Firewire ports-- most desktop computers have large Firewire ports (if they have any at all!); most camcorders and most Firewire-equipped notebook computers have the small-sized ports. You'll need a cable with the correct-sized plugs (though you may be able to purchase an adapter if needed).
Look for Windows MovieMaker in the Start Menu's Accessories folder. When it starts up, it looks like this: 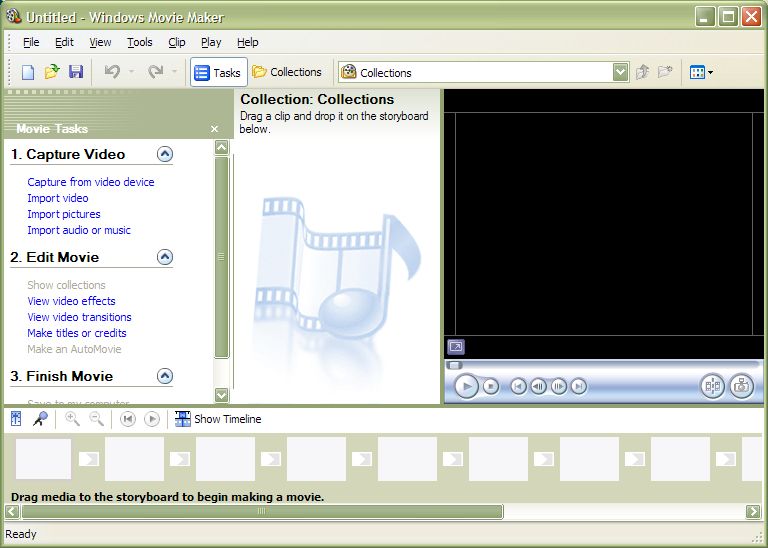 Notice that it helps to walk the user through the steps, with a series of options in the left-hand frame. The first step is to Capture Video- bring video, still pictures, or music in for use in your MovieMaker project. You can import video clips, photos (or other images) or music, sound effects, or other audio files that are already on your computer. Alternatively (and more likely in this case), you may want to Capture from video device (i.e. your camcorder). To do that, connect your camcorder's Firewire port to your computer's Firewire port, and click on that item. Assuming your camcorder is powered on and recognized by your computer, you should see the following: 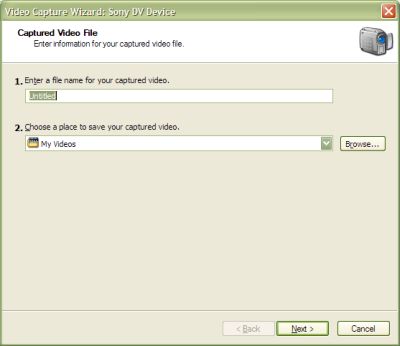 Enter a file name for your soon-to-be captured video clip, and (optionally) Browse to choose a location for the video files (if you want someplace different than the default My Videos folder. Next, you'll be prompted for a somewhat geeky bit of information about what quality to save your captured video: 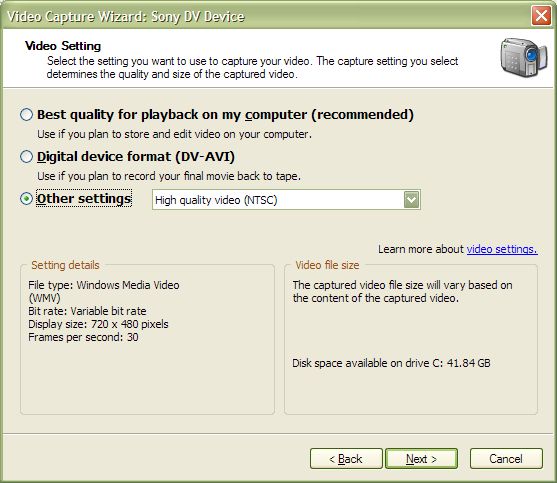 Chose an option depending on where you expect to be viewing your videos. (The default is to create a computer-quality video). Note the Setting Details in the lower-right. Key information is display size and frames per second (fps). Unless you don't have much free hard drive space, you may want to choose an option with a relatively large display size and fps rate-- you can always use that file to create a video (for web use) with smaller display size and lower fps. If however, you initially capture your video with a smaller display size or lower fps rate, if you later want to use your video clips for a DVD or other higher-quality purpose, you'll be stuck with a poor quality video. If you are sure that you will only be using your captured video for a single purpose, however, take a look at the drop-down list of other settings. Choosing one can result in significantly-lower (or higher) file size, along with a significantly smaller (or larger) display size.  I picked High Quality Video, so that I could end up with a file that would work well on DVD, but could also be later rendered into a smaller file with lower quality for Web display. Next you're asked whether you want to simply capture everything that's on the tape, or whether you want to capture clips manually. I suspect that in most cases, you'll want to look over the tape, and select sections of it for capture... 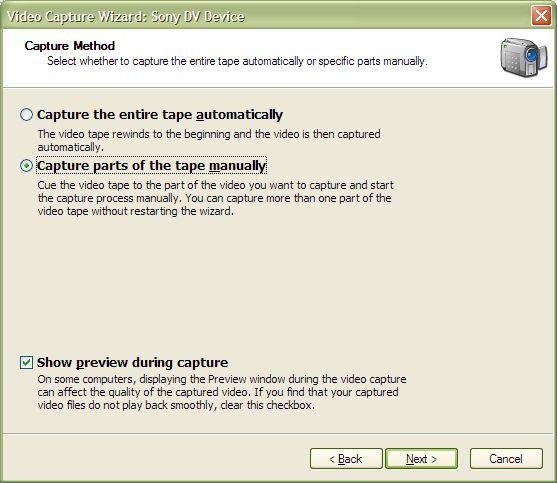 I selected to Capture parts of the tape manually and to Show preview during capture. Finally, I'm ready to capture video! 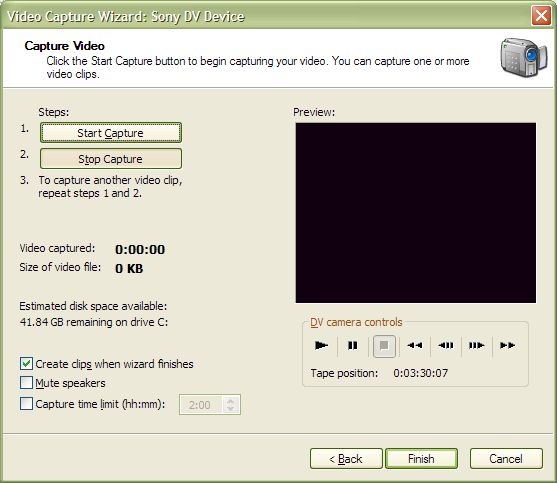 Note that on the right is a Preview area, along with a set of DV camera controls. On the left are buttons to Start and Stop Capture. Using the camera controls, you can view the contents of the tape, and capture the section or sections that you desire. You can repeat as needed, capturing multiple sections of the tape. You can even press the Stop button, Note that this process can be time consuming! When you think you've selected all your video clips, click Finish. There will be a brief pause while your clips get saved to your hard disk, then you'll see: 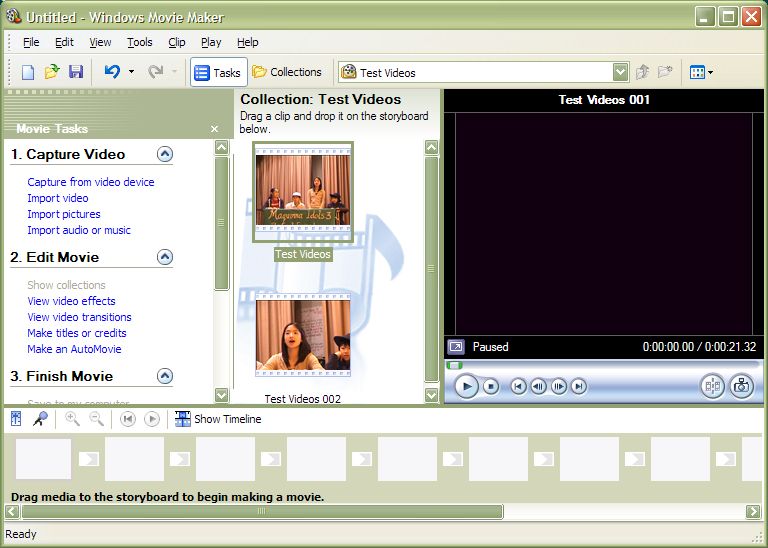 You see thumbnials for each clip in the center section, and can view the content of each one my clicking on it and then using the Play controls in the right-section. You can drag your clips to the Storyboard along the bottom to arrange them in the order that you want them to play. To add a title, click the Tools menu, then Titles and Credits... You'll be asked whether you want to add a title at the beginning, credits at the end, or a title before, after, or on top of the selected clip. Then, you'll get to type in your desired text. A preview screen will show how it will be displayed. Click the Done link when finished to add it to your chosen location. You may also want to experiment with transitions or other effects. I like to use a Fade In and Fade Out transition to smooth what can otherwise be an abrupt jump between clips, for instance. To do this, click View video transitions (etc) under the 2. Edit Movie options in the left-hand frame; when you do this, the thumbnails of clips changes to the list of transitions, allowing you to preview them before applying one. To return to the thumbnails of your video clips, click Show collections under the Edit Movie item on the left. When you think you've got your video the way you want it, go to the File menu and Save Project. Then choose one of the options under 3. Finish Movie (in the left-hand frame). In my experience, the Save to CD option doesn't seem to work the way I would like-- it makes a computer-video burned onto a CD (shrinking your file by reducing resolution or frames per second if needed), rather than a Video CD viewable on a DVD player. Similarly, there's no option to produce a high-quality DVD disc. If you want to create a video CD or DVD disc (viewable on a DVD connected to a TV), you'll need to use the Save to my computer option, then use another piece of software such as Nero or Easy CD Creator to burn a video disc. Choosing the Send to the Web option lets you give your file a name, then select from several options, depending on how you think your viewers are likely to connect to the Internet. The Setting details at the bottom of the dialogue box describes each option. Note that a display size of 160x120 is often described as 'postage stamp sized'. On the other hand, it the bulk of your possible audience is still using dial-up to connect to the Internet, this is your best choice. I prefer to click on the Show more choices... option to see: 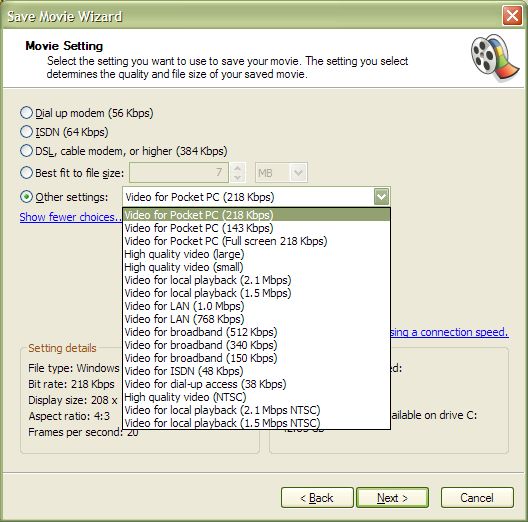 From there, I pick the Video for broadband (150 Kbps) option... this produces a 320x240 pixel display size (four times as large as the dial-up 'postage stamp' which runs at 15 frames per second. Not as smooth as a TV show, but watchable in my experience. The bit rate, 150 Kbps, is too high for dial-up modems, which transfer data at more or less 40 Kbps, but a reasonable choice for broadband users, whose bandwidth is generally higher than that, but can vary widely. (You can see a video clip saved with these settings from my school by clicking here. See if you're happy with the display quality over your Internet connection). You may also choose to do this twice-- once producing a file size for broadband, the second time producing a smaller one for dial-up users, then give your audience a choice. Once you've got your video clip (or clips) saved, you still have some other chores ahead of you-- making a webpage that links to it, and uploading (usually using a process known as ftp) the webpage and the video clip onto an Internet server. But those are topics for other tutorials: Last updated April 26 2006
|
||
|
|
||
|
|
||
| Alan Zisman is a Vancouver educator, writer, and computer specialist. He can be reached at E-mail Alan |