Working with Frames(When you don't actually know much about web pages) by Alan
Zisman (c)
2005
|
||
|
Frames are a powerful tool for
websites,
particularly if you have a growing collection of pages on a site, and
you want them to all share certain features. By building your design
around frames, you only have to make the common elements once, and they
can appear on all the pages-- even ones you haven't created yet. And if
you have (for example) a set of links listed on one of the common frame
elements, you only have to update it one time for it to appear on
everything on your website.
If you've seen my
tutorials
on using Netscape/Mozilla Composer/NVu, you'll know that I'm a fan of
the various versions of this web design software. The various versions
are free, reasonably easy to learn to use, with virtually identical
versions for Windows, Mac, Linux, and more. And did I mention that
they're free?
Unfortunately, they lack support for working with frames. You can use one of these prograams to work with the different pieces of a frame, but from time to time, you're going to need to drop down to the 'source code', the basic HTML text that makes a web page (or set of web pages, like a frame) work. But don't get too worried; even if you know nothing about HTML code, you can do what's needed; it's not as scary as it may sound. An example Point your browser to www.proto-barbarism.ca, a web site of poetry, illustrations, and somewhat over the top prose. The home page looks something like this (at least this is how it looked on June 7, 2005): 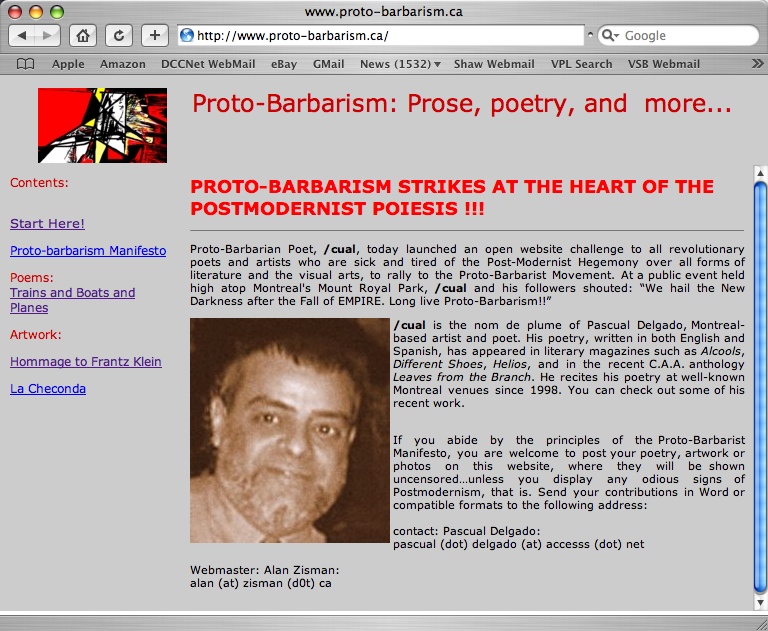 Click on any of the links along the left-hand side... notice that the column along the left with the links remains the same. And notice that the logo in the top-left corner and the text on the top also remains the same; only the large section with the main content changes as you change the page. This is done by setting up a frameset; a description of how multiple pages of HTML content should be displayed together. In fact, in this case (as in many other commonly-used web designs), there are really two framesets in use. Here's how the Proto-barbarism site does it: 1) Because the file index.html typically loads automatically when you type a web address (even without typing its name), that file described the first frameset. It tells your browser to load a file named caption.html, and display its contents in a row that goes across the browser's window, but is 90 pixels deep. A second row takes up whatever space is left in the browser window, loading a file named imageset.html. 2) Caption.html can be created in Composer or your favourite web page editor... there's nothing about it that isn't a standard webpage, as long as you remember that it's wide, but only going to be about 90 pixels deep. In this case, it's got a graphic (129 x 75 pixels) and the text that appears along the top of every page in the website. 3) Imageset.html however, is also a frameset; in this case, it describes the arrangement of two columns; the first is the column along the left that holds all the links. It's described as being 180 pixels wide and loading the file named thumbnails.html. The rest of the space initially loads the file target0.html but the space is given the name "images". (We'll see why this is useful in a moment). When you put a frameset inside another frameset, it's described as 'nesting'. (You can also achieve the same sort of nesting in a single file, writing the second frameset code within the first frameset code... but that's more complex; feel free to experiment). Look at the code: Index.html Most browsers and web page editors have an option to show the source code; if you're looking at the Proto-barbarism website in a browser, you can check (probably in a View menu) for an option saying something like View Source or Page Source But there's a problem when you're looking at a set of web pages in a frameset; you'll only be able to view the first page loaded that way. In this case, that's Index.html, and that's what we're wanting to check out. You may be able to view the source of a different part of the frame by clicking in that frame, then choosing View/Source... but that doesn't always work. (That's just one of several possible limitations with frames-- see below). If you're creating your own framesets, though, you should start to get comfortable working with a text editor. This is a program that's like a simplified version of a word processor, that only works with plain text files-- text without graphics, without fancy fonts, formatting, etc. Behind the scenes, all web pages are plain text files, with the instructions about how to display the contents included (also as plain text). Windows users have a program named Notepad (look in the Start Menu's Accessories sub-menu) which is a very basic text editor. Mac OS X users have a program named TextEdit, but it can also work with Microsoft Word-style files with graphics, fancy formatting, and more. If you use TextEdit, open its Preferences, and set the Format option to Plain Text. (On the Mac, I prefer the free BBEdit Lite from Bare Bones Software: http://www.barebones.com). Here's the source code for www.proto-barbarism.ca/index.html: <html> <head> <title>Proto-Barbarism: Prose, Poetry, and More...</title> <meta http-equiv="Content-Type" content="text/html; charset=ISO-8859-1"> <link rel="stylesheet" href="style.css" type="text/css"> </head> <frameset cols="100%" rows="90,*" border="0"><frame src="caption.html" border="no" scrolling="no"><frame src="imageset.html" border="0"></frameset> </html> It's pretty short. The first and last lines simply imply that there's HTML code that starts after that first tag (the word 'html' inside angle brackets) and the last tag ( '/html' inside angle brackets). That's a basic feature of HTML code: sections start with a tag- a name within angle brackets, and end with a '/' character followed by the same name, also within a pair of angle brackets. Pretty much every web page has a <head> section. This includes the page title (which typically appears in the browser's title bar along the top), and a bunch of optional information, such as meta-tags which may be used by search engines to help categorize your page. Feel free to copy/paste the <head> section from this or some other web page, changing the <title> to meet your needs. More important for our purposes is the next section, between the <frameset> and </frameset> tags. This one starts off: <frameset cols="100%" rows="90,*" border="0"> In other words, it's describing a frameset with one column. occupying 100% of the window. It's broken up into two horizonal rows; The first is 90 pixels deep, while the * indicates that the second one takes up as much space as is left. Notice that we can describe column or row dimensions in two ways: as a percent, or as a fixed number of pixels. And a * always means 'whatever is leftover'. In either case, the dimensions need to be written within a pair of quotation marks. (You can define more than one frame using the '*' character... if we had, for example: rows="90,*,*" we would have three rows, the first 90 pixels deep, and two more, splitting whatever space was remaining). Finally, in this case, there's a 0-pixel border- in other words, no border at all. Using this simple set of instructions, we could create some pretty complex designs. We could set up a grid with multiple columns and multiple rows, of varying dimensions. But here, we've only got the two rows. They're described in each of the next two sections, in order from top to bottom. (If there were multiple rows and columns, they would be described in order, left to right, for each row, top to bottom). The top row is described: <frame src="caption.html" border="no" scrolling="no"> The frame's source is the file caption.html. There's no border, and there shouldn't be scroll bars-- even if the contents of that page are too large to fit in the space provided. The second row (all the space that's left over) is described: <frame src="imageset.html" border="0"> That frame's source is the file imageset.html, and again there's no border. Without an instruction regarding scrolling, a scrollbar will appear if needed. And that's it. There's a tag to close off the frameset instruction, and another to say that that's the end of the HTML code. Look at the code: Imageset.html It's pretty similar to Index.html, but in this case, it divides everything underneath the top caption strip into two columns, a narrow one on the left, and a larger section on the right: <html> <head> <title>Proto-Barbarism: Prose, Poetry, and More...</title> <meta http-equiv="Content-Type" content="text/html; charset=ISO-8859-1"> <link rel="stylesheet" href="style.css" type="text/css"> </head> <frameset cols="180,*" border="0"><frame src="thumbnails.html" border="0" scrolling="yes"><frame src="target0.html" name="images" border="0"></frameset> </html> Once again, there are <html> opening and closing tags, and a <head> section pretty identical to the one in Index.html. You should be able to understand the contents of the <frameset> tags; two columns are defined, the first one is 180 pixels wide, and the second takes up all the rest of the space. The column on the left uses the file thumbnails.html with no border, but a scrollbar (which only will appear if needed). The other column uses the file target0.html and also has no border. What's new in the description of this part of the frameset is the code: name="images" This gives this section a name separate from the file name that (initially) is loaded into it. That's going to come in handy when we look at the links in the left-hand column, in the file thumbnails.html Before we do that, however, let's look at a diagram of what we get when we combine the framesets in index.html and imageset.html: 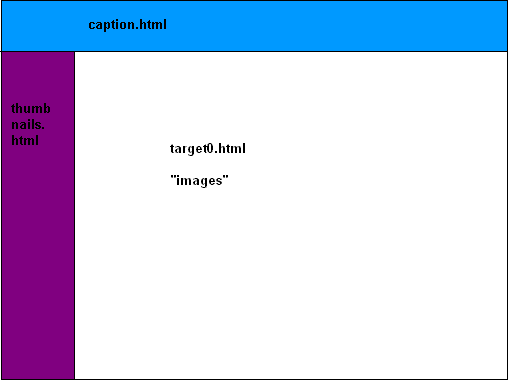 We've got
three sections, a
caption on top, a strip down the side holding the links, and the
"images" section, which holds the content. When we click on a link
along the left, the content displayed in the "images" section changes,
but the rest of it should stay the same. So let's see what's special in
the links in the file thumbnail.html
Look at the code: thumbnail.html I'm just going to show the code behind one of the links... in this case, where clicking on the words Trains and Boats and Planes loads that poem into the section named "images": <a target="images" href="target1.html">Trains and Boats and Planes</a> The code for this link, like all HTML links goes between the <a> and </a> tags; what's different between this and most typical links is the part reading: target="images" This is telling your browser to display the link (its 'target') in the section labelled "images" (which you may recall, was defined in the frameset in the file imageset.html. You don't have to make this customized link in a text editor. In Mozilla Composer or NVu, for instance, if you highlight some text, and click on the Link toolbar button, you can navigate to the file you want to link to. Then click on the Advanced Edit... button and you'll see: 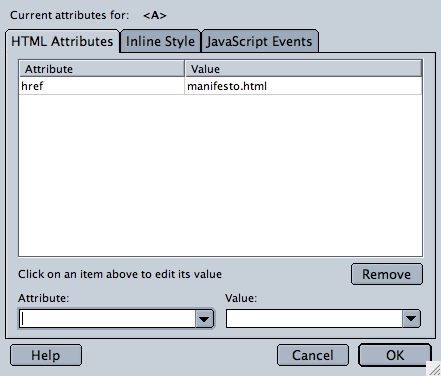 Add the word target as the Attribute and images as the Value. (No quotes needed). If you didn't target the link to the "images" section, clicking on the link would display the content in the same frame as the link, in this case, squeezing the poem into the skinny section on the left. More about target As we saw, you can use the target link attribute to tell a link to open in a particular frame, but there are a some more potentially useful tricks involving target... some of these may be useful even if your webpages don't use frames.
There are a number of possible problems with webpages built around frames. As we saw above, you may not be able to view the source code of any of the various pages in your frameset other than the initial (usually image.html) page. As well:
The noframes tag As a courtesy for people who can't view frames, you may want to include a 'noframes' option... For example, try placing the following somewhere between the <frameset> and </frameset> tags on a page such as our example's index.html: <noframes> <p> This site uses frames to display its content. Your Web browser does not display frames. You can view this page's content by clicking on <a href="noframes.html">this link </a> </noframes> People viewing your site with an older browser will see text suggesting they click on the words 'this link' to go to a file noframes.html. Of course, you'll need to create that file! You can also add <noframes> tags to a regular HTML page such as the content pages of your frameset-- if you do, the text between the <noframes> and </noframes> will only appear if your page is viewed on its own-- for instance if it pops up in a Google search. You could, for instance, include your links (which otherwise wouldn't display) that way. That's it for now... Give it a try; play around with frames. Feel free to combine use of a graphical webpage design program like Composer or NVu and a text editor when you need to much around with the source text. (Composer and NVu let you look at and in many cases edit a page's source text, but they tend to choke if you try to use them to edit the source code in frameset pages (like index.htm and imageset.html in our example); they get confused because these pages lack the <body> </body> section of more standard webpages (not needed since frameset pages don't have the content contained within this section). One way to get started is to get a program that automatically generates a set of framed pages. For example, Windows users may want to download the free Picasa from www.picasa.com. Picasa (like Apple's iPhoto for Mac OS X users) is a nice program for working with libraries of digital photos; one of the things it does is create various designs of web albums-- web pages that combine thumbnail-sized versions of photos with larger views of the same pictures. These use frames to separate a scrolling set of thumbnails from the larger view of the images. Hmmm, that sounds sort of familiar. Try generating a frameset using Picasa, iPhoto, or a similar program, then look at the pages in a text editor or a web page design program like Composer or NVu. Add text, or throw away the photos entirely and recycle the frameset in a completely different context. -- last updated 30 October 2005 |
||
|
||
|
|
||
| Alan Zisman is a Vancouver educator, writer, and computer specialist. He can be reached at E-mail Alan |