Much
as you may be excited to build your own
website, schools and other individuals are
excited by the
opportunity as well. In this
handout, we’re going to look at using a number of free
programs to
build and maintain relatively simple web sites. But
before getting into
the tools, it’s important for any wannabee
web-builders to
spend some
time thinking about the purpose of their site, and the
potential
audience.
Ask
yourself
questions—what is the
purpose of the site? Who’s likely to view it? What technology
are they
using to view it. For example, if you’re building a
site for
a Vancouver
elementary school, while the site may be available to
the whole world,
are very many people in other countries really likely
to visit? Should
you create a site for a world-wide audience, with
glowing mission
statements? Or is it really more aimed at your current
parent body,
more interested in being able to verify if next Monday
really is a
Pro-D day?
Keep
in mind that
‘cool
content’—big graphics,
animations, sounds, special
effects all make
your site load more slowly—a big concern for people
viewing
from home
over a modem connection. Your page may display quickly
when run on your
own hard drive, or across a fast network—but still be
painfully slow
over a phoneline modem. And pages that appear quite
readable on a
display set to 800x600 or higher resolution will often
require too much
sideways scrolling to be workable for the many users
with screens set
to
640x480 resolution. The moral is Keep it Simple! And
check
how
your page looks on a variety of computers, screen
sizes, colour depths,
Macs/PCs, etc.
Why
Composer?
-
Composer (and its various spin-offs) offers a
so-called
WYSIWYG interface—unlike many HTML editors, you
don’t work with raw
HTML code, but rather with an interface that looks
like a web
page—if
you’re comfortable with a word processor like Word,
Word
Perfect, Claris
Works, etc, you’ll be comfortable with Composer.
Serious web
page
designers need the power and precision of being able
to work with raw
HTML code—but the rest of use don’t need to get our
hands dirty those
ways. Sort of like driving with an automatic
transmission vs learning
to drive standard.
-
It’s free.
-
It creates relatively
standard,
relatively clean HTML code, that aren’t burdened
down with
extra junk.
The pages you create will run on any server or web-hosting
provider—unlike, for
example,
Microsoft Front Page, which is loaded with lots of
neat added
features—many of which turn out to be unusable
unless you are
able to
load special Front Page Extensions on your web
server (something
Vancouver schools can’t do).
-
It’s free.
-
It’s lacking
in high end
features—frames, cascading style sheets, and a lot
of things
you haven’t
heard of. In this case, a lack of features is a
plus, both because they
result in a program that’s easier to use, and
because it
keeps you from
designing pages with high-end features that are
either unviewable by
users with older browsers, or result in
overly-complex, messy pages, or
both.
-
It’s free.
That means you can
install it on all the computers in the lab, and get
a whole class
creating pages at once.
-
There are virtually
identical
Windows, Linux, and Mac versions.
Getting a
copy of Composer
Composer
was initially included in
the freely
downloadable Netscape Communicator package (for PC or
Mac). If you
don’t already have a copy, you could get it from Netscape.
The program is about an 18 meg download. In general,
the default
installation settings are usable—and if you are
installing it
over an
existing school copy of Netscape Navigator, it should
be OK. (Note: Mac
users need to be running OS 7.6 or later to use the
current versions.
You can find a version compatible with older Macs with
older (System 7)
operating system versions at: http://home.netscape.com/download/archive/client_index3.html#4.05
Windows 3.1 users can find Netscape Gold 3.0 (which
includes a similar
web creation program) athttp://home.netscape.com/download/archive/client_archive3x.html.
New!
New
and improved
versions are
available in two different versions:
-- Netscape
has spent
quite a while trying to get past version 4.x. They
skipped numbering
5.x, and version 6.x was pretty awful. As of this
writing, however,
version 6.2 is actually pretty good, and there's a new
version of 7.0
that's getting good reviews. Both include a nice
version of Composer,
but also a bunch of America Online add-ins that you
may not want.
-- Mozilla
is an
open-source project that is at the base of the new
Netscape. And
Mozilla
1.0 (or later) is available for download for Windows,
Mac OS X, Mac
8.5/9, Linux
and
other
operating systems. I'm using its version of Composer
full-time now (written in 2002),
though this tutorial was originally written using the
Windows and Mac versions of
Composer included with Netscape 4.x.
2007 update: while
either Netscape or Mozilla Composer are still
usable, there are several
descendents of those programs, updated. SeaMonkey
retains the Netscape/Mozilla philosophy of having a
suite combining web
browser, HTML editor, etc all in one, while nVu
and the even newer KompoZer
offer the HTML editor on its own. Since most of us
already have web
browsers, email, etc, I would recommend using
KompoZer. With minor
differences, everything in this tutorial is
applicable to SeaMonkey,
nVu, KompoZer, etc.
2022 update: Even though
Kompozer has not been updated since 2007(!), Composer
lives on, with a new 64-bit edition with Windows,
Mac, and Linux versions under the name BlueGriffon. Like
earlier incarnations, it can be freely downloaded
and installed. The website offers 'basic' and 'ePub'
licenses at prices of Euro75 and 195 respectively.
Starting
Composer
|
You
can start Composer
in a
variety of ways… Windows users will find a
Composer icon in
the Start
Menu’s Netscape Communicator submenu.
Alternatively, if Netscape
Navigator has been started, Composer can be
opened from its Communicator
menu, or by clicking the Composer icon in the
floating component bar.
Alternatively,
if you
find a page
you like on the Web, you can load it into
Navigator, then make changes
to it in Composer, by choosing Navigator’s File/Edit
Pagemenu
item.
If
you
choose to start a new file in Composer, using
the File/New
menu item, you’ll get a choice of a blank
page, a template,
or a wizard.
In this handout, we’re only going to look at
starting with a
blank
page—the other two options open Navigator,
taking you to a
page on
Netscape’s website. You may find them
interesting to
investigate on your
own.
|
|
Working
with Text
On
your new page, you
can simply
type, as you would with a word processor, and the text
will appear
onscreen as you would expect. You’ll find a formatting
toolbar with
options similar to your word processor, but with some
important
differences as well.

The
biggest difference
is that
unlike your word processor, you don’t really have the
power
to define
text characteristics like font and size very
accurately. The reason is
that you have no control over the fonts installed on
the remote
computers that are viewing your page. If you really
need to use a
special effects font for a headline, make the headline
as a graphic in
a
painting program, and insert the image. Otherwise, the
best thing is to
accept the limitations.
On
the left, is the Paragraph
Styledropdown list. Most of the time, you’ll be
using the
so-called NormalHeadingstyles
(Heading 1 is the largest),
and a few other, less-widely used styles.style—standard
body
text,
in a Times Roman default font, and a standard size.
Clicking on
the small triangle on the right of the word
‘Normal’ will drop down a
list of styles—five
Next,
is the font
drop-down.
Unlike the font-list in your word processor, it
describes several
standard typesof fonts, without giving their
names.
Below that,
it will list the actual fonts on your system. My
advice: don’t
choose any of them! All too often, they won’t be
present on a
viewer’s system, and the results will be
unpredictable.
Buttons
for bold, italic,underline,
work as you’d expect—and you can mix them, for
example, getting bold
italic-- but don’t use underlining! On
web pages, underlined
text generally indicates a hyperlink… underlining
non-linked
text just
causes confusion. Instead, get in the habit of using
bold or italic for
emphasis. (Do the same in your word processor.
Underlining is
a
hold-over habit from typewriters, where it was the
only way to show
emphasis. It’s not needed with computer-generated
text and
just looks
tacky!)
Next
to the
underline icon is an icon to Remove Character Styles
and
Links… I don’t
often use it, but it’s a quick way to unlink text. The
following two
buttons are used to create bulleted and numbered
lists—nice
for point
for lists, for example
- Here’s
my
first point in the
list. Notice that it can have multiple
lines.
- I
pressed enterto get
the next bulleted point in the list
- And
here’s
the 3rd…
|
- With
a
numbered list, the
numbers are entered automatically.
- –
each time I press enter.
- Just
like
this!
|
Next
come two icons to
decrease
and increase indentation—something I rarely use. The
final
toolbar icon
is a handy dropdown to control alignment. I often like
to center-align
headlines and graphics, for example.
Generally,
pressing Enter
in an HTML document gives you a new paragraph—with a
blank
space
between paragraphs. (This blank line may not show up
in Composer or in
all browsers). If you want to type on a new line
without starting a new
paragraph (and adding the blank space), press Shift+Enter.
Making
your text into
hypertext
Web
pages are more than
just a
bunch of text. Composer includes a set of tools on a
so-called
composition toolbar to enhance your plain text.

The
New, Open, and Save
buttons work pretty much as you’d expect. Note that
when
saving files,
you should find out whether your server wants to see
them with *.HTM
or *.HTML file extensions. (Yes, Mac users, you’re
into the
wonderful
world of file extensions—give your files names ending
in a
period and
one of those extensions). For example, if you’re
saving on a
Vancouver
school’s NetVista server, the filename index.htm
is a magic name
that will open up automatically when a user just types
a web address
without indicating a filename at the end (i.e. typing
http://maquinna.vsb.bc.cawill
actually open up an html file named index.htm
at
that location). Saving onto the Vancouver School
Board’s
Unix-based server, however,
wants the file to be named index.html—a
file with the wrong
extension won’t work as advertised.
As
well, while Windows
and the Mac
may allow you to use long file names, resist the
temptation. Such names
are a pain for you and the user to type each time.
While it may be okay
to name a file: school_calendar_1999-2000, the same
filename with
spaces simply won’t work as part of a web address.
Spaces in
filenames
are a definite no-no!
The
Publish
button should
allow you to send your page (and associated graphics)
to a web
server—but it doesn’t work with many servers. With
the Vancouver
school and school board servers, for example, it
doesn’t
work—don’t
bother trying. Instead, get one on a number of freely
available ftp(file
transfer protocol) programs. I recommend the free WS-FTP
LE program for PC users, and Fetch
for Mac users. Both can be downloaded from www.download.com,
among other fine
shareware sites.
The
Preview
button serves
an important function—allowing you to see how your
page will
look when
viewed in Netscape Navigator. Composer tries to make
your on-screen
experience similar to the final page, but it’s not
perfect.
Previewing
also lets you test your links, to see if they actually
load what you
expect. Before previewing, you need to save your
page—and
it’s a good
idea to preview often.
Next
are Cut,
Copy, and
Paste buttons that work as you’d expect in a
word
processor or
other program. The standard keyboard shortcuts
(Control-V, Control-C,
Control-X on PC, Command+ the same keys on Mac) work,
as expected.
Control/Command-Z works for Undo, as in most other
programs. Print
and Find buttons are also pretty standard.
Link
and Target
buttons are unique to hypertext. When a user clicks on
a link, they go
to a new page, either stored locally on their computer
or local area
network, somewhere across the wide Internet, or to a
new location
within
the same document. Both text and graphics can be
linked—in
both cases,
the procedure is the same. First, select what you want
to make into a
link—if it’s text, highlight it with the mouse, if
it’s a graphic, just
click on it. Then click on the Link button. You’ll
see:
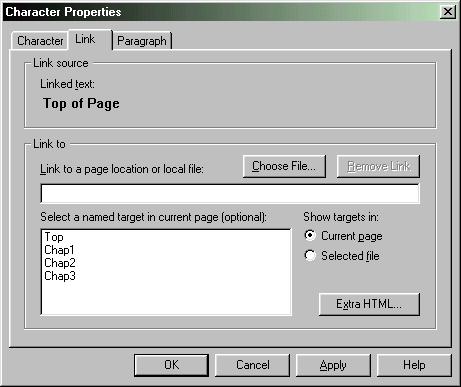
If
your link is a local
file, you
can locate it using the Choose File button.
For
best results,
keep the local files you’re linking to in the same
folder—that way, you
don’t need to type in location information that will
change
when your
pages are uploaded to your server. If your link is a
web page on the
Internet, add the full address—type http://www.yahoo.com
for
example, not www.yahoo.comor
just yahoo.com. If you don’t include the
‘http://’ part, you’ll find your browser
looking
for the page on your local hard drive—and failing to
find it.
In
fact, links that work
on your
local hard drive but fail when you upload the pages to
your server are
a common problem—after uploading your pages, go there
with
your browser,
and test all the links—and be prepared to experiment a
bit to
fix the
ones that fail to work as expected!
A
good way to get the
link to a
page on the Internet absolutely correct is to go there
in your browser,
highlight the browser’s address bar, and copy the
highlighted
address
to the clipboard (Edit/Copy or Control/Command+C). Go
to Composer,
click in the link field (in the above dialogue box),
and
Paste—Edit/Paste won’t work for this—you
can use the Control/Command+V
keyboard shortcut, or right-click in the space,
choosing Paste from the
popup menu.
Notice
how the lower
portion of
the illustrated links dialogue box includes a list of
named targets in
the current page. This makes use of targets—a
useful technique
for long web pages. The idea is like having a
hypertext table of
contents—clicking on a link takes you directly to that
section of the
document. To make use of this, you first have to
define your targets.
To
define a target, click where you want the target to
be—at the
beginning
of Chapter 2, for example, and click on the Target
button.
You’ll be asked to give your target a name. (Your name
can
include
spaces, by the way), then click OK.
Once
you’ve
defined your targets,
you’ll see them listed in the Link
dialogue, as above- simply
select one of the targets to link to it. (The Top
target is a
handy one in such cases—place a link to it by all your
other
targets,
so a user can quickly jump back to the table of
contents.
Adding
Images
Most
web pages have
graphics of
some sort—these may be pictures used as pictures, but
can
also be
pictures used as organizational logos, or as
navigational
links—a Home
button, an arrow pointing to the left for ‘previous
page’, etc. Once
again, it’s important to think about how your users
will be
accessing
your page. And be kind! Most users continue to access
the web using a
phone-line modem. It’s easy to overload a page with
large
graphics, and
make it take seemingly forever to load.
So
shrink your graphics
in an
image-editing program (such as the free IrfanView
for the
PC or the shareware Graphics
Converter for the Mac-- both downloadable
from http://www.download.com).
You
may
shrink a full-page graphic to a medium-sized one, and
be happy with
that
as the only version. Or post a page with a bunch of
thumbnail-sized
pictures that link to larger-sized versions of the
same picture. That
way, the page downloads relatively quickly, and the
viewer has the
choice whether to take the time to see the larger
version or not.
Images
on the Web are
most
commonly stored in so-called GIF (pronounced
like’Jif’) or JPEG
(pronounced ‘JayPeg) pictures. JPEGs (aka JPGs) are
most
often used for
photos, while GIFs are more often used for
illustrations—pictures with
256 or fewer colours, or for animations. (A third
format, PNG, is also
starting to be used). Composer lets you place GIFs and
JPEGs, and also
Windows-standard BMP and Mac-standard PICT pictures
(in the Windows and
Mac versions, respectively)—that means you can use
pictures
created by
students in programs like Windows Paint or KidPix. If
you import a BMP
or PICT, Composer will offer to convert it to a
Web-ready format for
you.
To
add an image, place
your cursor
where you want the image to appear. You can left or
center-align the
cursor, if you like. Click on the Image
button, to
see the
following dialogue box:
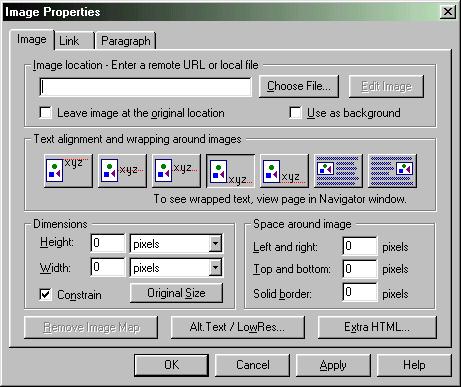
You
need to specify the
image
location and file name—or more effectively, perhaps,
click on
the Choose
File button to browse for its location.
You
probably want to
leave the [ ] Leave Image at Original Location option
unchecked. If you
choose the [x] Use as Background option, the image will
be tiled all
across your page.
The
text alignment
options are
needed because normally, you can only place a single
line of text next
to a graphic… they control where that line appears
– top, middle,
bottom, etc.The last two text wrap buttons allow you
to place multiple
lines of text next (or around) an image-- but there is
a catch. When
you
select one of these options, it appears as if it isn't
working-- you'll
only see a single line of text beside the picture... in
Composer.
If you save and preview in Navigator, you will see
that it does work
as advertised. This is where Composer's graphical
interface falls down,
and it makes using this feature quite awkward.
The
dimensions settings
are
useful—and dangerous. They set the size that the
browser will
leave for
the graphic. If you know the exact dimensions (in
pixels) of your
graphic—perhaps because you resized it in your
image-editing
program,
you can set them here, and the page will load faster
because the
browser
doesn’t have to wait to see how large the graphic is
before
placing the
text.
If
you type in
dimensions that are
smaller than your actual picture size, the picture
will appear to
shrink on the page—some people have done this,
thinking this
will give
them smaller, faster loading pictures. It won’t.
Don’t do it!
What happens is the your browser has to download the
full, large-sized
picture, then resize it—resulting in a page with small
graphics that
takes forever to load. Very bad idea!
The
Space Around Image
settings
let you control how much blank space appears around
your picture. Most
times, you can leave these alone.
Do
get in the habit of
clicking on
the Alt Text/Low Res button every time you
import
an image,
however… this lets you add a line of text that will
appear
while the
image is loading, or in place of the image on browsers
where the user
has turned off loading images. Type in a description
of the image. This
is invaluable for two classes of users—visually
disabled
users who are
accessing the web using text-reading software, and
users of slow
modems who have turned off images to speed up page
loading times. For
similar reasons, if you are using graphics as
hyperlinks, also have a
text-based link to the same location. Otherwise,
people who
can’t view
your graphics have no access to your link.
The
Horizontal
Line tool
button does just what you’d expect—places a
horizontal line clear
across your page.
Tables—the
big trick
If
you can only get a
single line
of text next to a graphic, how are you able to see web
pages that look
like newspapers—with pictures surrounded by multiple
lines of
text? (Composer'sImage
Propertiesdialogue that we looked at earlier
can be used, but
it's
awkward and unpredictable-- and the page layout
changes on different
size screens or even if a user resizes the browser
window).
The
trick is tables. If
you create
a table, you can put a graphic in one cell, and as
much text as you
want in a cell next to it—creating the illusion that
you have
text
neatly wrapped around the picture. As you might
expect, you create a
table using the Tablebutton. When you click
it, you
see the
following dialogue box:
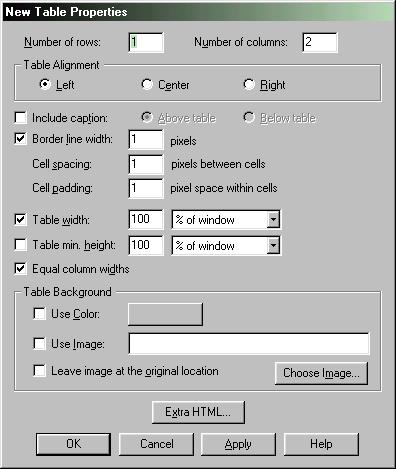
Set
the desired numbers
of rows
and columns—rows go across, columns go up and down.
Table
Alignment sets
where on the page the table appears. You can leave
space for a
caption—either above or below the table. Border lines
appear
as a light
line around the table—unless you set a width of zero.
I
recommend that
in many cases where you use a table, but don’t want it
to
appear as if
you’ve done so. If you set the border to zero,
Composer will
still show
you the outline of the table’s cells using dotted
lines—these won’t
appear in the actual browser. Spacing and padding is
the room between
table cells, and between the edges of the cell and the
text or pictures
inside each cell.
You
can set the table
width as a
percentage, or as inches on screen—if set as a
percentage, it
will
resize automatically for different screen sizes. If
you remove the [x] Equal
Widths setting, you can move the cell
boundaries, so the
column with
the picture, for example, tightly fits the width of
the picture.
You
can set the colour
inside the
table—but in most cases you probably shouldn’t.
Similarly, you will
rarely want to use an image in the background of the
table.
After
creating your
table, you can
insert graphics, and type or paste text within the
individual cells. If
you want to make changes to the table, click in a
cell, then
right-click
(Windows) or hold the mouse button down for about 5
seconds (Mac) and
choose Table Properties or Insert
or Delete to
add or remove rows or columns.
Table
Properties
returns you
to the dialogue box shown above, but adds tabs for
rows and cells. The
Row options aren’t particularly useful—but the Cell
options let you set
the width of a cell, and hence of the column it’s
in—this is useful if
you want the cell holding a graphic to always stay
exactly the size of
the graphic, while columns with text can freely expand
or contract to
fit the width of the page.
You
can place tables
inside
tables, giving the possibility of fairly complex
arrangements of text
and graphics. This is how it’s done on the web pages
that
appear to
have pretty sophisticated page layouts.
A couple
last things…
One
useful collection of
settings
isn’t on the various toolbars—in the Format menu,
there’s the Page
Colors and Properties item, bringing up this
three-tabbed
dialogue
box:
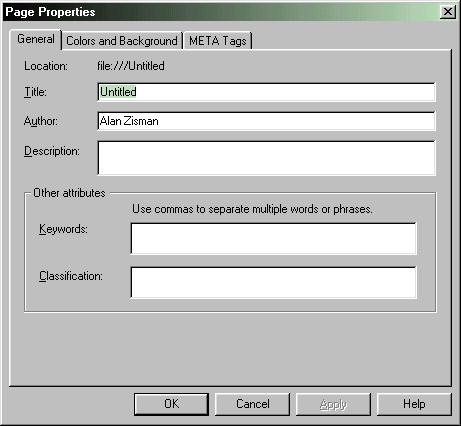
Be
sure to give your
page a
descriptive title. This is different from the saved
filename—it’s what
appears in the top title bar of the browser when it’s
viewing
your page.
Add a list of keywords (separated with commas) to
describe your
page—this will help it show up (eventually) in search
engines. (To speed
up the process of becoming listed by search engines,
you can submit
your site to the various search engines, either by
visiting each search
engine manually, or using an automated service such aswww.submit-it.com).
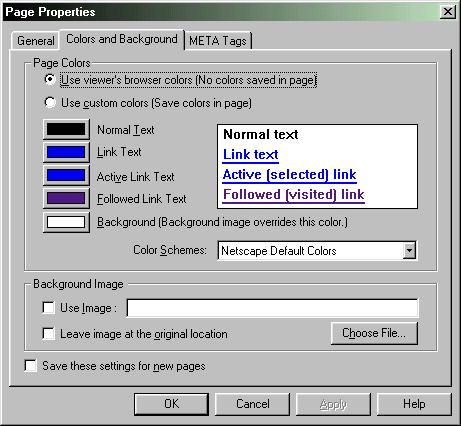
The
Colors and
Background
tab lets you set these page properties. I’d suggest
leaving
the link
text settings alone, but you could choose a different
colour for
normal text, and for the background. But try and be
tasteful, please!
You can choose to use an image as a background—it will
be
tiled across
the page. You’ll need an image that is faded out
enough that
you can
read the text placed on top of it.
One
popular trick used
by many web
sites is to appear as if they have a coloured stripe
running down the
page—usually on the left, with text of links appearing
over
this. This
is done by creating a picture in a paint program, with
a size
that’s a
screen-wide, by a single pixel high—and painting the
colour
part-way
across… sort of:
Green
Green Green Green
Green
White White White White White White, etc.
This
will be a very
small image
that will load quickly, but if set as the background
image will be
tiled—repeated down the length of the page.
Then
create a table,
with a
left-hand column set to the width of the coloured
stripe, and
you’re in
business.
We’ll
ignore
the MetaTags
page. Along with keywords, these are often manipulated
by shady webpage
designers, wanting to increase the likelihood that
their pages will
show up in searches—even for topics that are not
really
related to the
page’s contents.
Getting
your page(s) onto the server
After
your pages are
done, you
need to get them, along with the associated image
files, onto the
server. Unlike a word processor or page design
program, the images are
not embedded into your file—all that’s actually
present in your HTML
file is text—including instructions for the browser to
insert
a graphic
in the place indicated. If the graphic isn’t available
(or
the name
doesn’t match), then all users will see is a space
where the
graphic
should be, and an icon looking like a torn page.
Vancouver
school users,
as we’ve
noted, can’t use Composer’s Publish command.
Instead, they need to use
an FTP program. But first, you need to get permission
to upload to your
school server. This is surprisingly quick and
easy—phone the
VSB’s
HelpDesk (local 4444), and explain who you are and
what you need.
You’ll
be given a user ID and password (you can make them the
same as your
NetVista account or create a generic one for your
school). Once you
have an account and an FTP program, you’re ready to
load your
pages
onto the server. I’ll illustrate using the free
(Windows) WS
FTP_LE.
(Note—you can do this from school, from home, from
anywhere
you have an
Internet connection).
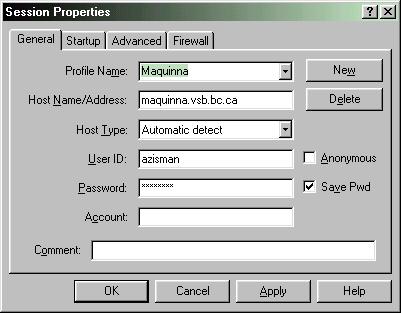
Open
WS FTP, and click
on the New
button to create a new session. Give it the name of
your school, and
enter information as in the example below (for
Vancouver’s
Maquinna
Elementary):
If
you’re
doing this on a
publicly-accessible computer, leave the password
blank—you’ll be
prompted for it each time you connect. When you’re
connected,
you’ll
see the entry-level folder for the website on your
school server.

The
window on the left
is on your
computer—the one on the right is on the school’s
NetVista server. You
can fumble your way through folders on the left (click
on the up-arrow
at the top to move up a level of folders) until you
find the files you
want upload. Select the desired files—you can
Control+Click
or
Shift+Click to select multiple files at one time—on
the left,
then click
on the --> button to send them across to the
right-hand side.
(Similarly, you can select files on the right, click
on the <--
button to send them from the server to your computer.
If
desired, create
folders on the
server, using the right-hand window’s MkDir
command—that will
enable you to have groups of pages and graphics neatly
housed in their
own folders, and let you have a document named
Index.htm as the default
page for each folder.
(For
more
detail on using WS-FTP
to manage your website, go to my
tutorialon
that subject).
That’s
it! It
should only take a
few minutes to upload all your pages—and they take
effect
immediately.
Good
luck and have fun!
Alan
Zisman is a Vancouver
educator, writer, and computer specialist. He can be
reached at