Creating a classlist folder on Vancouver's new CSP workstations
by Alan Zisman (c) 2010
In 2009, Vancouver public schools got about 6000 new Dell workstations for teacher and student use, under what the school district refers to as the Computer Sustainability Plan (CSP). This tutorial is aimed at Vancouver teachers trying to make effecient use of their new computers.
When logged into one of the new (CSP) workstations using a VSB teacher log-in, you should have a folder on your desktop labelled Teacher Tools. In there are some useful tools, including one named Student Homes that gives teachers access to the Home Folders (My Documents + Favorites) for every student in their school, arranged by names (last name then first name) rather than BCeSIS number.
While this is handy, finding the students in your class can be chore, when they are mixed in with all the other students in your school. You can create your own folder with links ('shortcuts') to all your students' folders - which lets you, for instance, distribute files like worksheets or Internet shortcuts, to all the kids in your class. It's a bit of a chore to do - though it takes longer to describe than to do! Luckily, you'll only have to do it once a year (perhaps updating it when you get a new student).
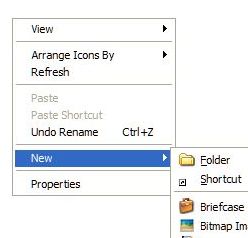
1) Double-click on the My Documents folder icon (in the top-left corner of the desktop). Right-click anywhere in the window that opens, and choose: New, then Folder from the popup menu.
While the new folder's default name: New Folder is highlighted (blue), type your preferred name- perhaps Division 3
Double-click to open your new, empty class folder.
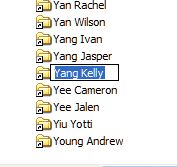
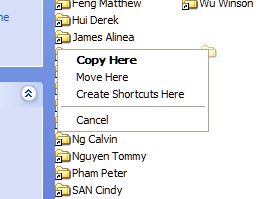
2) Double click on the Teacher Tools folder on your Desktop; you should see several icons... double-click on the folder icon labelled Students Homes. You should see a set of folder icons, with little 'shortcut' arrows on the bottom-left of each, pointing to the Home folders of every student in your school. Find the folder of the first child on your classlist, click on the student's name once, (pause) then click again... this turns the name blue:
While the student's name is blue like this, press Ctrl + C (hold either of the Control keys and press the letter C) to copy the student's name to the Clipboard. Then, double-click on the little folder icon to open that student's folder.
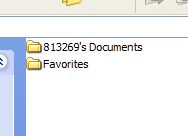
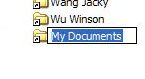
3) You should see two folders. One will be labelled Favorites, the other will either be labelled 'My Documents' or something like '813213's Documents' (where the number is the student's BCeSIS number).
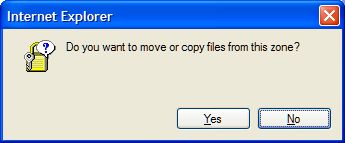
Click on the student's Documents folder using the RIGHT mouse button, and keeping the right button pressed down, drag with the mouse into the open window for your newly-created class folder. When you're pointing anywhere inside that open window, lift the (right) mouse button. (This is called 'right-dragging'). A message will pop up:
Click Yes (using the regular left-button). Another message will pop up, this time near where you right-dragged:
Click (with the left button) CREATE SHORTCUT HERE
An icon will appear - but it will have the name of the student's documents folder, My Documents or 812317's Documents... not very helpful!
As you did earlier, click on the folder's name, pause, then click again - which will turn the name blue:
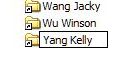
Press Ctrl+V to paste the student's name (which you earlier copied to the Clipboard). Ta Da!
Repeat as needed for each student in your class. Tedious, but only something you need to do once.
-- Alan
Alan Zisman is a Vancouver educator, writer, and computer specialist. He can be reached at E-mail Alan