 |
Recording a Concert with an iBookby Alan Zisman (c) 2003 First published in LowEnd Mac , December 24, 2003Like many elementary schools, Vancouver (BC, Canada) Chief Maquinna Elementary School holds a winter concert where the children perform seasonal songs for family and friends. It's a nice event, kept to about an hour in length so it doesn't tax anyone's patience. For several years I've been recording the concert. The first year we produced an audio CD as a school fundraiser, but sales were barely at the break-even point. Since then we've been ripping the recordings as MP3s and placing them on the school website. Even though our school population is by no means wealthy (a large majority of the families are recent immigrants to Canada), nearly all have computers and Internet access. We don't stream the audio files; instead, they are simply linked on a web page. That means home users may have to wait a while while the files, typically 1-2 MB in size, download. But it works very smoothly within the school, where about 50 computers are directly linked by ethernet to the school's web server; inside the school the tunes can be listened to almost as if they were on the local hard drives. It's nice to see students with headphones on listening and humming along with their performances from earlier years. This year's recording and production was totally done on a G4 iBook (the 12" 800 MHz model). Of course, "totally done" still requires some old-style non-computer hardware, just as in the days of recording to reel-to-reel tape, you need microphones, a mixer, etc. holds a winter concert where the children perform seasonal songs for family and friends. It's a nice event, kept to about an hour in length so it doesn't tax anyone's patience. For several years I've been recording the concert. The first year we produced an audio CD as a school fundraiser, but sales were barely at the break-even point. Since then we've been ripping the recordings as MP3s and placing them on the school website. Even though our school population is by no means wealthy (a large majority of the families are recent immigrants to Canada), nearly all have computers and Internet access. We don't stream the audio files; instead, they are simply linked on a web page. That means home users may have to wait a while while the files, typically 1-2 MB in size, download. But it works very smoothly within the school, where about 50 computers are directly linked by ethernet to the school's web server; inside the school the tunes can be listened to almost as if they were on the local hard drives. It's nice to see students with headphones on listening and humming along with their performances from earlier years. 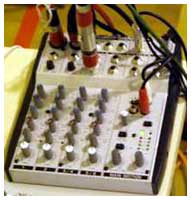 Years of
playing in rock bands has left me with a cache of sound
hardware. Years of
playing in rock bands has left me with a cache of sound
hardware.I recorded the kids using three rock 'n' roll standard Shure SM58 microphones. They're not the best for the job, since they're really designed for close miking soloists, not miking a bunch of kids from about 15' away, but they're what I have on hand. I connected them to a little Behringer six-channel mixer, about the size of a hardcover novel and costing about US$75 -- an inexpensive and basic piece of gear. Since the iBook lacks an audio-in port, I connected the mixer to a Griffin Technology iMic, a simple little US$40 audio input and output device that plugs into a USB port. The next problem was choosing OS X recording software. There are lots of options, ranging from expensive pro-level programs like the US$499 Peak -- they also make a US$99 Peak-LE that probably would have worked fine. 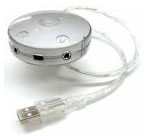 And
there
are free options, such as the SimpleSound-like Audio Recorder or Audacity. I really want to like
Audacity. It's an open source project with some nice features, but it
lacks one feature that I consider essential whether recording live or
just digitizing old LPs or tapes: I need meters to show the intensity
of the sound being recorded. And
there
are free options, such as the SimpleSound-like Audio Recorder or Audacity. I really want to like
Audacity. It's an open source project with some nice features, but it
lacks one feature that I consider essential whether recording live or
just digitizing old LPs or tapes: I need meters to show the intensity
of the sound being recorded.You might think you can make your recordings louder or software after the fact -- and to a degree this is true. But if your original recordings are too faint, when you increase the volume you also make the inevitable background noise more noticeable. Boost too quiet an original recording and it can sound like the music is being played in a shower with the water running. If you record at too high a level, the loudest parts of the sound will be clipped and distorted. Even if you reduce the volume, you'll just end up with quieter distortion. Digital recording is less forgiving than old-style analogue recordings. (Clipping for a fraction of a second may be acceptable, but you definitely don't want clipping for extended periods of time.) I've made both sorts of mistakes and have Winter Concerts from years past as documentary evidence. Meters (often called VU Meters in the old days of tape recordings) give you a visual way to see your recording levels. Your goal is too get your levels as loud as possible while avoiding clipping the loud parts. The OS X Sound preference panel has a meter, but it mixes together left and right sound channels, isn't very responsive, and doesn't show when you're clipping clearly enough to make it very usable. After testing several shareware recording applications, I settled on Sound Studio. It's US$50, with reduced prices for students and teachers. It includes a nice set of features with an easy-to-learn interface. While lacking pro-level features (which are beyond what I need or want), it also lacks a pro-level price. It does include a good pair of meters. It saves sound files in several uncompressed formats, including AIFF and Windows-style WAV. 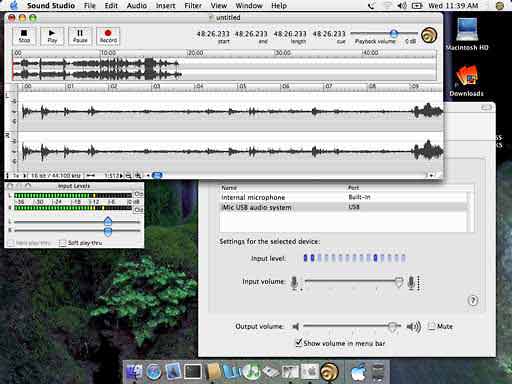 - Sound Studio in action. (Note level meters!) With my mikes and mixer, iMic and Sound Studio, I was ready to record. I set up the gear and computer and sat in on several classes' rehearsal sessions to get a rough sense of levels. After that, I could set levels, click "record," and sit back and watch the dress rehearsal (attended by 200 students from our school's nearby annex) -- and later the actual performance. That gave me a pair of hour-long audio files, each about 500 MB or so. The next step was to split them into individual songs, I used Sound Studio, locating each song amid the noise of moving classes on and off stage, the MC's remarks, and more. Copy a song, paste it into a new file, clean up the beginning, fade out the applause at the end, save. Repeat ten times, and the end result was a folder filled with just the songs, about 250 MB worth of content. If I had wanted to, I could have burned them to a CD, but I wanted to rip them to MP3 format. iTunes does that just fine, but it takes a few not-entirely intuitive steps. First, set the MP3 conversion rate. The higher the bit-rate, the better the quality, but the larger the files -- though even at a fairly high quality, the file sizes are much smaller than the uncompressed files as originally recorded. 128 kbps files are near-CD quality and tend to be about 1/10th the original file size; 64 kbps files are FM-radio quality at about 1/20th the original file size. That was my choice; to select it, I opened the iTunes preferences dialogue, clicked on Importing, set it to import using the MP3 encoder, and opted for a Custom setting. That let me pick a 64 kbps stereo bit rate, opting for smaller files at the expense of sound quality. Next you need to get the individual songs into iTunes (still in uncompressed AIFF format). The File menu's Add to Library item does this, letting you select the sound files en masse. Finally, find them in your iTunes library (in my case, they were at the bottom of the list, with no Artist or Album listed). Select them all, click on the Advanced menu's Convert to MP3, and pretty quickly you've got a second copy of each tune added to the iTunes library. The actual MP3 files can be found by looking in your Music folder. I found them in the iTunes/iTunes Music/Unknown Artist/Unknown Album folder. What was originally about 250 MB of music in AIFF format had compressed down to about 12 MB. Not finished yet, but close. Next, I moved them to another folder and renamed them to simpler names with no spaces. (Make sure the file names end in .mp3) Then I made a web page with links to each of the songs. I used the free Mozilla Composer web page creation program. Finally, using Transmit (US$25 shareware) FTP software, I uploaded the web page and graphics, along with the ten MP3 files, onto the school's website. You can check out the results. The next school day, students were pleased to be able to sit in the computer lab and sing along with their performances from the day before. |
|
|
|
|
| Alan Zisman is a Vancouver educator, writer, and computer specialist. He can be reached at E-mail Alan |