Adding video to your website
by Alan Zisman (c) 2006
Polish translation by Marek Murawski. Turkish translation by Zoltan Solak
With lots of people, schools, and more now having access to digital video cameras, websites, and high speed Internet access, it's natural to want to post video clips onto personal or school websites.
This can be done, making those video clips available to anyone world-wide. There are, however, some issues to be aware of-- preferably before you start adding your video clips.
The biggest one is file-size. Video files are large-- remember, a two hour DVD quality movie fills a DVD, taking up multiple gigabytes of space. You probably don't have that much space available on your web server, and visitors to your website aren't going to want to spend the time it would take to download so much data even with a high-speed broadband Internet connection.
So before you begin adding video clips to your website, you need to prepare your video clips. This tutorial isn't going to tell you how to do that, and the details will vary with the software you're using. But some things to think about:
I've got the file stored on my webserver, but no special server software. Try clicking on the picture below to see how the clip plays on your system:

Clicking on the image, or on this link should (assuming you have Quicktime installed on your computer) open a new browser window... it should automatically start downloading the 19 MB video file. There will be a bit of a delay, but it should start playing the video well before the entire file has been downloaded. Depending on the speed of your Internet connection, how many people are accessing my webserver at the same time, how much traffic is on the Net between your location and mine, the phases of the moon, and general randomness, you will experience more or less jerkiness-- times when the video seems to stop and start.
In my tests, it seemed to play pretty well... but only one person was accessing one video clip at a time. If you upload a bunch of clips to your server and multiple clips are being accessed at the same time by different people, you may find that performance starts deteriorating.
(Note that you can optionally save the video clip to your own computer by right-clicking (or on a one mouse-button Mac Control+clicking) on the link and choosing to save the file- saving the file onto your local hard drive then playing it would improve performance).
But it didn't take anything very special for me to add this video clip to my website.
In order to add the video clip, I simply created a link-- inserted the graphic and/or typed the text for my link. I use the free graphical nVu webpage editing software (http://www.nvu.com - versions for Windows, Mac, and Linux), a newer descendent of the Netscape/Mozilla Composer. (See my tutorials on using Composer) You may use whatever software or method you are comfortable with to create your webpage; if you're using other software, exact details will vary but hopefully you'll be able to modify what I did:
Instead of pointing my link to another HTML page, I pointed it to my video file.
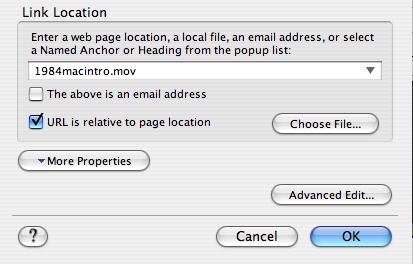
Since I wanted it to open in a new browser window (rather than in the initial browser window-- this is optional), I needed to click on the Advanced Edit button:
by Alan Zisman (c) 2006
Polish translation by Marek Murawski. Turkish translation by Zoltan Solak
With lots of people, schools, and more now having access to digital video cameras, websites, and high speed Internet access, it's natural to want to post video clips onto personal or school websites.
This can be done, making those video clips available to anyone world-wide. There are, however, some issues to be aware of-- preferably before you start adding your video clips.
The biggest one is file-size. Video files are large-- remember, a two hour DVD quality movie fills a DVD, taking up multiple gigabytes of space. You probably don't have that much space available on your web server, and visitors to your website aren't going to want to spend the time it would take to download so much data even with a high-speed broadband Internet connection.
So before you begin adding video clips to your website, you need to prepare your video clips. This tutorial isn't going to tell you how to do that, and the details will vary with the software you're using. But some things to think about:
- Edit your video. Most home-made videos include non-essential footage. Make it short and sweet
- Reduce the size... a video that plays at 320x240 resolution is 1/4 the size of one that plays at 640x480 pixels. (160x120 is 1/4 the size again, but that may be too small for comfort).
- Try different compression schemes. Compression is a trade-off between file size and image quality. Experiment and view the results.
- Think about different file formats. People use different sorts of computers- Windows, Macs, Linux- and have different software installed that can affect whether or not they can view your videos. You may be stuck with the file format you produce-- if you're using Windows Movie Maker or Mac iMovie, for instance-- but try to end up with a file that's as univerally accessible as possible-- and let potential visitors to your website know the format of your video file and what software is needed to run it.
I've got the file stored on my webserver, but no special server software. Try clicking on the picture below to see how the clip plays on your system:
Clicking on the image, or on this link should (assuming you have Quicktime installed on your computer) open a new browser window... it should automatically start downloading the 19 MB video file. There will be a bit of a delay, but it should start playing the video well before the entire file has been downloaded. Depending on the speed of your Internet connection, how many people are accessing my webserver at the same time, how much traffic is on the Net between your location and mine, the phases of the moon, and general randomness, you will experience more or less jerkiness-- times when the video seems to stop and start.
In my tests, it seemed to play pretty well... but only one person was accessing one video clip at a time. If you upload a bunch of clips to your server and multiple clips are being accessed at the same time by different people, you may find that performance starts deteriorating.
(Note that you can optionally save the video clip to your own computer by right-clicking (or on a one mouse-button Mac Control+clicking) on the link and choosing to save the file- saving the file onto your local hard drive then playing it would improve performance).
But it didn't take anything very special for me to add this video clip to my website.
In order to add the video clip, I simply created a link-- inserted the graphic and/or typed the text for my link. I use the free graphical nVu webpage editing software (http://www.nvu.com - versions for Windows, Mac, and Linux), a newer descendent of the Netscape/Mozilla Composer. (See my tutorials on using Composer) You may use whatever software or method you are comfortable with to create your webpage; if you're using other software, exact details will vary but hopefully you'll be able to modify what I did:
Instead of pointing my link to another HTML page, I pointed it to my video file.
Since I wanted it to open in a new browser window (rather than in the initial browser window-- this is optional), I needed to click on the Advanced Edit button:
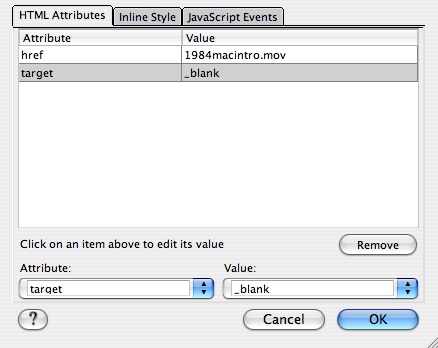
I clicked
to drop down the list of possible Attributes (in the lower-left of the
window) abd chose target.
When I did that, a list of possible values for the target attribute
appeared, and I chose _blank.
I then saw what's illustrated above, except that the it wasn't yet
added to the list in the main body of the window. In nVu and Composer,
it's necessary to click on that word "_blank"
in
the
Value: list and you'll see it added to the list (as it is in the above
illustration). (Yes, this is clumsy).
If you're more comfortable working with HTML source code, here's the code for the link above on the words 'this link':
<a target="_blank" href="1984macintro.mov">this link</a>
Nothing to it... just a standard HTML link, with the (optional) target attribute added to open the video clip in a second window.
Added extra: Use thumbnails for your links
As you saw above, I had two links to the video clip... one was text (the words 'this link') while the other was a graphic from the video. I think you'll agree that the graphic was more attractive.
Your video-editing software may let you export a single frame from your video clip(s); if so, that's an easy way to get graphics to use.
Alternatively, you can play each video on your computer, and make a screen capture when an appropriate scene appears on screen. Here's how:
Okay... all this is interesting to you, but you're not sure how to get started-- how to capture video clips from your camcorder onto your computer, how to edit your video, reduce it to smaller size, etc.
Windows users can take a look at my tutorial on producing web video using Windows Movie Maker (included with Windows ME and XP).
An alternative - rather than storing large video files on your own web server, you may want to upload them to a dedicated video-sharing site such as YouTube or Vimeo; either of those services allow video clips to be 'embedded' in other webpages - I have a tutorial discussing how to add this embed code to your web pages: Inserting Online Video Clips Into Web Pages
If you're more comfortable working with HTML source code, here's the code for the link above on the words 'this link':
<a target="_blank" href="1984macintro.mov">this link</a>
Nothing to it... just a standard HTML link, with the (optional) target attribute added to open the video clip in a second window.
Added extra: Use thumbnails for your links
As you saw above, I had two links to the video clip... one was text (the words 'this link') while the other was a graphic from the video. I think you'll agree that the graphic was more attractive.
Your video-editing software may let you export a single frame from your video clip(s); if so, that's an easy way to get graphics to use.
Alternatively, you can play each video on your computer, and make a screen capture when an appropriate scene appears on screen. Here's how:
- In Windows, pressing the Prtscn (Printscreen) key captures a picture of your entire desktop, including the video clip. Holding down the Alt key and pressing captures just the front window-- this may be better. Either way, the captured image is in your computer's clipboard. Open the graphics software of your choice (I use the free Irfanview (http://www.irfanview.com) but you can use Windows Paint or Photoshop or whatever you like). Click Edit then Paste to paste the clipboard contents.
- On a Mac (running OS X 10.4-- your instructions may vary with other operating system versions), pressing Command+Shift+3 (isn't the Mac intuitive?) captures the entire screen, while Command+Shift+4 lets you drag to select a portion of the screen to capture. This saves the screen capture as a file on your desktop. Alternatively, holding the Control key down along with the other keys, saves the screen capture to the clipboard so you can paste it into the graphics application of your choice. (I like the shareware Graphic Converter -- http://www.lemkesoft.de). You can also take pictures of the screen using the OS X Grab utility (in the Applications/Utilities folder). I prefer the free SnapNDrag utility (http://www.yellowmug.com) which greatly simplifies making and saving screen captures. (Note that Apple's DVD Player application (and probably some other programs as well) doesn't let you make screen captures).
Okay... all this is interesting to you, but you're not sure how to get started-- how to capture video clips from your camcorder onto your computer, how to edit your video, reduce it to smaller size, etc.
Windows users can take a look at my tutorial on producing web video using Windows Movie Maker (included with Windows ME and XP).
An alternative - rather than storing large video files on your own web server, you may want to upload them to a dedicated video-sharing site such as YouTube or Vimeo; either of those services allow video clips to be 'embedded' in other webpages - I have a tutorial discussing how to add this embed code to your web pages: Inserting Online Video Clips Into Web Pages