http://zisman.ca

An Introduction to Digital Cameras and Photography - Pt 1

by Alan Zisman (c) 2022-10-03
email: alan@zisman.ca

This document: http://zisman.ca/photos
Last updated 2022-12-02
Contents:

types of digital cameras
camera jargon
look at your camera
menu items - going beyond the presets
know the icons on your screen
mobile device cameras
--  digital zoom
how to take better photos:
—— focusing
—— flash
—— It’s all about the light
—— pre-set scene modes
—— use macro for closeups
-- --   hdr
—— better composition
links
This workshop is being given in two parts. The first part - this one - introduces you to your digital camera (or phone/tablet camera) and to composing and taking better photos with it. Part two looks connecting your camera to your Windows or Mac computer and using basic software on your computer to organize your photo collection, make basic edits to your photos, and using your photos in printed project like photo books and calendars.

Talking about digital cameras and photography can be confusing and complicated - there are a wide range of types of digital cameras, from simply point-and-shoots to complex SLRs. As well, increasingly people are using their smartphones and tablets to take photos. So no one size fits all! As well, people are storing and editing their photos on Macs and Windows PC, on iPads, iPhones and Android devices and using cloud services. One relatively brief introduction can barely scratch the surface of all of these.

What this isn't: It's not going to be make you a professional photographer - it's not going to into detail on using the many manual settings on a pro-level camera or to use the astounding depth of options on pro-level software like Adobe Photoshop.


Instead, we're going to take a look at a relatively simple digital camera and the camera on a smartphone - your camera and/or smartphone will almost certainly be different, but hopefully you can apply the ideas from to your own gear. In Part 2 we'll look at several pieces of software available for Windows PCs and make some recommendations for Mac-users and users of iOS and Android devices. We'll also look at several cloud-based photo storage services and book/card/calendar printing services.

Types of digital cameras:
See: Choosing the right kind of digital camera and The Best DSLR for Beginners and How to buy a camera in 2018 and The Best Mirrorless Cameras of 2018 and The Best Digital Cameras of 2018 and Are DSLR Cameras Going Extinct? (2022)

Increasingly people are using smartphones and tablets in place of compact point-and-shoots. While even a low-end compact point-and-shoot can offer the big advantage of an optical zoom, the best camera is 'the one you have with you' - and in most cases, that's the camera in a smartphone or tablet. See: Smartphones Have Officially Crushed Digital Cameras  and 6 Reasons Why Your Smartphone Is the Best Camera You Own Also note that the compact digital camera market has shrunk by 97%, mostly due to the use of smartphones.

Camera jargon:

You need to be able to talk the talk to understand camera/photography discussions. Many of the terms are carry overs from the days when 35 mm film was used in 'single-lens reflex' (i.e. SLR) cameras; today, lens sizes, for instance, may be discussed as having a 35 mm-equivalent size.

Term:
Definition:
lens size
45-55 mm lens were 'standard' on 35 mm SLRs; smaller sizes (24-28 mm for instance) were 'wide angle', larger sizes (80 mm and up) were telephoto/close-up. A zoom lens can smoothly move from wide-angle to telephoto. Read: What is focal length in photography
aperture
the opening in the camera's shutter, controlling how much light could enter - refered to as 'F-stop' - the smaller the number, the larger the opening. This affects 'depth of field' - Read: Understanding camera aperture and why it matters and What Is Aperture In Photography? A Beginners Guide To Understanding Lens Aperture and Photography Basics: What Is Aperture and How Does It Change Photos?
ISO
the measure of 'film speed' - i.e. sensitivity to light. Standard film was ISO 100-200; higher numbers can capture images in lower light - but with more 'noise' - random dots of colour. Digital cameras pretend to be loaded with film of a specific sensitivity. Read: What is ISO in photography and Photography Basics: This Is How ISO Changes Your Photos
shutter speed
how fast the shutter opens, measured in fractions of a second. A longer shutter speed lets in more light, but risks blur as the subject moves. Shutter speed and aperture both affect exposure. A quick shutter speed can capture action without blurring. Read: What is shutter speed in photography and What Is Shutter Speed and How Does It Change Your Photos?
depth of field
how much of the image is in focus - a shallow depth of field, with the background blurry is often a desired effect. Aperture affects depth of field. Read:
megapixels
digital camera images are made up of tiny dots (pixels); a megapixel is a million dots. Today's digital cameras take images that are 8 -16 megapixels in size - but more isn't necessarily better.
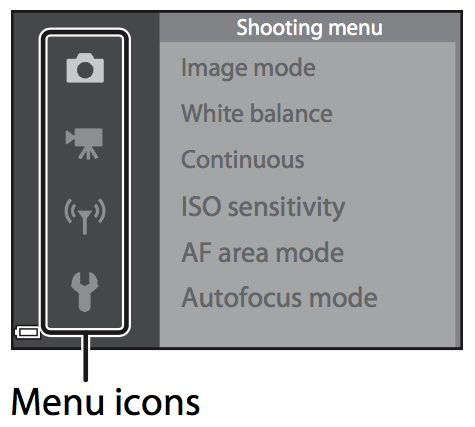
white balance
set what the camera sees as 'white' in different sorts of light for more accurate colours. Read: What is white balance in photography
optical vs digital zoom
with optical zoom the lens magnifies the image; with digital zoom the camera artificially magnifies the center of the image by enlarging the size of the pixels.Try and avoid digital zoom! Most smartphones and tablets only offer digital zoom. Read: Camera zoom explained: How optical, digital, and hybrid zoom work
aperture/shutter priority
on DSLR models (but not on many less sophisticated cameras) users can choose these partially manual modes: aperture priority lets the user manually choose an aperture and the camera does the rest; shutter priority lets the user control the shutter speed and the camera does the rest. With aperture priority, the user can control the depth of field; shutter priority lets the user control the amount of motion blur.
macro mode
set your camera in macro mode when you want to take a close-up picture of something a few inches away - some cameras may have two macro settings - one for very close, the other for very, very close. The icon often looks like a tulip.

See: Understanding the Language of Photography: Basic DSLR Definitions and A Digital Camera Glossary

How to Choose a Camera – A Comprehensive Guide offers a nice introcution to both the variety of types of cameras and camera jargon.

Look at your camera:


Familiarize yourself with its buttons and what they do. For my examples, I'm using a Nikon S-7000 compact ultra-zoom, with images from that camera's Quick-start Guide and Manual. (Your camera's guide and manual are probably available online and are worth a quick look). Be familiar with the equivalent features on your own camera.

S7000 back and bottomHere are the back and bottom of the S-7000; note the large 'monitor' - many people like the small optical viewfinders of older cameras; these are rare nowadays.

There's a button to start/stop recording movies (videos), separate from the button (on top, not illustrated) to snap a still photo. A small button (with an arrow >), 'playback' lets you view the images/videos stored in the camera's memory.

This camera has a button to turn built-in Wi-Fi on/off. Frankly it's a pain. I ignore it!

The 'multi-selector' lets you move up/down, right/left in menus or playback mode, with an OK button in the center. Images at the four corners let you access flash, macro, self-timer, and exposure controls.

A trash-can button can be used to delete an image; the menu button enters/leaves the camera's settings menu.

On the bottom there's a tripod socket (tripods are a great accessory!) and a compartment that opens to reveal the camera's removable battery and memory card. Make sure you know how to open and close (and lock) the one on your computer and that you can remove and replace the memory card. Note that the memory card and the battery only fit in one way - pay attention and don't try to force them in the wrong way!

S-7000 camera topThe top of the S-7000 has an on/off switch. Note that the camera will automatically turn itself off when it hasn't been used for a little while (typically two-minutes or so) in order to save battery life. Press the power button again to bring it back to life.

Beside that is a shutter-release buttom with a zoom ring around it - you can zoom to the left to get a wider angle image, zoom to the right for telephoto - to magnify or 'get in closer'. Frame the shot the way you want.

Practice pressing half-way on the shutter-release: this locks the focus and exposure and can be very handy in capturing a more interesting image. Hold your finger at that point until you're ready to smoothly press down further to take the picture.

On the right is a rotating wheel that lets you select different picture-taking modes. When it's set at the little camera icon, you're in 'auto' mode - the camera makes what it thinks is the best choice. SCENE lets you choose between a variety of typical photo-taking situations which will vary between camera models. (The S-7000, for instance, has a 'pet portrait' mode!). Some cameras offer semi-automatic aperture or shutter priority modes (but not mine!)

On the side, there's a little door that opens to reveal two similar looking - but not identical - jacks. One is for the cable to connect your camera to your computer or the battery charger, the other is for the cable to connect your camera to a TV for displaying your images/videos. If your cable doesn't fit into one of these, try it in the other - but don't try to force it!

Note that the cables to connect your camera to your computer/charger or TV set are not standardized on the camera end - the connectors to the computer or TV have to be standard to fit in those other devices. That means the cable for a Nikon probably won't work on a Canon or Olympus. In fact, the cable for my Nikon S-7000 is different from the cable on my wife's older Nikon model. So when we travel, we need to remember to bring two different cables to keep our cameras charged.

For some cameras you have to remove the battery and plug it into the charger (though you can usually charge the camera by connecting it to your computer). Other models simply have you plug the camera into the charger - or computer. In most cases, you can safely charge your camera by plugging it into a computer or using a smartphone (or iPad) charger.

Browse the menus:

For every digital device, from computer (and computer programs) to smartphone or tablet, it's worth taking a bit of time to poke through the various configuration settings - these might be named Preferences, Settings, Control Panel, Options, etc. On your camera, it's often called the Menu - and there's usually a button to press to display the menu options on screen. On the S-7000 we see:

S-7000 setup menuThere are four icons on the left - each offers a group of settings. After pressing Menu on the S-7000, I need to press left on the Multi-selector switch to move to this left-hand frame; then I can use the up/down options on that switch to move up or down, choosing between the Shooting menu (illustrated) for options for shooting still pictures, the Movie menu for video options, the Wi-Fi menu and the Set-up menu.

To actually get to the options of one of these menus, move to it (on the left) then press either the right side of the Multi-selector switch or the OK button in the center of that switch.

In the Shooting Menu, for instance, I can choose between various 'image modes' - picture size and quality, 'white balance' - auto, manual, or a variety of different light sources, 'continuous' - whether clicking the shutter shoots a single shot, or a bunch of shots automatically, 'ISO sensitivity' - auto or various manual settings (note that there are more options than fit on a screen), 'AF area mode' and 'Autofocus mode'.

In all cases, you can use the left/right and up/down options of the Multi-selector switch to move in and out of these various options.

You computer's manual will give you much more information about these options - and the equivalents for your camera - than I can in this limited introduction. Explore your camera's menu and its options - even if most of the time you leave your camera and its options in Auto mode.

Note: on many cameras, the menu options will change depending on whether you are in Auto mode or in some other mode - in auto mode, you may only have a limited range of options available, while in other manual modes, more options become user-controllable.

Look at your screen or viewfinder:

A small viewfinder is a nice feature rarely found on today's cameras - it lets you look at your subject and frame your shot even in bright light which may make it hard to see what's on the camera's larger 'monitor'. Using either the viewfinder or the larger screen, you'll see what your camera is pointing at, but you'll also see a set of icons around the screen. You may be able to control whether you see a larger number of icons or a smaller number - and the icons will change depending on whether you're taking still pictures, movies, or are in playback mode. On many camera models, the icons may change if you switch between Auto, Scene, or various manual modes. On my S-7000 I might see a simple screen like the one on the left (though this image mixes icons for still photo and movie modes) or some more complicated arrangement of icons as in the image on the right. (There are two pages of names for these icons in the S-7000 manual!)

Screen with a few icons.... Lots of icons
Check your camera's manual for more information about the icons that ones your screen. See if you can remove the ones that seem like clutter - but make sure you know what they are telling you!

Mobile device cameras:

Many people are taking most of their photos with a mobile device - a smartphone or tablet. There are many different mobile device camera apps - and their user interfaces can change as the Android or iOS version gets updated. Learn how to use the one on your device! Here are pictures of the camera apps on my Android phone (left photo) and iPhone (right). Your smartphone camera app may look different - new versions of Android and Apple's iOS may update the camera apps from these versions - and different Android phone manufacturers include different customized apps. But all include similar features.

Android camera 1 Some things to note:
  • On both cameras, you can zoom in my pulling two fingers apart on the image, but you get digital zoom (i.e. fake zoom) not optical zoom.

  • Note the flash icon in the top-right on the Android picture. Currently, flash is turned off; the iPhone flash icon is on. In either case, tap on the lighting bolt to get flash options.

  • Beside the flash icons are icons for HDR+ for extra bright images and for the self-timer. Touch to change. (Not all smartphone camera apps include HDR).

  • Note the other icons on the top of each camera - tap on them to explore these options! The 3 lines on the top-left of the Android camera drops down options: Panorama, Slow Motion, Settings and more. The iPhone offers similar options along the bottom.

iPad camera
See: iPhone/iPad Camera: The Ultimate Guide and Your complete guide to the Android camera and How to Get the Most Out of the New Google Camera for Android and Tips and Tricks for Better Smartphone Photography

Digital zoom: You can barely see the heron in the original photo on the left, taken with my smartphone camera. It's more visible with the photo taken with the phone's digital zoom. But notice that the feathers on the edge of the bird (especially the lower-right) appear 'pixellated'. Magnifying it even more simply makes the image more pixellated - digital zoom doesn't give you any additional detail - it just makes the dots in the original photo larger.

Heron - no zoom
Heron with digital zoom

Another example - the first photo was taken with my Nikon S7000 with no zoom. The middle photo was taken with my iPhone 6, zooming in (with digital zoom) to the maximum. The third photo was taken with the Nikon S7000 using optical zoom - I could have zoomed in further. The digital zoom photo looks okay - but it's been reduced in size from the original, reducing pixilating. Click on it to see it full-sized - you may start to see some fuzziness. On your computer, press Control + to magnify it (Command + on a Mac)... you'll quickly start to see a loss of clarity. Do the same with the Nikon's optical zoom photo - full-sized, you see much more detail and clarity, even after you magnify it further with Command +

Habour Centre - Nikon S7000 no zoom Harbour Centre iPhone 6 optical zoom
Harbour Centre Nikon S7000 optical zoom

Taking better pictures:

We can all point a camera and click to take a photo. You can learn to take better pictures by slowing down and thinking first and shooting later. Among the things to consider:

Focus:

What is the subject of your photo? It doesn't have to be in the center - in fact, many photos look more interesting if the subject isn't in the center - but your subject probably needs to be in focus! Your camera may have an autofocus feature that's turned on automatically - on-screen, you may see the camera put squares around what it thinks are the focus areas. But sometimes the camera guesses wrong. For instance, your camera may assume that whatever is in the center of the image is the focus.

You can manually control the focus putting what you want in focus and pressing your finger halfway down on the shutter button. Keep your finger there to hold that focus and then move the camera to frame the way you want it. Once the frame is properly composed, press your finger down all the way to snap the picture.

The first image is out of focus - the second was improved by focusing on the banner on the wall. Doing that even improved the focus of the wood on the fire and the people on the left of the building.
fuzzy bonfire
In focus bonfire
Long zoom - fuzzy image
Poor focus isn't the only cause of fuzziness, however. In this photo, it's the result of shaky hands.

The photo was taken at night, which means the shutter was open longer, giving more opportunity for my hands to tremble holding the camera. As well, it was taken with a long zoom to try to catch the details of the top of the clock on the distant tower. The magnification of the long zoom also magnifies any shaking.

The photo could have been significantly improved if I had the camera on a tripod to hold it still. In a pinch, resting the camera on a wall would have helped.

No tripod or wall was available - the result was a more or less unusable photo.


Take control of the flash:

Auto-flash has ruined more photos than any single thing I could name - sometimes you need flash to light up your photos, but more often its harsh light adds glare, bright reflections and washed out, over-exposured colours. Professional photographers usually use a removable flash and point it away from the subject, often pointing it at a reflective 'umbrella' to soften and spread out the flash. You don't have that option.

Note as well that the flash on most small cameras has a very limited range - about 10-15 feet at most. That means everything close by is brightly lit, while everything further away is in the dark - you'll see lots of flash photos with exagerrated contrast between overlit foreground and overly dark, under-exposed background.

Learn how to turn off auto-flash. (The icon is usually some sort of lightning bolt). On the S-7000, pressing up on the multi-selector shows a set of flash options on-screen. The lightning bolt with a line through it indicates that the flash is off. On some cameras, pressing a button pops the flash up - in that case, it's easy to control whether the flash is on or not. Even in a relatively dark room you may find you take better photos with the flash off - at least of things that are staying still.

You can try taking the same picture with flash on and off - with it off, you'll probably have a slower shutter speed, so you may get motion blur, but you'll also probably have more natural colours.

Flash may be surprisingly useful, though, on a bright sunny day - if your subject's face is dark and in shadow while everything in the background is brightly lit, try turning the flash on - with it lighting up the subject there will be better balance between foreground and background.

It's all about the quality of your light

Photography is all about light. We often don't notice the quality of light, but the colour and clarity changes at different times of day and in different weather - 'grey' overcast days vs bright sunnt days. Sunlight is harshest around noon, while the increased shadows earlier and later in the day can make more interesting photos. Photographers talk about 'golden hour' a bit after dawn and before sunset when landscape and portrait photos are lit up with a special golden hue.

Here are three images of the Duomo (cathedral) in the Italian town of Orvieto in different light, including golden hour:

Duomo 1
Duomo 2
Duomo 3 - golden hour

Here are two more photos of the Orvieto Duomo - neither of which I took - to show how the same scene can be captured even in bad weather if you have a good eye for an image:

More Duomo
Duomo reflection

For more - the article: Technique Tuesday: Quality of Light & Time of Day - shows a series of photos of the same landscape taken at different times of day.

Take advantage of reflections, windows, framing, etc.


That last photos of the Orvieto Duomo reminded me - take advantage of reflections, or natural framing created by windows, doorways, archways, etc. This photo (not one of mine!) uses the arch of the bridge for a bit of framing and gets a wonderful reflection of the bridge (and the tree-covered mountain) in the lake to create a striking image.

See how the second image (also not mine) uses the passageway to frame the streetscape below - perhaps more effective than just a view looking down at the same vista.


If your color's off check the white balance:

Different types of artificial lighting accentuate different parts of the colour spectrum. Our eyes and brains quickly get used to this and learn to ignore it - but our cameras are more objective. The auto white balance setting tries to adjust for different sorts of lighting, but sometimes fails - my jeweler wife Linda takes lots of close up photos of her work; using auto white balance, her camera often gave her photos a blue tinge. Fiddling with the white balance settings of her camera let her take more natural-looking images.
Bridge Framed by an arch

Here are three photos of the same piece of jewelry my wife took - with the auto white balance, the photo is too blue. Her first try at adjusting was too yellow. Finally she got a realistic-looking shot:

Too blue!
Too yellow
Just right!

Here are two more images of the same scene, but with very different colour balance. Let's see what happened:

Oops!
Ahh!
I was taking photos indoors at the Biennale in the Italian town of Viterbo in the basement of a medieval stone building - all the photos I was taking had a reddish cast like the image on the left. I assumed it was the result of the dim indoor light. Then I noticed that my camera was still in 'Sunset mode' from the night before.
Switching to 'Auto mode' got me the image on the right - note that both photos were taken without flash - the image on the right is actually a bit clearer and brighter than 'real life'!

Exposure: If there is a large difference in lighting between different parts of your photo, your camera can have problems knowing how it should adjust - to the bright part? To the dim part? Unless you tell it otherwise, it will tend to assume that whatever is in the center is what should be emphasized. Look at the photo below:
Dark people Because the center of the image was so brightly lit, the camera toned down the light  - making the people in the front even darker than they appeared 'in real life'. There are a couple of things that could have been done to prevent this - but weren't.
  • Putting one of the people in the center and half-pressing the shutter button would have made that person the focus - and set the camera to emphasize the light-level of that part of the camera. Leaving the finger that way, then the camera could have been moved to the desired framing - the resulting photo would have the people properly exposed (while the background would have been overexposed)
  • Alternatively, the S-7000's multi-selector switch has an exposure selector - pushing on that would give the photographer options to over-ride the automatic exposure settings, over-exposing (to brighten) or under-exposing (to darken) the overall image. Different cameras will have different ways to access the exposure settings - learn how to do it on your camera. Just remember to put things back when you're done!
  • Perhaps the simplest way to have taken a better photo in this situation would have been to turn on the flash - that would have lit up the people in the foreground while not affecting the lighting on the background.
On Auto
Brighter exposure
Use your camera's pre-set scenes:

Most cameras these days - including many smartphone/tablet camera apps - have a set of scene modes: pre-sets for specific commonly-encountered situations. Here's the list for my Nikon S-7000:

Scene menu

Become familiar with the list on your camera and use them as needed.

Use macro for closeups:

No macro
Macro on
In its standard modes, your camera propably can't focus well on anything closer than about two feet away.

Tying to take a closeup of the red flower in standard mode got us the fuzzy image on the left.

Switchin on 'macro mode' - on the S-7000 using the tulip icon on the multi-selection switch - got the much clearer image on the right.

Again, your camera will have its own way of letting you access macro mode - learn how to enable it, and again, remember to turn it off when you're done!

HDR


HDR (High Dynamic Range) is wildly popular these days - when you see landscape photos with seemingly exagerrated colours in clouds and sky, those shots may have been made with an HDR (or HDR+) setting.


Sunset on Lake Como
No HDR enhancement here! (Lake Como)

"Instead of just taking one photo, HDR uses three photos, taken at different exposures.... In the case of HDR on smartphones, your phone does all the work for you—just snap your picture and it'll spit out one regular photo and one HDR photo. The result is something that should look more like what your eyes see, rather than what your camera sees." (
What Is HDR: Concepts, Standards, and Related Aspects and When to Use HDR Mode When Taking Photos)

In fact, while many photos - think sunsets, skies, clouds - generally seem less colourful than we remember 'real life' many HDR images seem a bit over the top, at least to my eyes. I wish I'd seen a Venice evening that colourful! (Not my photo!)


Below are two images of more or less the same vista taken a moment or two apart on a snowy morning at Vancouver's New Brighton Beach Park. The one on the left was taken using my smartphone's standard photo settings, the other with HDR.

Note how much more intense the blue in the sky is on the image to the right, how there is greater contrast from grey to white in the clouds, and how the shadows in the footprints in the snow are darker.

Since your camera is snapping 3 images when you use HDR settings, it will take longer to snap and save the shots. Not recommended for action photos!
No HDR
HDR

Compose your shots:

Get in the habit of thinking in terms of The Rule of Thirds - mentally draw lines to divide your camera screen into thirds horizontally and vertically. Try to line up the horizon with one of the horizontal lines. Place verticals - edges of buildings, people, etc - along one of the vertical lines. The result will be an image that is more interesting than if the subject is smack dab in the middle.

Look at the photo on the right (again, not one of mine) - laundry hanging across a canal in Venice. Notice how the right-hand edge of the brick building on the left and the left-hand edge of the building on the right make strong vertical lines at (more or less) the 1/3 and 2/3 mark.

As well, the top of the line of laundry makes a horizontal line approximately 1/3 of the way down.

Finally, the two people in the lower-right hand corner are in the lower-right square formed by the imaginary horizontal and vertical lines.

Your camera - including smartphone cameras - may have an option to add horizontal and vertical gridlines to the viewfinder to help compose your photos using the Rule of Thirds - and to help you get the horizon level. You may want to look for the option to turn these on - note that the gridlines won't show up on your actual photos!
Venice with laundry - rule of thirds

Think about background and foreground in your photo.... adding a person, a flower, etc in the foreground makes for a more interesting photo than one that's only background.

Street- no person
Street with person

A nice discussion: 3 Simple Landscape Photography Tips to Improve Your Images

Duomo with soldiers Tell a story - a photo with a story is more interesting than one without. The photos of the Orvieto Duomo up above show a beautiful building, but that's all.... the photo of the Duomo with the Italian soldiers with submachines guarding it against possible terrorist attack has a story to tell, and is certainly more interesting than the same photo if it had, say, a couple of tourists eating gelato looking across the square at the Duomo.

See: How to Compose a Photograph: 5 Essential Rules to Follow and 10 Quick Tips to Fix Your Bad Photos

More Links....