Microsoft no longer sells or supports any version of Microsoft Works - if you are using Works and have a collection of word processor and spreadsheet files, you can use the MS Works File/Save As command and save them in Microsoft Word (*.DOC) or Microsoft Excel (*.XLS) formats - unfortunately, you have to do this one file at a time. The newly-saved versions can then be opened in a more modern program: Microsoft Office or the free LibreOffice suite.
If you have saved MS Works database files, however, you have more of a problem. MS Office, LibreOffice, etc will not work directly with MS Works database files. You're not completely out of luck, however - you can save your database data in a spreadsheet format (or view it in List view - which looks like a spreadsheet or table), select it all, then copy and paste it into a Works spreadsheet.
Either way, once you have the data in a spreadsheet, you can save it in Microsoft Excel (*.XLS) format and open it in Microsoft Excel, LibreOffice, etc. Doing that will lose your data entry form design - but at least you'll be able to access your data!
Databases are collections of organized information... the phone book (white pages) is a common database. Databases are organized by records and fields.
-- Fields and the categories of information... in the phone book, name, address, & phone number
-- a Record is a set of data-- one for each field. Alan Zisman, 2684 E. 2nd, 713-4705 would be one record in the phone book.
Unlike word processors and spreadsheets, you really need to think about how to organize your database prior to entering data... a database is not free-form. Think about how you’re likely to use your data-- if you want to be able to treat first and last names separately, you will need to have them in separate fields. Similarly, you may want to separate street address, city, province, postal code (in an address-book database).
As well, before entering data, decide on a consistent manner... if you made a database of your CD collection, would you list artist Shania Twain as‘Twain, Shania’? How about Backstreet Boys? There are not necessarily right answers... but you need to be consistent.
We’re going to create and use a database to list our (real or fictitious) music collection-- CDs, tapes, old LPs, etc. Start MS Works, and click to start a new database... You’ll see:
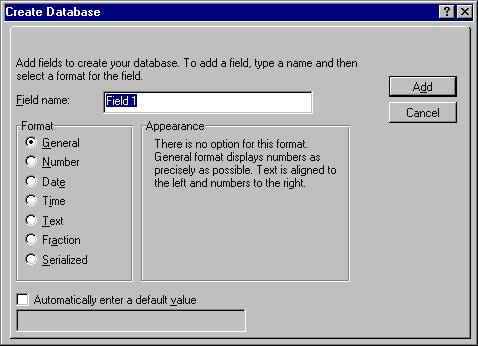
We’re being prompted to add fields and (optionally) identify their data-type and default value. Create the following fields:
Title Artist Format Genre (all text-format)
Year Rating (number-format, 0 decimal places)
(Why didn’t I pick Date-format for ‘Year’?)
When you’ve pressed Add for each of those fields, press Done.
(In older versions of Works, you aren’t prompted to create fields-- instead, on the blank page, to create a field, type the field-name followed by a colon: Title: You’ll be prompted to enter a size for the field-- the maximum number of letters you expect to store).
You should see something like this:
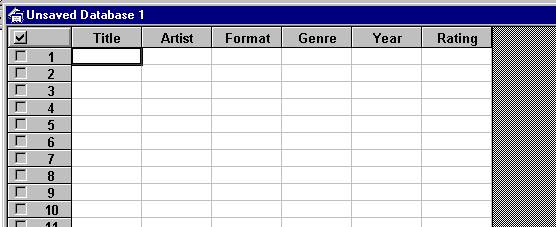
This is showing you your empty database, looking something like a spreadsheet-- with the fields as the vertical columns, and each (empty) record as a horizontal row. In database-speak, this is known asList View. You could enter your data this way... but it might be easier to switch to Form View-- click the View menu’s Formitem to see:
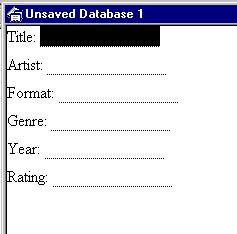
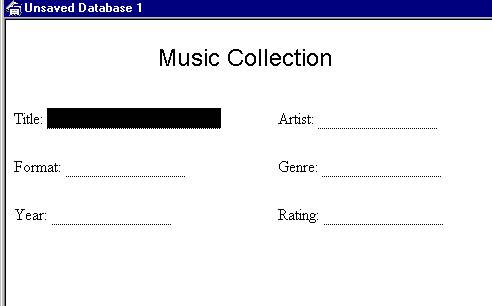
Here, you can enter the data as if on a paper form... one record at a time. But this default form isn’t very attractive... we can spruce it up, by choosing View/Form Design.
Here, you can drag the fields around the page, change the font, size, and style used in the field name, enter other text, like a title or instructions, add borders, shading, graphics, etc. To make the dotted line for the data for each field larger or smaller, click on the dotted line and drag it to the desired size, or use the Format/Field Size menu item.
(Earlier versions combine the Form Form Design views-- and don’t let you resize fields by drag and drop-- use theField Width menu item).When you’ve gotten a more attractive form design, return to Form View (using the View/Form menu item).
Now we can start entering data. Remember-- set rules for how to enter your data... for instance:
Title: write initial words like “the” or “a” at the end: Greatest Hits, The
Artist: for person’s names, last name first: Twain, Shania
for groups, group name, ‘the’ last: Beatles, The
Format: cassette, CD, LP, 45, 8-track, other
Genre: pop, rock, metal, jazz, alternative, folk, classical, opera, etc
Year: 4- digit year 1995,not 95 or ‘95
Rating: a number from 1 to 5, where 5 is best
To enter data, notice that the first field is highlighted... type your first title. You could move to the next field by clicking with the mouse... but instead, press the tab key. Notice that pressingtabmoves you from field to field. Holding down the shift key when you press tab moves you backwards through the fields.
Notice the controls on the bottom-left of the window:
![]()
These tell you what record you’re currently working on, and let you move back and forth through the records of your database:
|< moves you to the very first record
< moves you back one record
> moves you forward one record
>| moves you to the last record
As well, when you enter data in the last field on the page, and press tab, you get an empty form for the next record, ready to enter data. (Remember, shift + tab will back you up to the previous record).
Enter data for five records... if you discover that you’ve made a mistake in how your fields or the data are appearing, you’ll need to go back to Form Design view to make changes... for instance, if your dates are appearing as1995.00, you forgot to set the number of decimal points at ‘0’. Go to Form Design view, and click on the data-part of that field... choose Format/Field from the menus, and re-set the number of decimals to 0.
Form view is perhaps the clearest way to enter data... but it’s less useful if you want to see all the data, and perhaps draw conclusions from it. Switch back to List view (using the View/Listmenu item).

In list view, you can sort your information in various ways... alphabetically by title, or by Artist, or by year, or whatever... with larger databases, it makes sense to sort by multiple criteria-- perhaps by Year, then by Artist, then by Title.
Use the Record/Sort Records menu command to see:
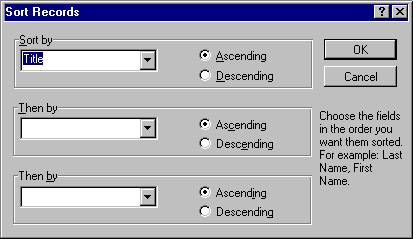
Notice that you can choose up to three fields to sort, choosing them from drop-down lists (so you don’t have to remember how to spell the field-names correctly!), and set each ascending or descending-- so you could sort with the earliest year first (ascending) or the more recent first (descending).
Often, simple sorting will give you valuable information.
For more detailed information, we might want to ask the database a question. Older versions of Works call this a Query. Works 4 calls it a Filter. (In the Tools menu).
Typically, you should first sort the records, then apply a filter (or query)... that way, the filter results will be sorted as desired. Check the following:
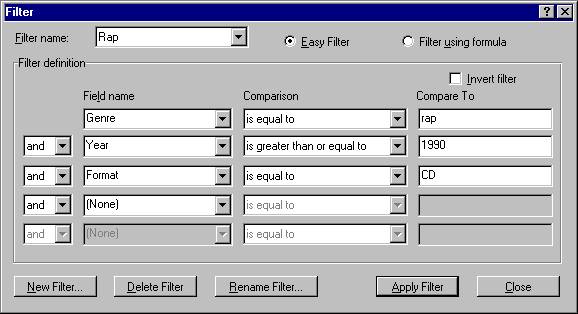
See how it would only show records that were Rap from the 1990s on CD (if any)... the results would show up in List view.
Sorts and Filters can be used to get all sorts of answers from a database... and that’s the whole point-- storing data is only valuable if you can convert it into information-- data that answers a question, giving it meaning.
Another use for databases is in producing reports-- in this case, a report is a printout of some of your information. You may want to sort and filter your data before producing a report... the report would, in that case, show the results of those actions.
To produce a report, click on Tools/Report Creator. (Earlier versions of Works made you do all this manually, using Tools/Report). Give your report a meaningful title-- you can save up to 8 reports with your database, and remembering which is Report 6 is difficult!
The first window of the Report Creator looks like:
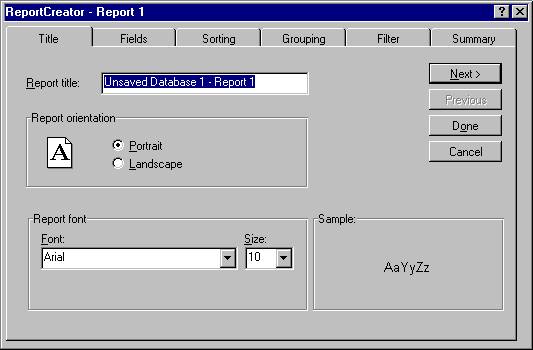
and simply checks the title, font, and how you want it to print-- vertically or horizontally. Next takes you to theFieldspage:
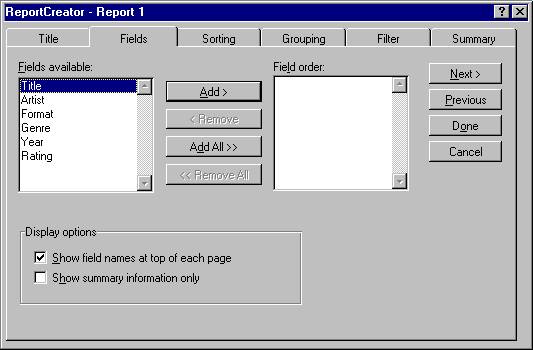
This lets you choose which fields you want to appear in a report... so a filter is a sub-set of the records, a report gives a subset of the fields.
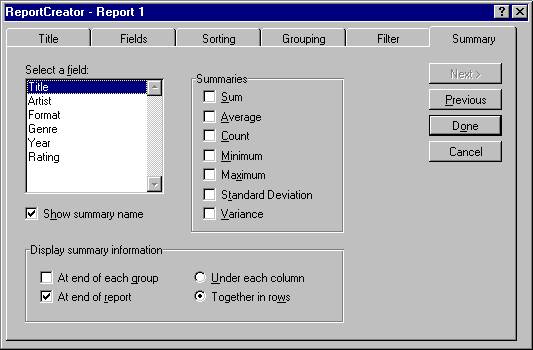
The next pages let you sort and filter your records (if you haven’t already done so). The final page lets you include some basic statistics about the data:
When Done, you’ll see something like this:
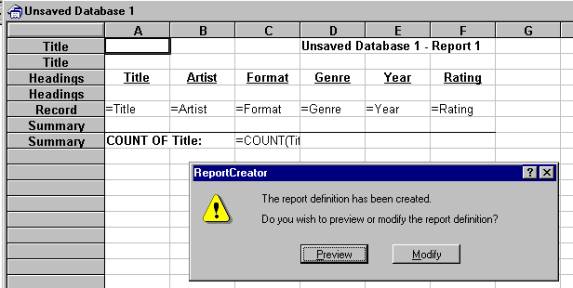
Preview gives you a Print Preview screen, showing how the report will look when printed... Modify gives you the above-page, without the dialogue box (which is also what you get when you leave Print Preview).
In this mode, you can make the columns wider or narrower (drag the tabs on the top), change the title’s font and size, etc... preview the results before printing.
Other uses of databases involve merging their information with your word processor, for creating form letters, report cards, labels, etc.
Here, we want to first create a database with the desired information... with that file open, we’ll merge it with the word processor.
Let’s use the Music collection information you previously created.
We’re first going to merge the information into a set of bogus-personalized fan letters... so start a new word processor document.
Type the contents of a typical gushy fan letter... we want to tell Madonna (etc) how much we loved her CD Like a Virgin, and how it was our favorite CD of the year 1988 (or whatever)... and automatically do the same for each other artist in the database.
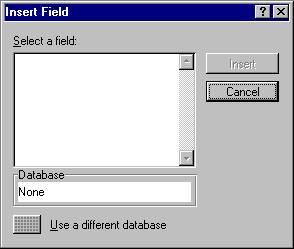
Type your letter... but where you come to items like the artist’s name, the CD name, the date (etc), don’t type anything. Instead, from the Insert menu, choose Database Field. You’ll see:
Click the Use a Different Database button to be able to select your database... when you do that, you’ll get a list of the fields in that database:
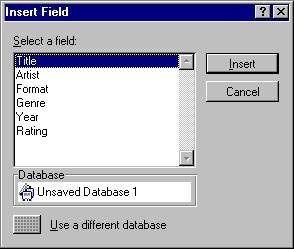
Select a field, and click the Insert button, followed by the Close button... in your text, you should see something like:
Dear <<Artist>>
Type punctuation after the brackets, and continue, inserting the appropriate database fields where needed.
When finished, Print Preview. You’ll be asked if you want to preview all database records-- say ‘Yes’. Notice that you get your letter, with the database information inserted... clicking Nextshows you the next fan letter.
If you only wanted form letters to some of the artists, filter the database first.
(In real life, you might want to print... not now, please!)
--Note: In Works 4 only, there’s a Tools/Form Lettermenu item, that helps walk you through the process. Similarly, let’s take a look at the Tools/Labels menu item... it asks you to choose between multiple copies of a single label, or labels... implying printing a sheet where each label uses a different database record. Pick labels.
You get instructions, followed by a page allowing you to pick from standard label sizes or enter a custom size... next, you’re prompted to select a database, The Recipients page lets you choose what you want to use from your database (again, you may want to sort and filter the database first).
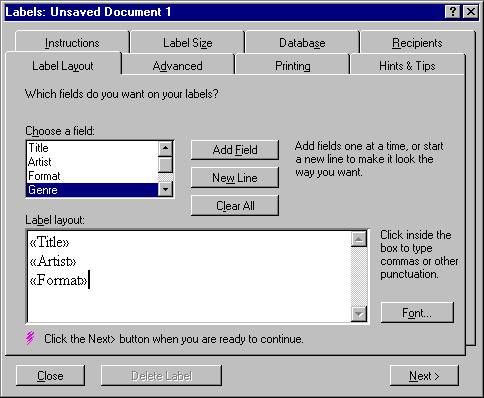
The Label Layout page lets you select the fields to use and the layout on the label, and shows you a sample label... If you type text in the sample, it appears on every label-- for instance, a comma, in between City and Province fields in an address.
It’s a good idea to Preview and Test before printing... use standard paper rather than label paper for your tests... maybe even do a test of one page of your label set, and line it up with your label paper to see if it seems to fit.
And remember to only use label paper that’s clearly marked as being appropriate for your type of printer-- laser or inkjet, for instance... having labels come loose and stick inside your printer can be a real mess!