ALAN ZISMAN ON
TECHNOLOGY
Adding (and deleting) a new user in Windows 10 or 11
By Alan Zisman ©2022-03-29
Some time, you're going to have to add (or remove) a user on your Windows computer. You can bet on it happening sooner or later. Here are some possible scenarios:
-- you get in a new relationship and are suddenly sharing your computer with somebody new. You could share the same user account and each have access to the other's documents, photos, emails, and stuff. But do you really want to do that? (Think sharing a toothbrush - or letting the new significant other see the photos of your ex and the ex before that, and your embarassing high school photos).
-- your grandchildren come over and want to use your computer. What does the Delete key do, grandma?
-- you're selling your old laptop; you'd like to show it to the potential buyers working, but don't want to give them access to your stuff.
In all those scenarios and many others, it makes sense to add a new user. When you do that, the new user has their own log-in and password, along with their own Desktop, Documents, Pictures, Music and other personal folders.
At the same time, it's useful to know how to delete a user - maybe you've broken up with that no-longer new relationship. Or you've sold the old laptop and you want to get your stuff off it before handing it over to the new owner.
There are two distinctions you need to know in all this: local user vs network login vs Microsoft account and limited user vs administrator.
-- A local user is what most of us are used to - a local user's account is solely on a single computer; their password and user data are only on that computer. If you connected to a work or school network, though, you may have a had a network account - that let you log in using any computer connected to the local network and access work (or school) saved files (and maybe applications) stored on that local network. Microsoft is pushing something similar with Windows 10 and 11 - in this case, they really (really!) want you to set up a network log-in using Microsoft's cloud network service OneDrive. In earlier version of WIndows (and using other devices like Macs, iPhones/iPads, or Android phone or tablets), you can optionally set up a and access Microsoft Office online, store files on OneDrive, use Microsoft's cloud-based Outlook email and more.
Logging into a Microsoft account on a Windows 10 or 11 computer has some useful features - your password, desktop wallpaper, Internet shortcuts (at least for Microsoft's Edge web browser) and more, are stored securely online 'in the cloud' - and magically appear if you log in using a new computer, for instance. Some people, though, are uncomfortable having that sort of information 'out there' and prefer keeping them on a computer under their control.
With Windows 10 and 11, though, Microsoft is making having and using a Microsoft account much less optional and more a requirement.
With Windows 10 and 11, when you first set up a new machine, Microsoft now only shows the option of creating an initial user account using a Microsoft account log-in. With Windows 10, if you're setting up a new computer and don't have an Internet connection, you'll get the option to create a local account. With Windows 11 (Home version), that's no longer an option - you can't set up a new computer without an Internet connection.
But both Windows 10 and 11 allow you to log-into a Microsoft account and then create new local accounts - and if you choose, you can then log-into that local account and delete the initial Microsoft account. If that's what you want to do.
-- The first account set up on a new computer is an administrator for that computer. That's the sort of account that most of us are used to - Administrators have the power to install new software, delete files, and add and delete new users. With this power, however, comes dangers. Some files you delete may, in fact, be required by your computer. And clever malware may take advantage of an administrative account to install itself onto your computer. And I don't want to think about what my 7 year-old grandson could do if he was on my computer logged-into an administrative account.
In fact, most of us don't need the power of an administrative account most of the time. So when you create a new user account, by default it's set as a limited user - users logged into a limited account can access their own files, photos, music, etc. They can run most software installed on the computer. But they can't do anything that affects other users or the computer as a whole - at least not without using an administrative user's log-in and password. And that means that malware has a much harder time installing itself as well, since most malware is trying to infect the computer as a whole.
One of the best ways a computer user (Windows or Mac) can protect their computer from malware is to create a limited user account and use that account for their every-day computer use. Most often, if they try to do something that requires administrative access, they'll be prompted for the administrative account password - only rarely will they be required to actually log-in as the administrative user.
(Sadly, I know that most folks won't bother doing this - but it IS the best way to keep your computer malware-free).
Okay - enough background. How do you actually go about doing any of this stuff?
Almost all of this is the same for Windows 10 and 11... in both cases, you want to start out by opening your Preferences - perhaps by clicking on the little gear-wheel icon in your Windows 10 or 11 Start Menu, and then finding a section labelled Accounts:
In Windows 10's Preferences, find Accounts and double-click; Windows 11's Preferences, you'll see Accounts in a column on the left - click it and the various options appear. Here's what you'll see in Windows 10:
You'll see basic information about the user account you're logged into - in my case, a Microsoft account set as Administrator.
To add or delete another user, in Windows 10 you need to click (in the left-hand column) on Family & other users. In Windows 11, in the column on the right (in the image up above), you'll see separate items for Family and for Other Users. I'm imagining that I'm creating a new account for the person I'm selling my Windows 10 laptop to - so I want to create an account for an 'other user' - once you've chosen 'Other User' the steps are the same for both WIndows 10 and 11 - but in Windows 10 you have one more step to get there:
In Windows 10, I have to choose between adding 'a family member' or adding 'someone else' to this PC...
Notice that Microsoft wants to make that new account a Microsoft Account - if that's okay, you can add the email or phone number that the person getting this new account uses to sign into their Microsoft Account. (What, they don't have a Microsoft Account or Office 365 account or Xbox account or Outlook-online or Hotmail email account? That should be set-up first. Or...) If you or they want to set up a Local Account click the line that reads I don't have this person's sign-in information.
If you do that, you'll see:
You could use the Get a new email address option, I suppose, to create a new Microsoft Account, but you finally get an option that's clearly labelled Add a user without a Microsoft account - in other words, a Local Account.
And that let's you add a user name and password. If I want to demo my old laptop to potential buyers, I might create a new user named 'User' with a password of 'password' - but if that's not the case for you, you probably want to use something else. (At the same time, I don't think the password for a local account needs to be particularly challenging - it's not like something that online hackers have access to and can try a million possible alternatives - it's to keep your grandchildren from messing with your files).
After you add the user name and password, you're prompted to provide answers to three security questions, chosen from a pre-made list - these questions and answers are used if the user has forgotten their password:
Obviously, to be useful, you need to involve the person who's going to have this account in the choice of question and answer. In my 'user/password' example, I got away with silly answers.
As soon as you've chosen your three questions and filled-in the answers, your user account - in this case 'Some User' - is created, and appears on the last of registered users for this computer:
Note that 'Some User' is listed as a Local account - it doesn't say so, but it's a Limited account, unlike the other account named User listed below it, which says it's also a Local account, but also an Administrator. If you want the new account to also be an Administrator (see above for why you might not want to do that), click on that new user's name - you'll see:
Clicking the Change account type button lets you change from Limited to Administrator. (Or vice versa).
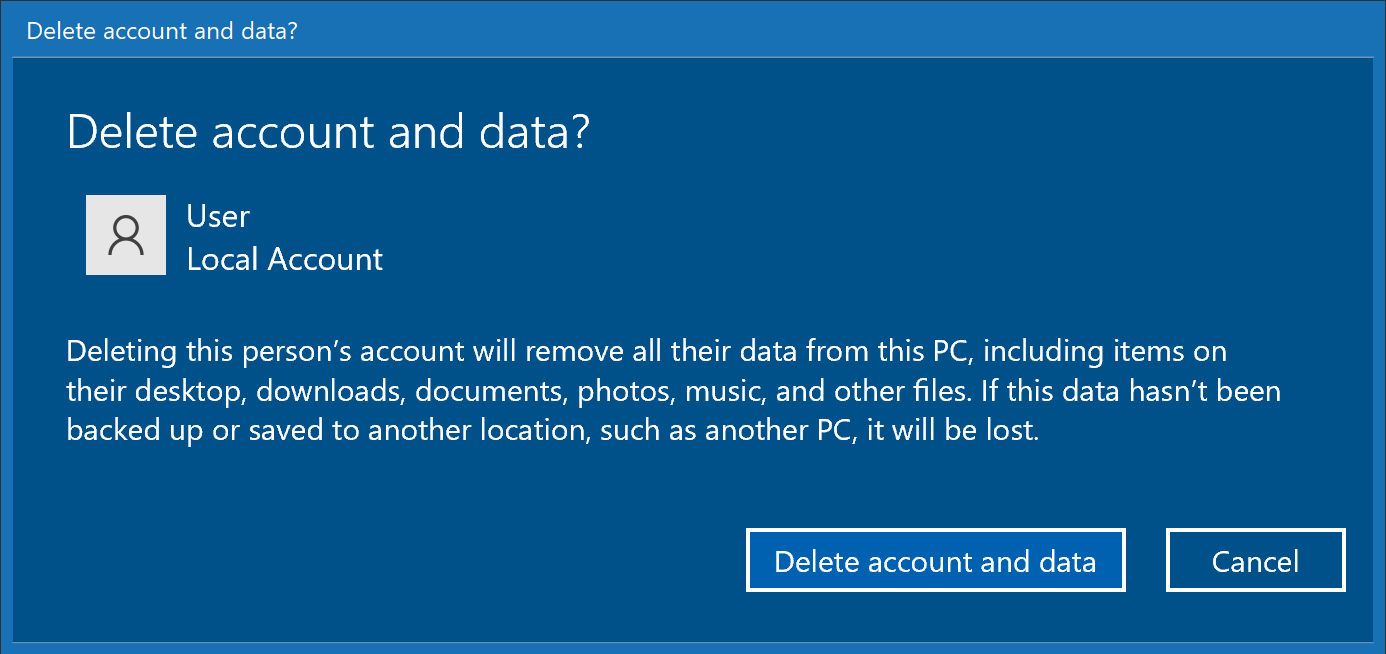
Note that there's also a Remove button - if you're wanting to delete the user. If you click that, you're reminded that you'll be erasing all that user's local folders and files: Desktop, Documents, Pictures, etc.
You can't delete an account if that account is in use at the time - which is possible since more than one account can be logged in at the same time - even if no one is actually using the other account at the moment.
So - let's imagine the scenario where I'm trying to sell my old laptop.
I've created a new local account on it named User with a generic password, made it an Administrator, and used it to show off the computer to the wannabe purchaser. While I was logged into the User account, I deleted my own account - which erased all my user files.
When the new owner gets home with the laptop, they can boot it up, log in as User and create a new account with their name and preferred password - they can make it a Microsoft Account or a local account as they choose, but should set it as an Administrative account.
Then they should log out of User, log into their new account - the first time it runs, it will take a few moments to set itself up and ask the same questions that anyone gets when they start up a new Windows computer for the first time. When that's done, they should delete the User account.
Optionally, they could create a second account, set as a Limited user - and use that for their day-to-day computing for maximum security.
Got it?
Older blog postings....
Adding (and deleting) a new user in Windows 10 or 11
By Alan Zisman ©2022-03-29
Some time, you're going to have to add (or remove) a user on your Windows computer. You can bet on it happening sooner or later. Here are some possible scenarios:
-- you get in a new relationship and are suddenly sharing your computer with somebody new. You could share the same user account and each have access to the other's documents, photos, emails, and stuff. But do you really want to do that? (Think sharing a toothbrush - or letting the new significant other see the photos of your ex and the ex before that, and your embarassing high school photos).
-- your grandchildren come over and want to use your computer. What does the Delete key do, grandma?
-- you're selling your old laptop; you'd like to show it to the potential buyers working, but don't want to give them access to your stuff.
In all those scenarios and many others, it makes sense to add a new user. When you do that, the new user has their own log-in and password, along with their own Desktop, Documents, Pictures, Music and other personal folders.
At the same time, it's useful to know how to delete a user - maybe you've broken up with that no-longer new relationship. Or you've sold the old laptop and you want to get your stuff off it before handing it over to the new owner.
There are two distinctions you need to know in all this: local user vs network login vs Microsoft account and limited user vs administrator.
-- A local user is what most of us are used to - a local user's account is solely on a single computer; their password and user data are only on that computer. If you connected to a work or school network, though, you may have a had a network account - that let you log in using any computer connected to the local network and access work (or school) saved files (and maybe applications) stored on that local network. Microsoft is pushing something similar with Windows 10 and 11 - in this case, they really (really!) want you to set up a network log-in using Microsoft's cloud network service OneDrive. In earlier version of WIndows (and using other devices like Macs, iPhones/iPads, or Android phone or tablets), you can optionally set up a and access Microsoft Office online, store files on OneDrive, use Microsoft's cloud-based Outlook email and more.
Logging into a Microsoft account on a Windows 10 or 11 computer has some useful features - your password, desktop wallpaper, Internet shortcuts (at least for Microsoft's Edge web browser) and more, are stored securely online 'in the cloud' - and magically appear if you log in using a new computer, for instance. Some people, though, are uncomfortable having that sort of information 'out there' and prefer keeping them on a computer under their control.
With Windows 10 and 11, though, Microsoft is making having and using a Microsoft account much less optional and more a requirement.
With Windows 10 and 11, when you first set up a new machine, Microsoft now only shows the option of creating an initial user account using a Microsoft account log-in. With Windows 10, if you're setting up a new computer and don't have an Internet connection, you'll get the option to create a local account. With Windows 11 (Home version), that's no longer an option - you can't set up a new computer without an Internet connection.
But both Windows 10 and 11 allow you to log-into a Microsoft account and then create new local accounts - and if you choose, you can then log-into that local account and delete the initial Microsoft account. If that's what you want to do.
-- The first account set up on a new computer is an administrator for that computer. That's the sort of account that most of us are used to - Administrators have the power to install new software, delete files, and add and delete new users. With this power, however, comes dangers. Some files you delete may, in fact, be required by your computer. And clever malware may take advantage of an administrative account to install itself onto your computer. And I don't want to think about what my 7 year-old grandson could do if he was on my computer logged-into an administrative account.
In fact, most of us don't need the power of an administrative account most of the time. So when you create a new user account, by default it's set as a limited user - users logged into a limited account can access their own files, photos, music, etc. They can run most software installed on the computer. But they can't do anything that affects other users or the computer as a whole - at least not without using an administrative user's log-in and password. And that means that malware has a much harder time installing itself as well, since most malware is trying to infect the computer as a whole.
One of the best ways a computer user (Windows or Mac) can protect their computer from malware is to create a limited user account and use that account for their every-day computer use. Most often, if they try to do something that requires administrative access, they'll be prompted for the administrative account password - only rarely will they be required to actually log-in as the administrative user.
(Sadly, I know that most folks won't bother doing this - but it IS the best way to keep your computer malware-free).
Okay - enough background. How do you actually go about doing any of this stuff?
Almost all of this is the same for Windows 10 and 11... in both cases, you want to start out by opening your Preferences - perhaps by clicking on the little gear-wheel icon in your Windows 10 or 11 Start Menu, and then finding a section labelled Accounts:
 Windows 10 Preferences | 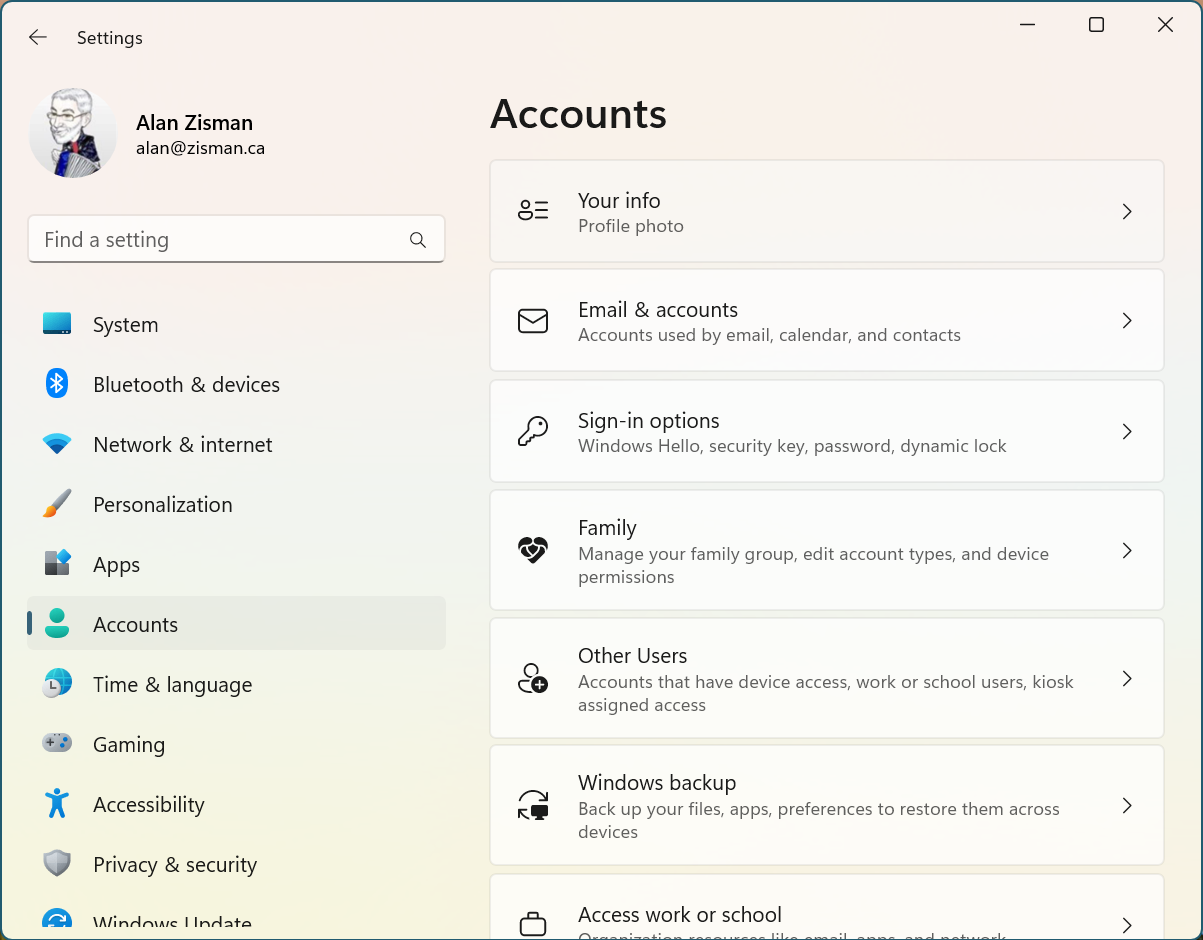 Windows 11 Preferences |
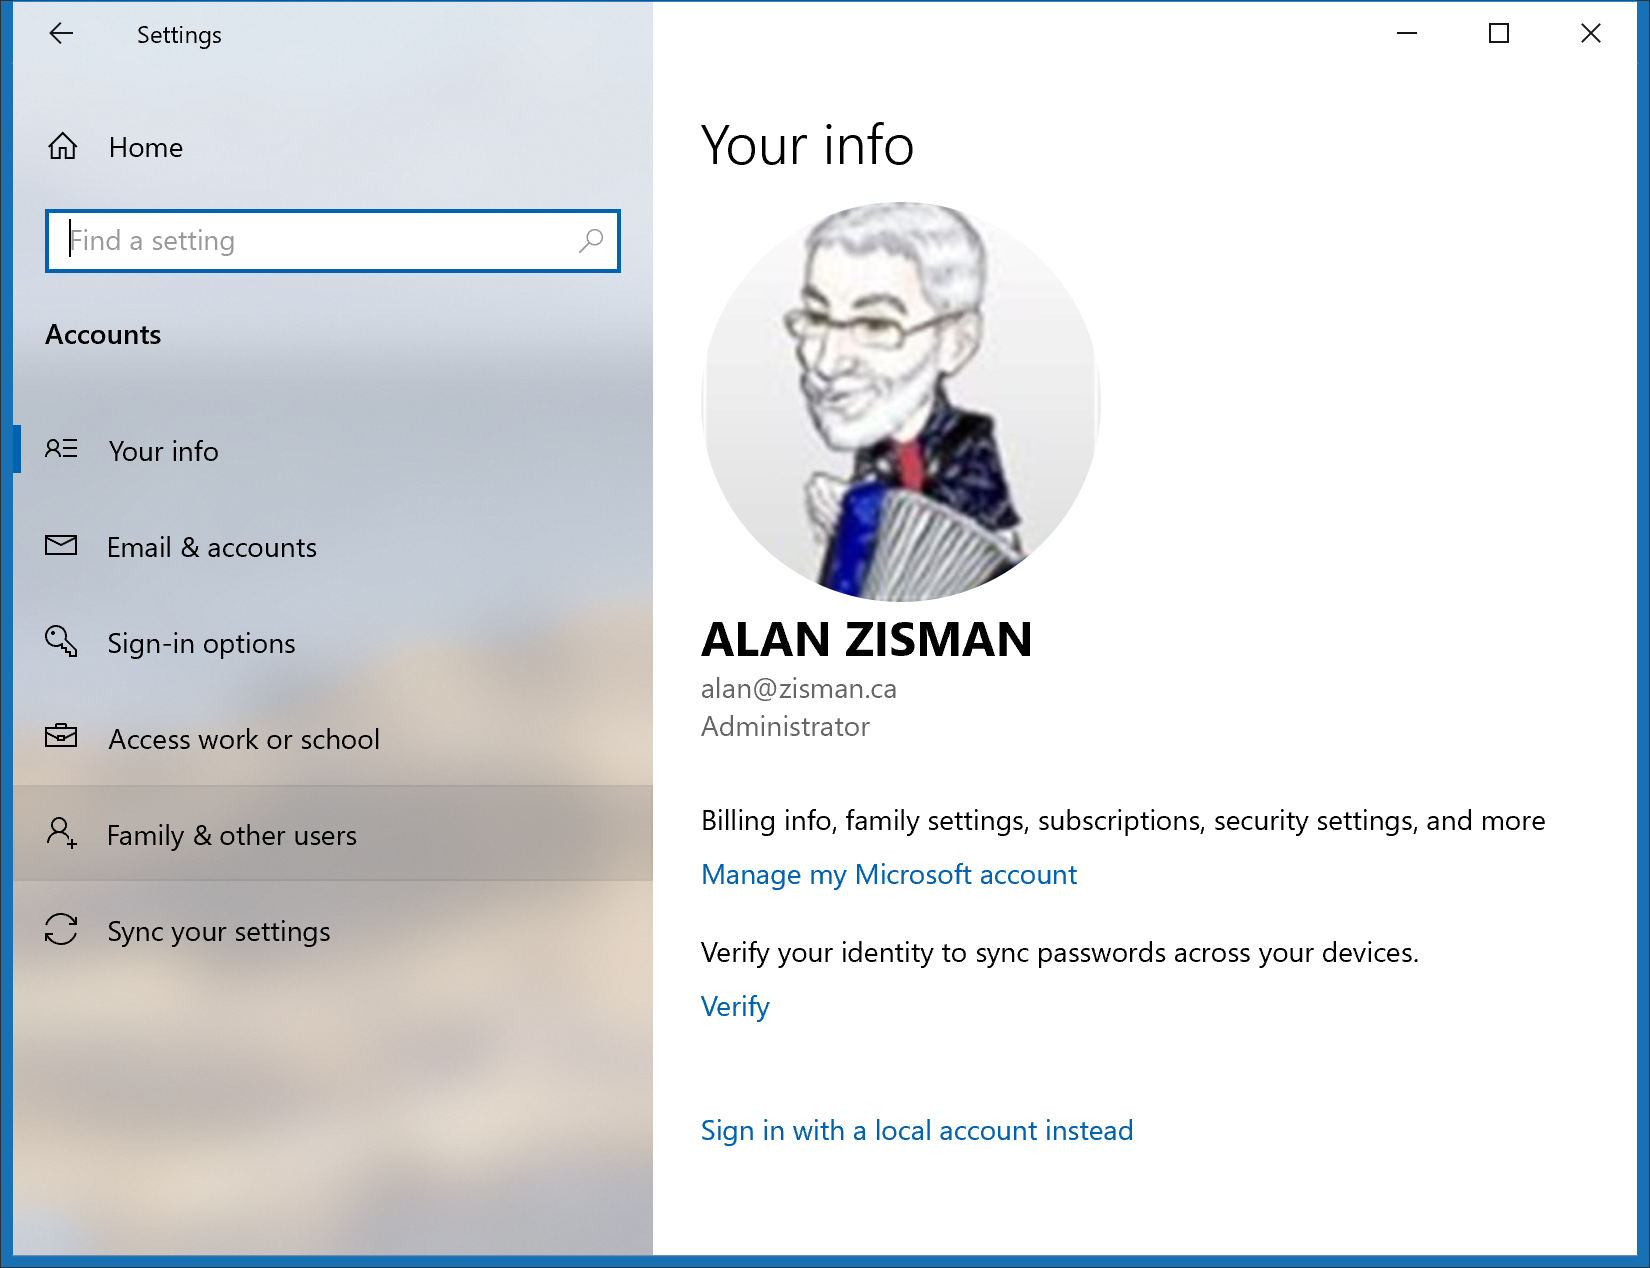
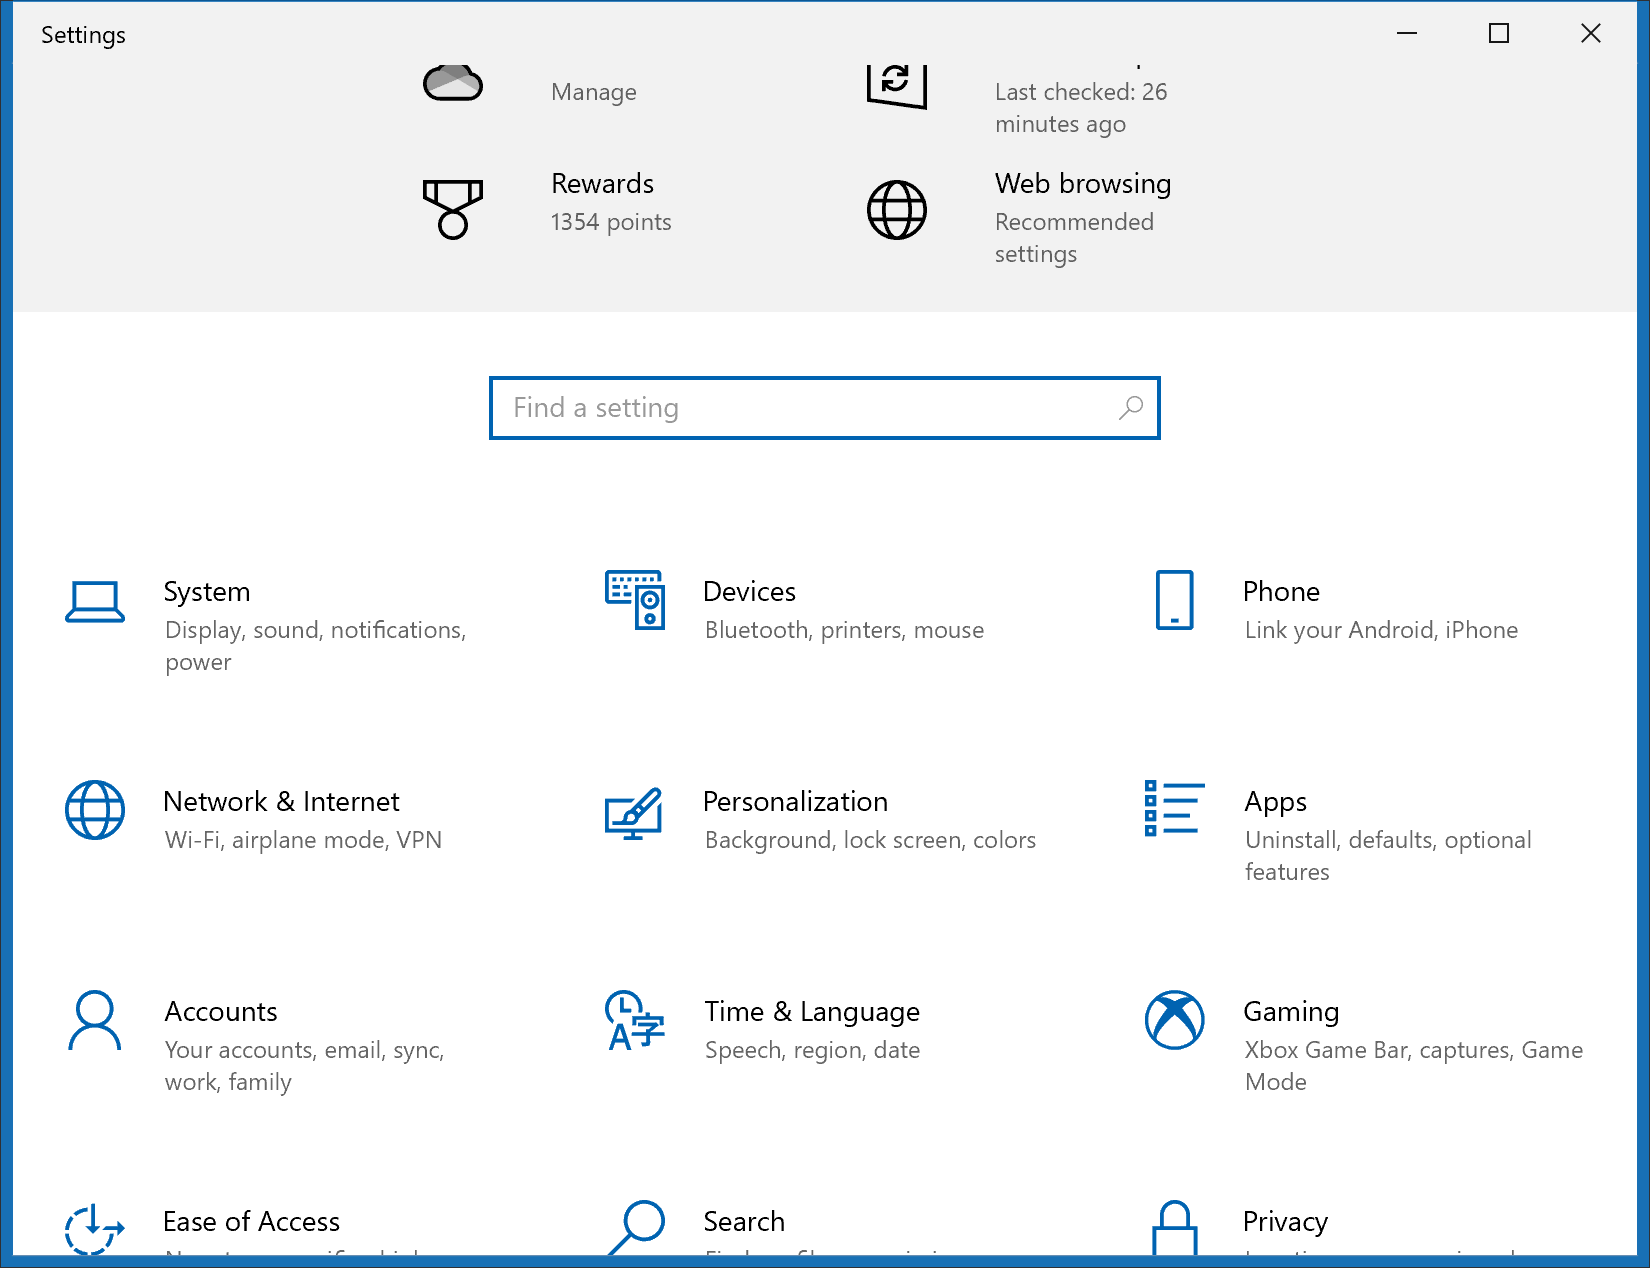
In Windows 10's Preferences, find Accounts and double-click; Windows 11's Preferences, you'll see Accounts in a column on the left - click it and the various options appear. Here's what you'll see in Windows 10:
You'll see basic information about the user account you're logged into - in my case, a Microsoft account set as Administrator.
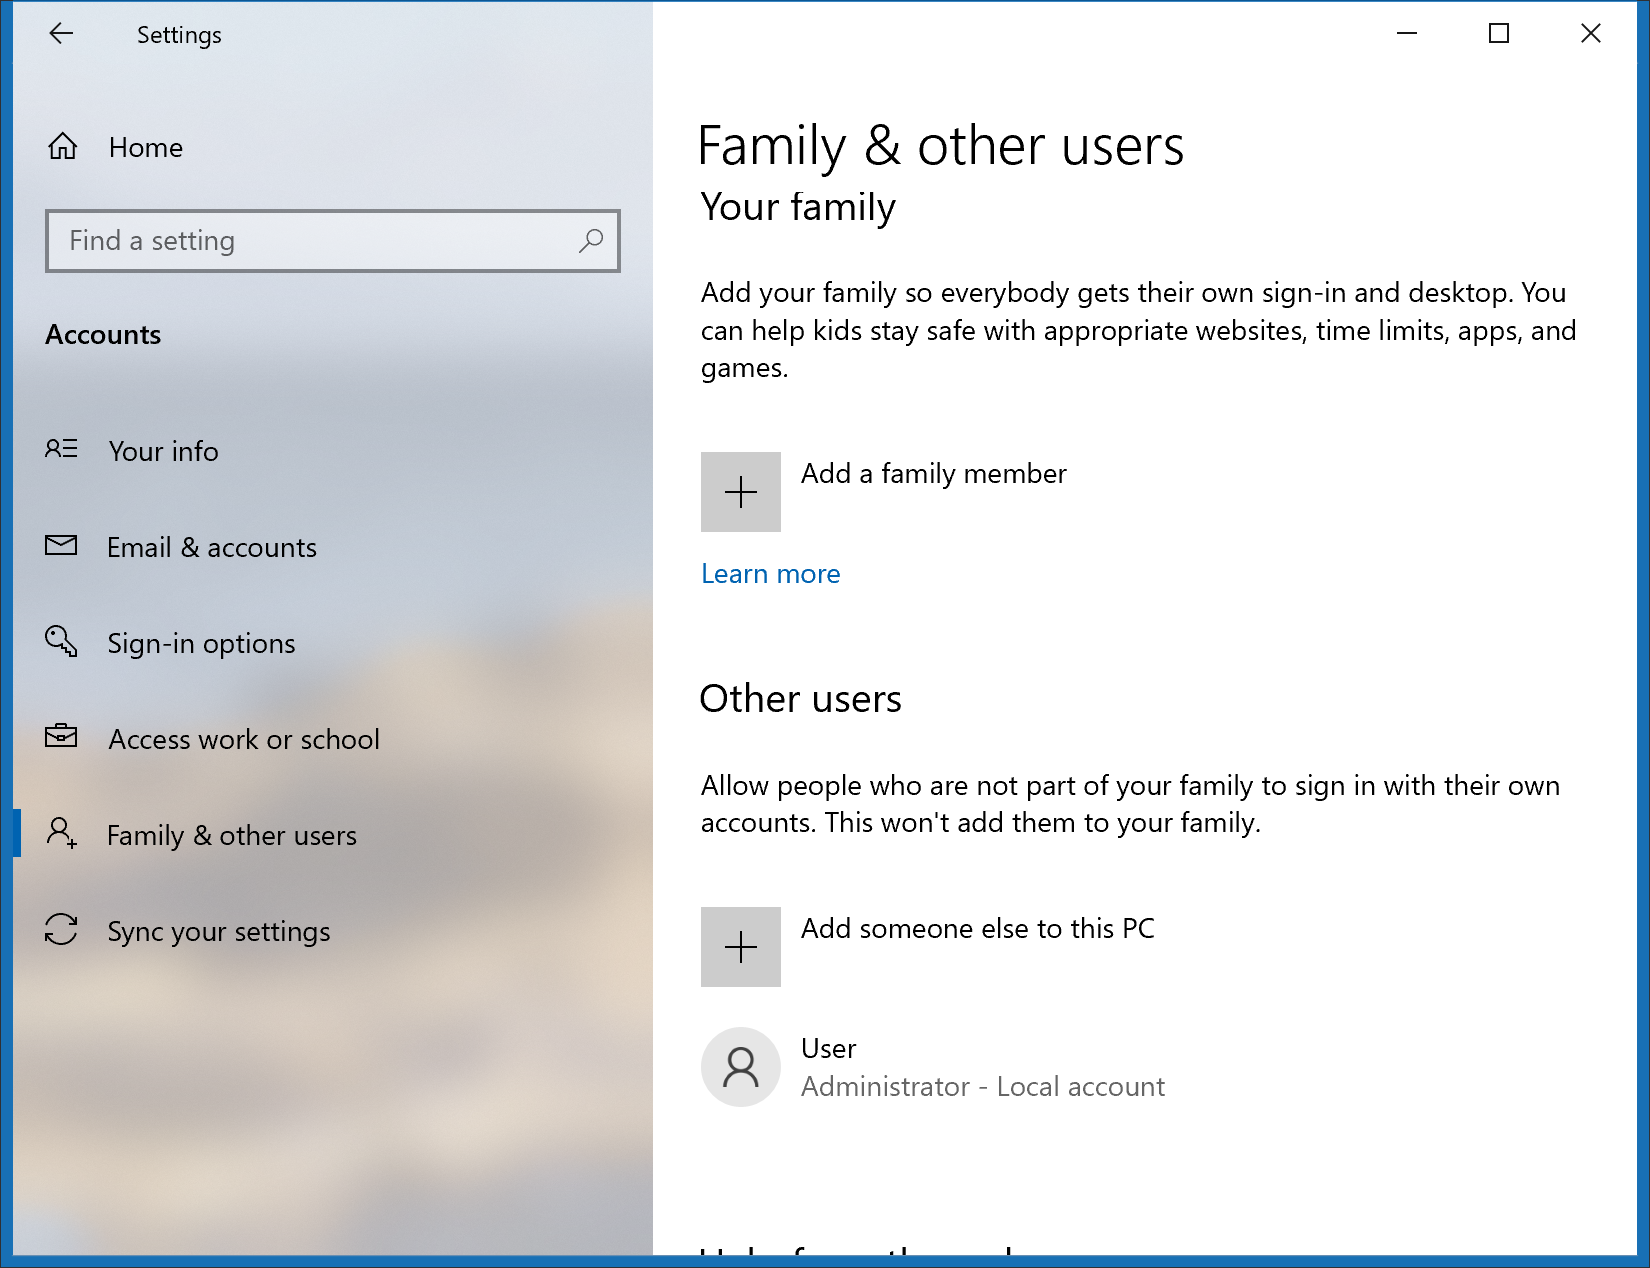
To add or delete another user, in Windows 10 you need to click (in the left-hand column) on Family & other users. In Windows 11, in the column on the right (in the image up above), you'll see separate items for Family and for Other Users. I'm imagining that I'm creating a new account for the person I'm selling my Windows 10 laptop to - so I want to create an account for an 'other user' - once you've chosen 'Other User' the steps are the same for both WIndows 10 and 11 - but in Windows 10 you have one more step to get there:
In Windows 10, I have to choose between adding 'a family member' or adding 'someone else' to this PC...
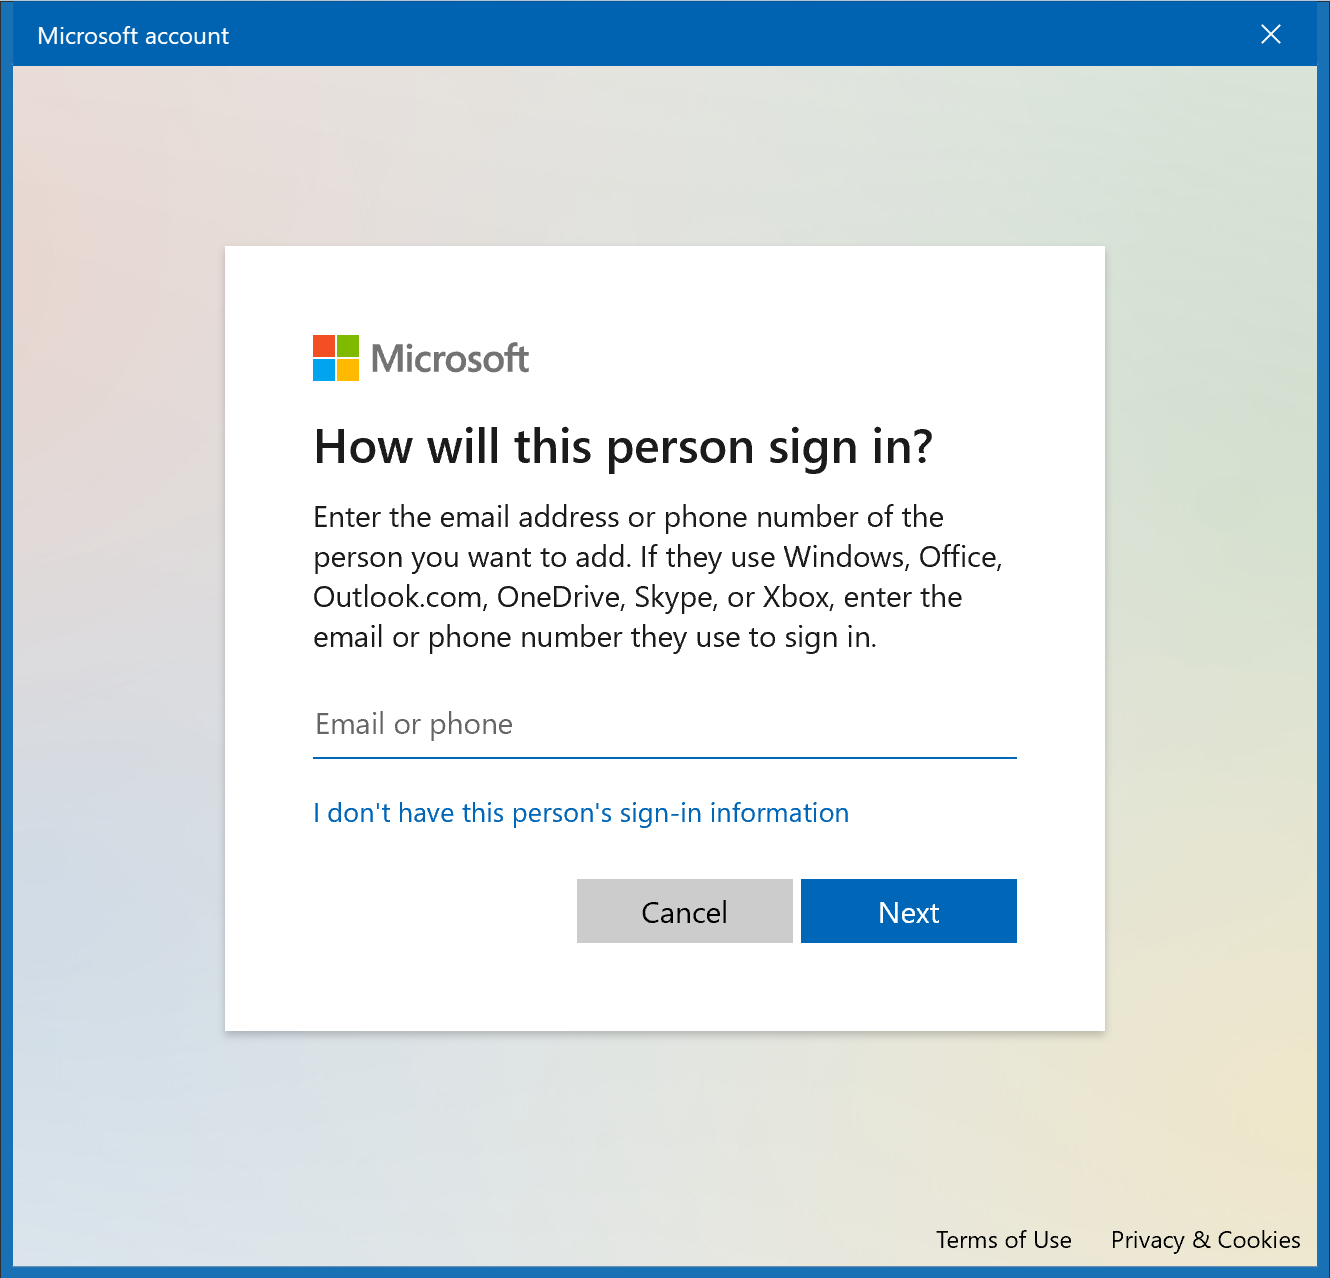
Notice that Microsoft wants to make that new account a Microsoft Account - if that's okay, you can add the email or phone number that the person getting this new account uses to sign into their Microsoft Account. (What, they don't have a Microsoft Account or Office 365 account or Xbox account or Outlook-online or Hotmail email account? That should be set-up first. Or...) If you or they want to set up a Local Account click the line that reads I don't have this person's sign-in information.
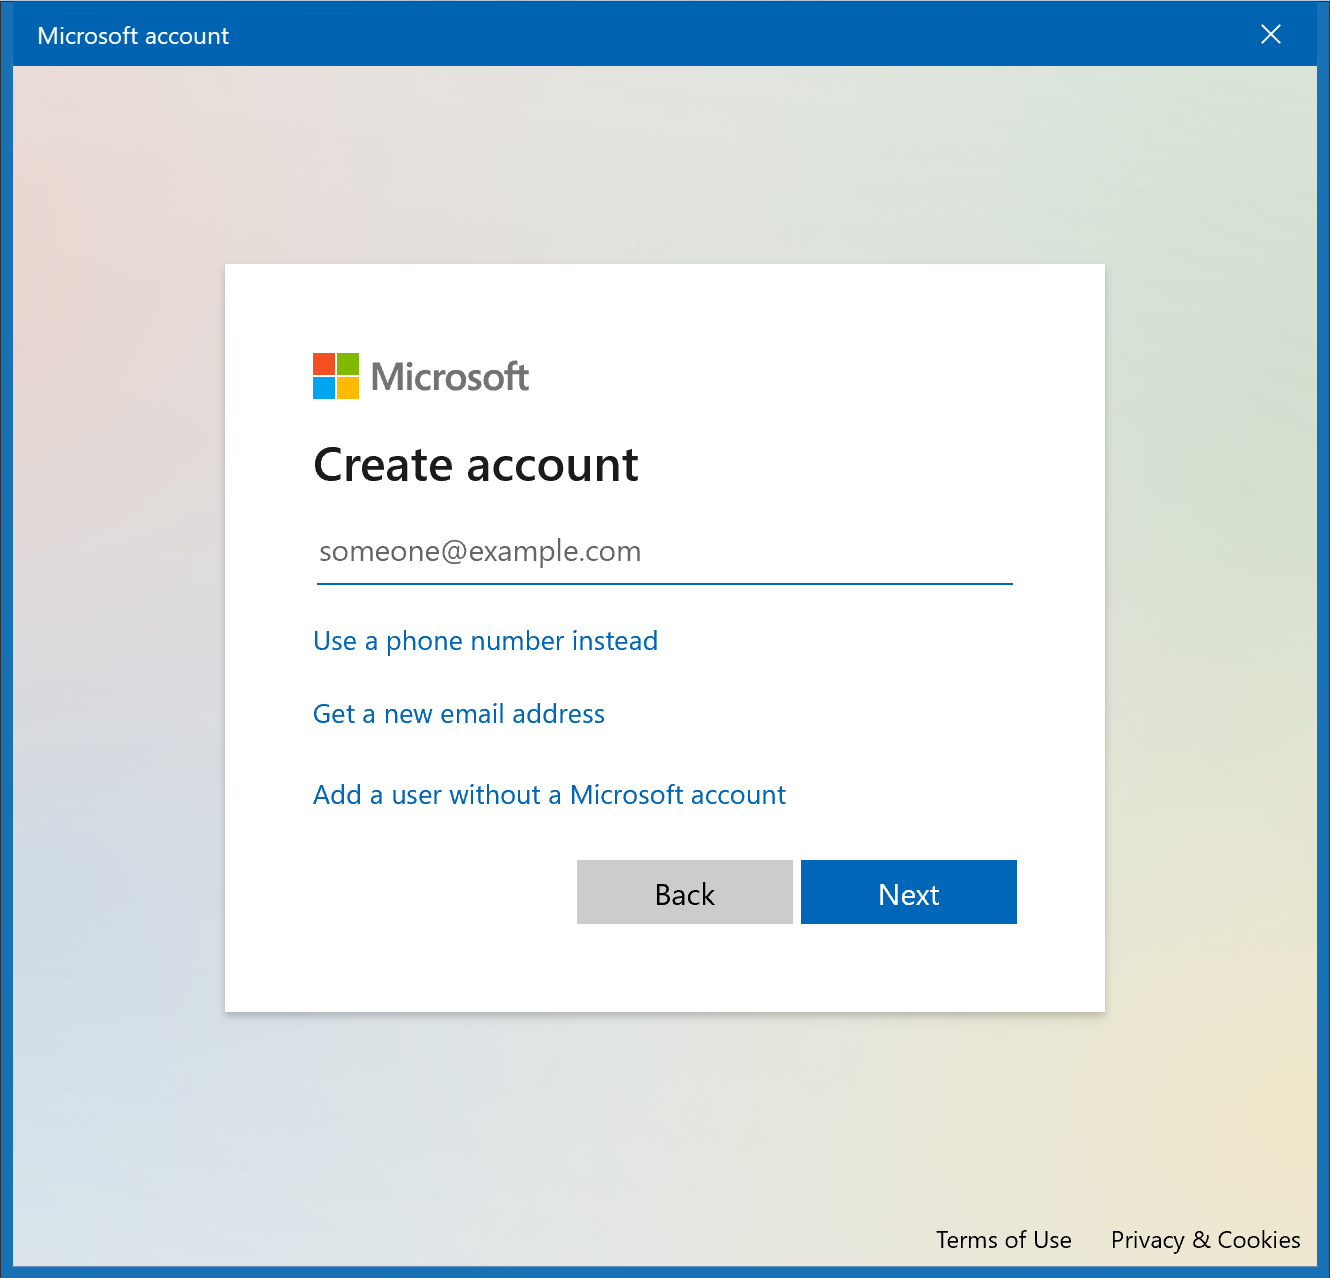
If you do that, you'll see:
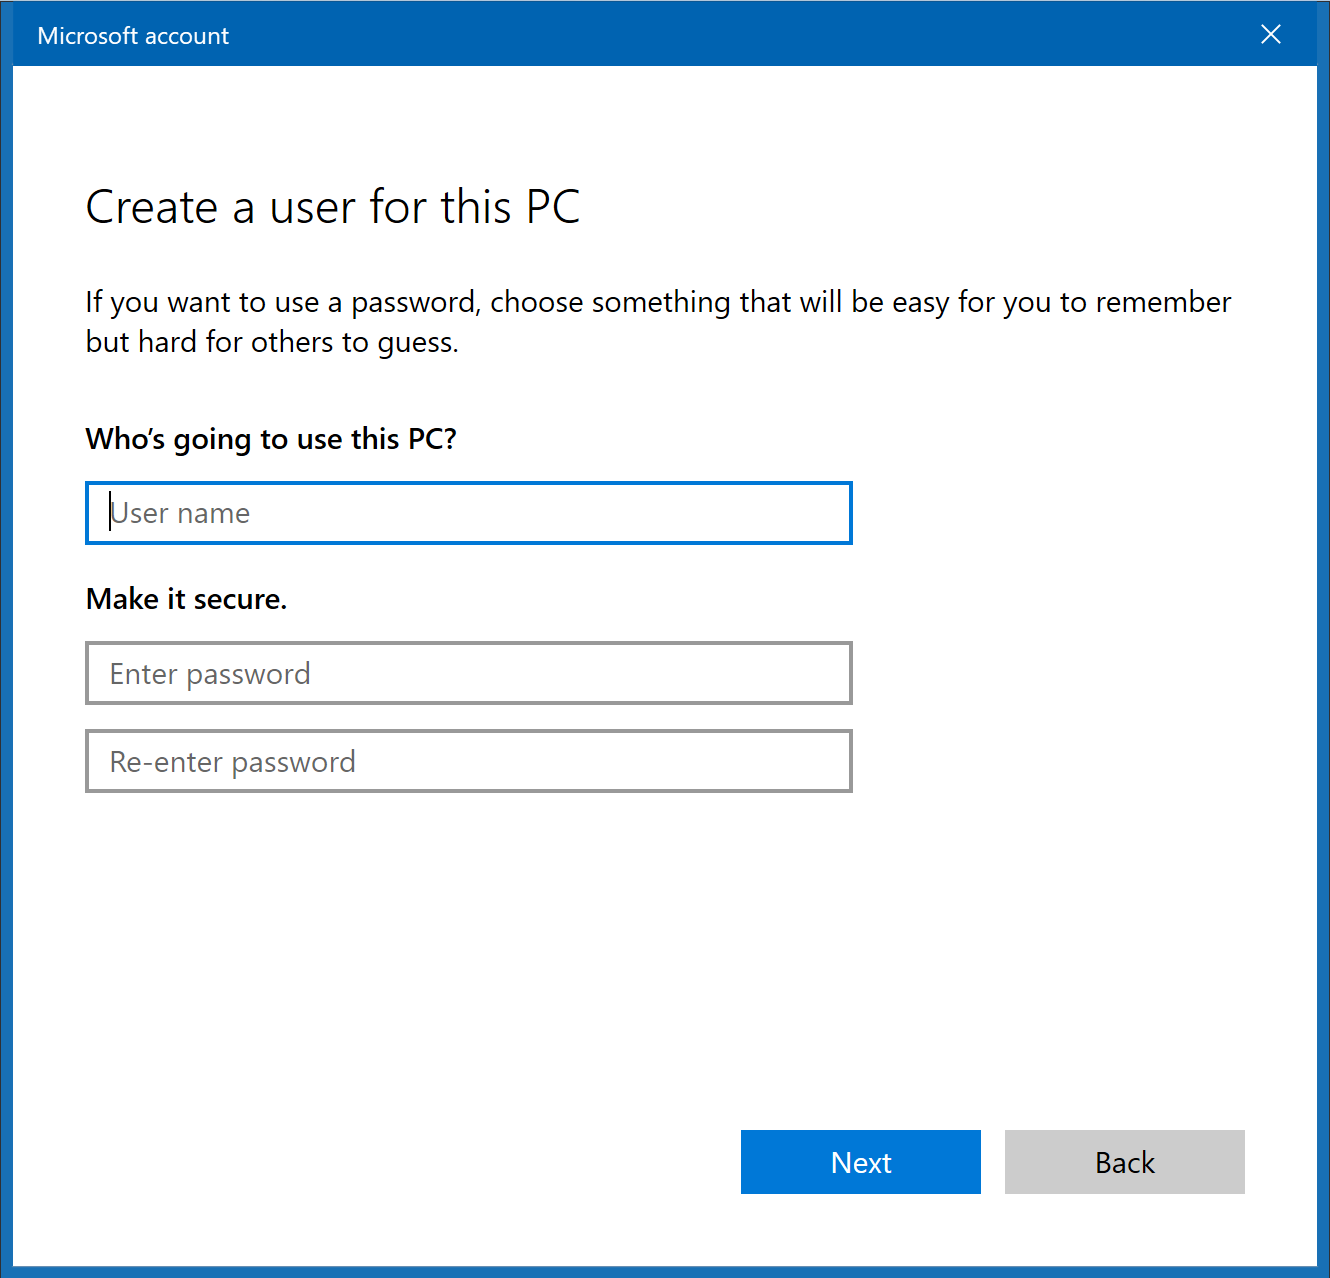
You could use the Get a new email address option, I suppose, to create a new Microsoft Account, but you finally get an option that's clearly labelled Add a user without a Microsoft account - in other words, a Local Account.
And that let's you add a user name and password. If I want to demo my old laptop to potential buyers, I might create a new user named 'User' with a password of 'password' - but if that's not the case for you, you probably want to use something else. (At the same time, I don't think the password for a local account needs to be particularly challenging - it's not like something that online hackers have access to and can try a million possible alternatives - it's to keep your grandchildren from messing with your files).
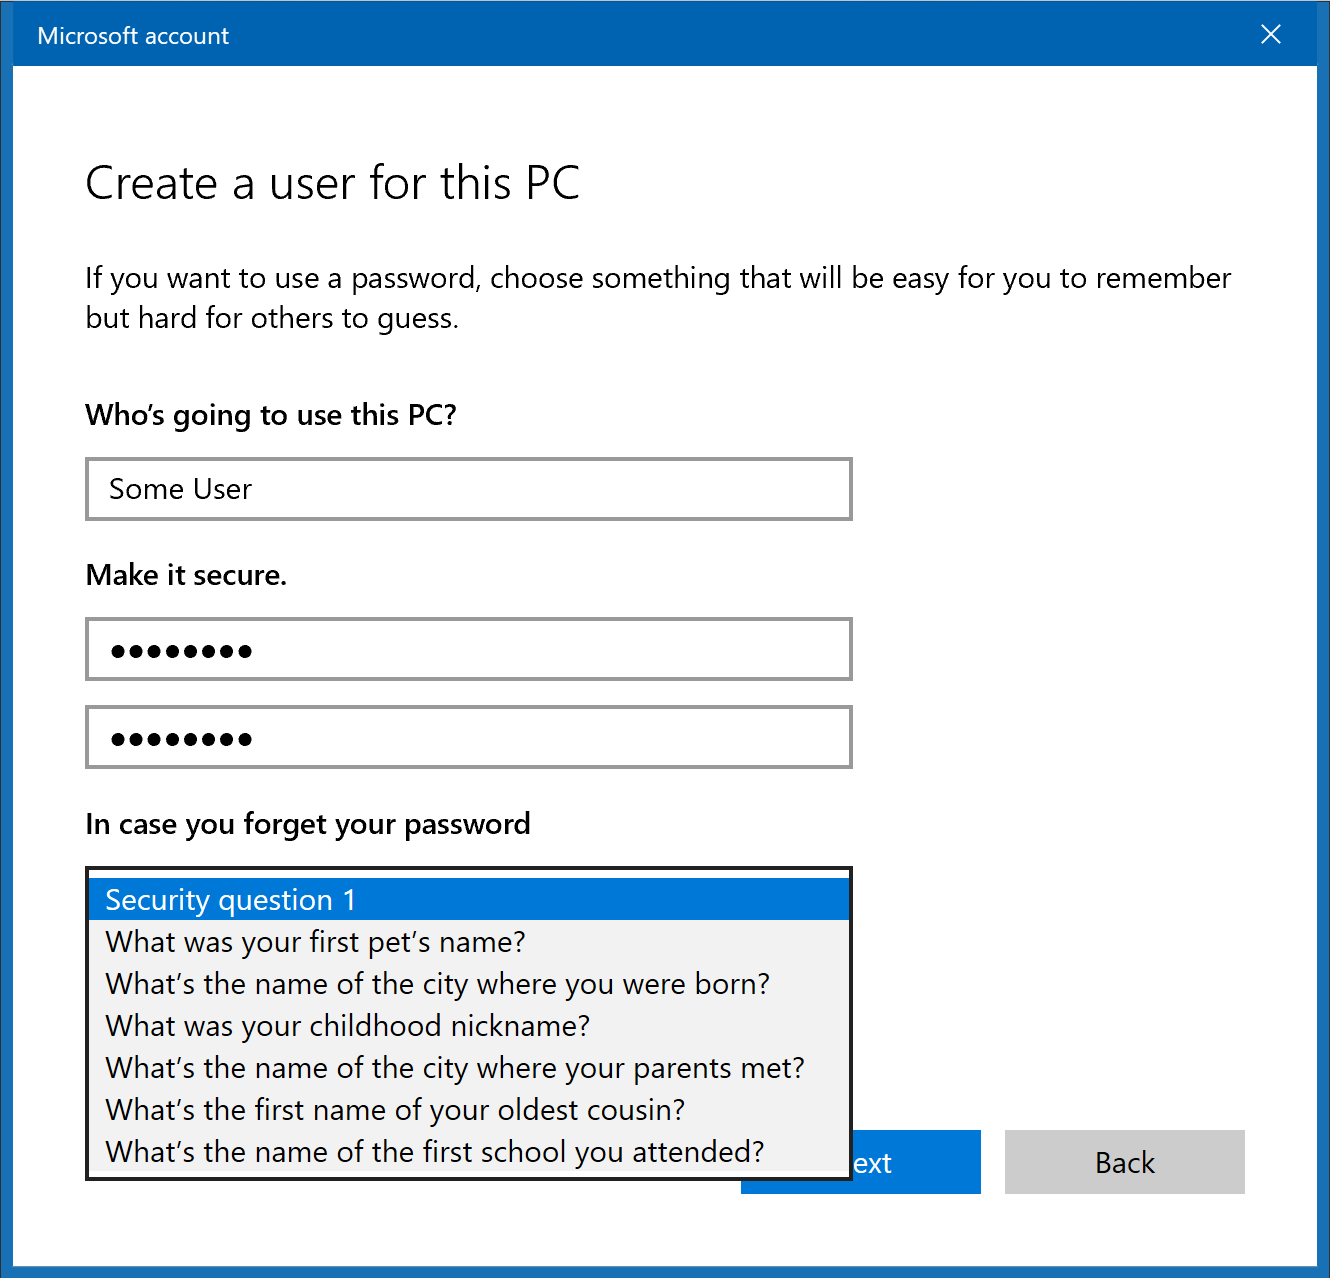
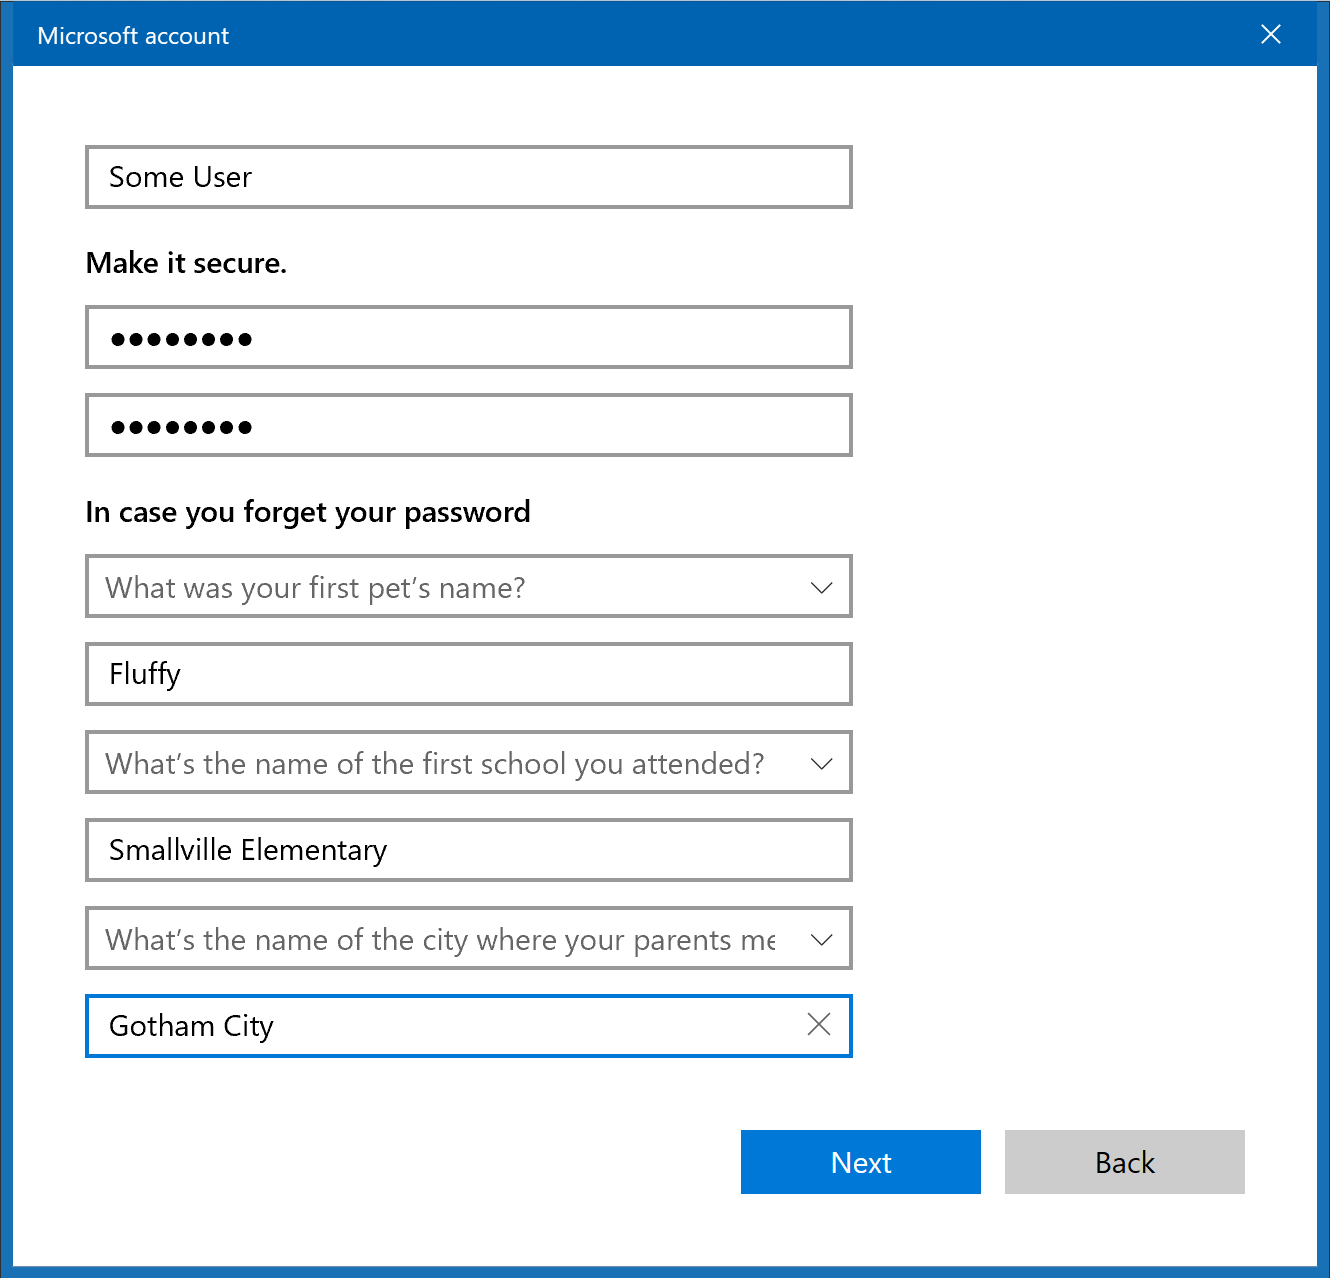
After you add the user name and password, you're prompted to provide answers to three security questions, chosen from a pre-made list - these questions and answers are used if the user has forgotten their password:
Obviously, to be useful, you need to involve the person who's going to have this account in the choice of question and answer. In my 'user/password' example, I got away with silly answers.
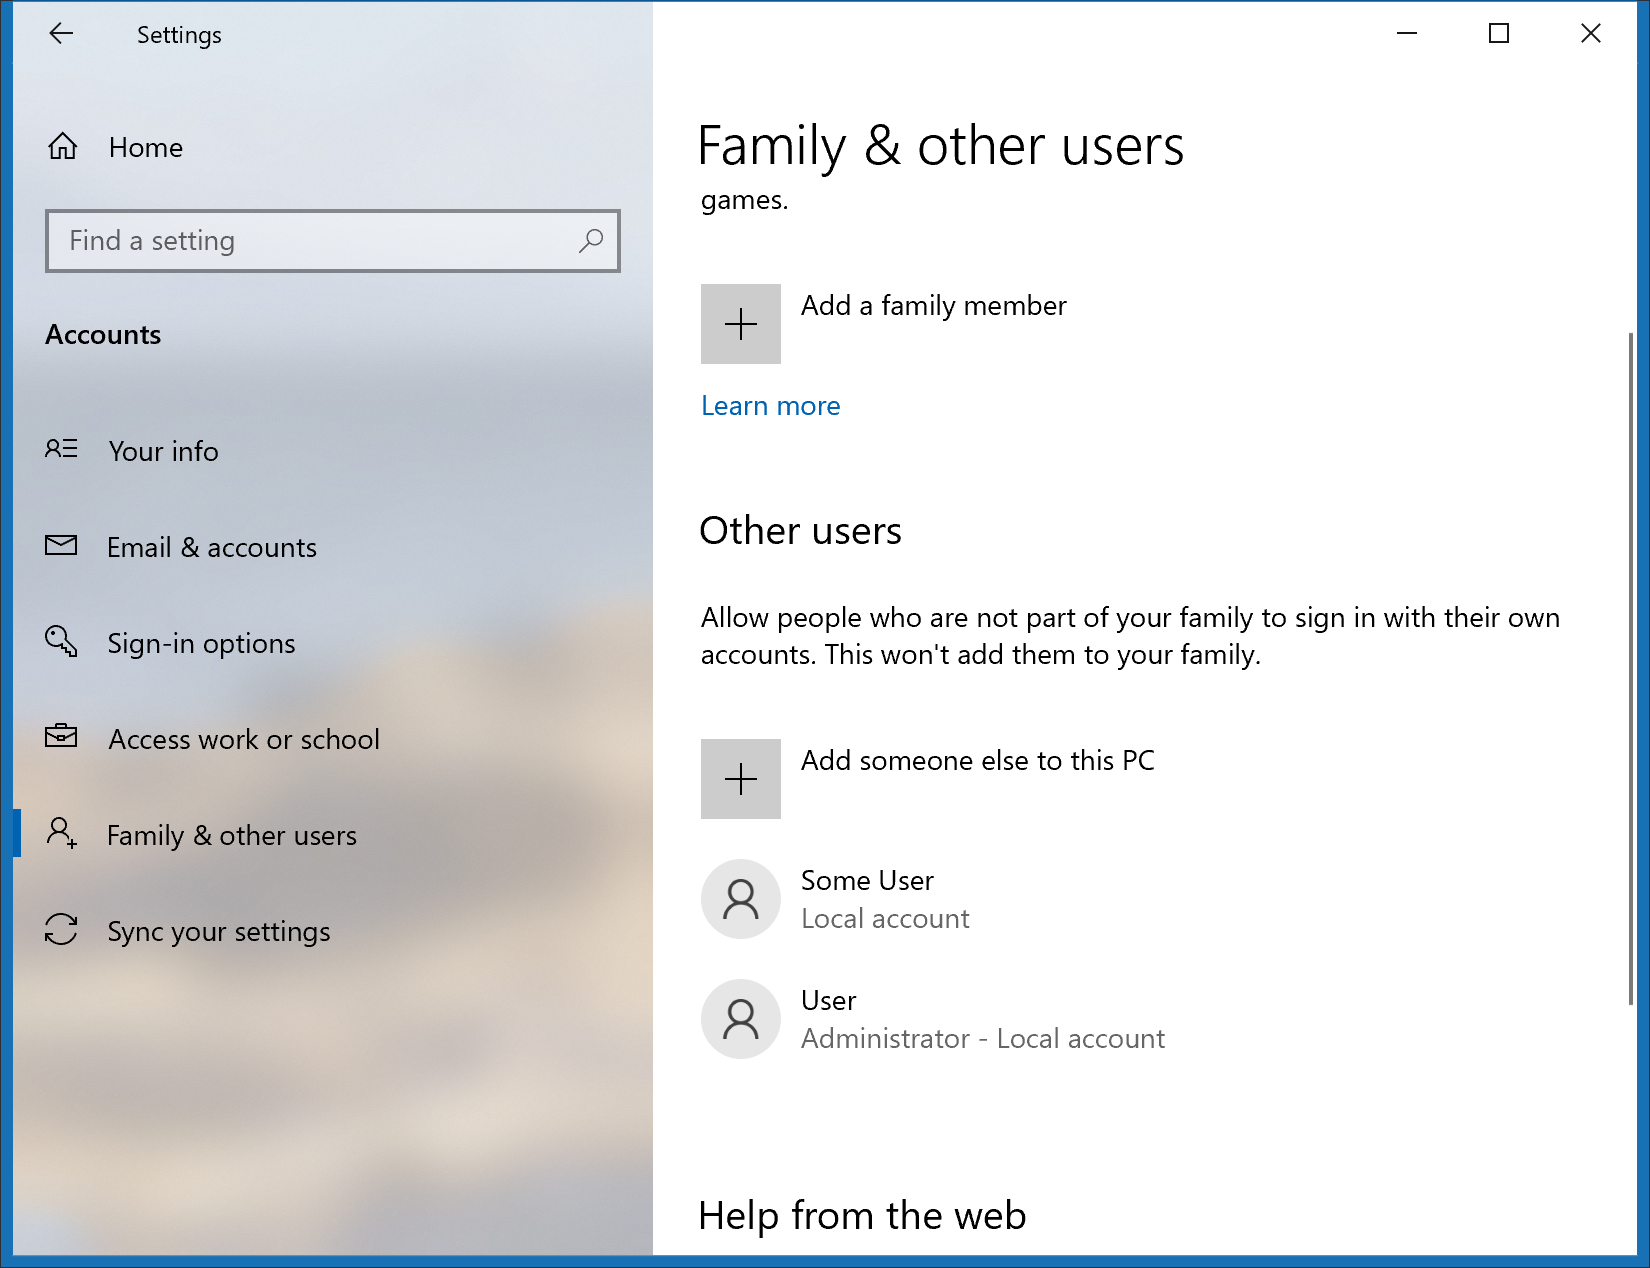
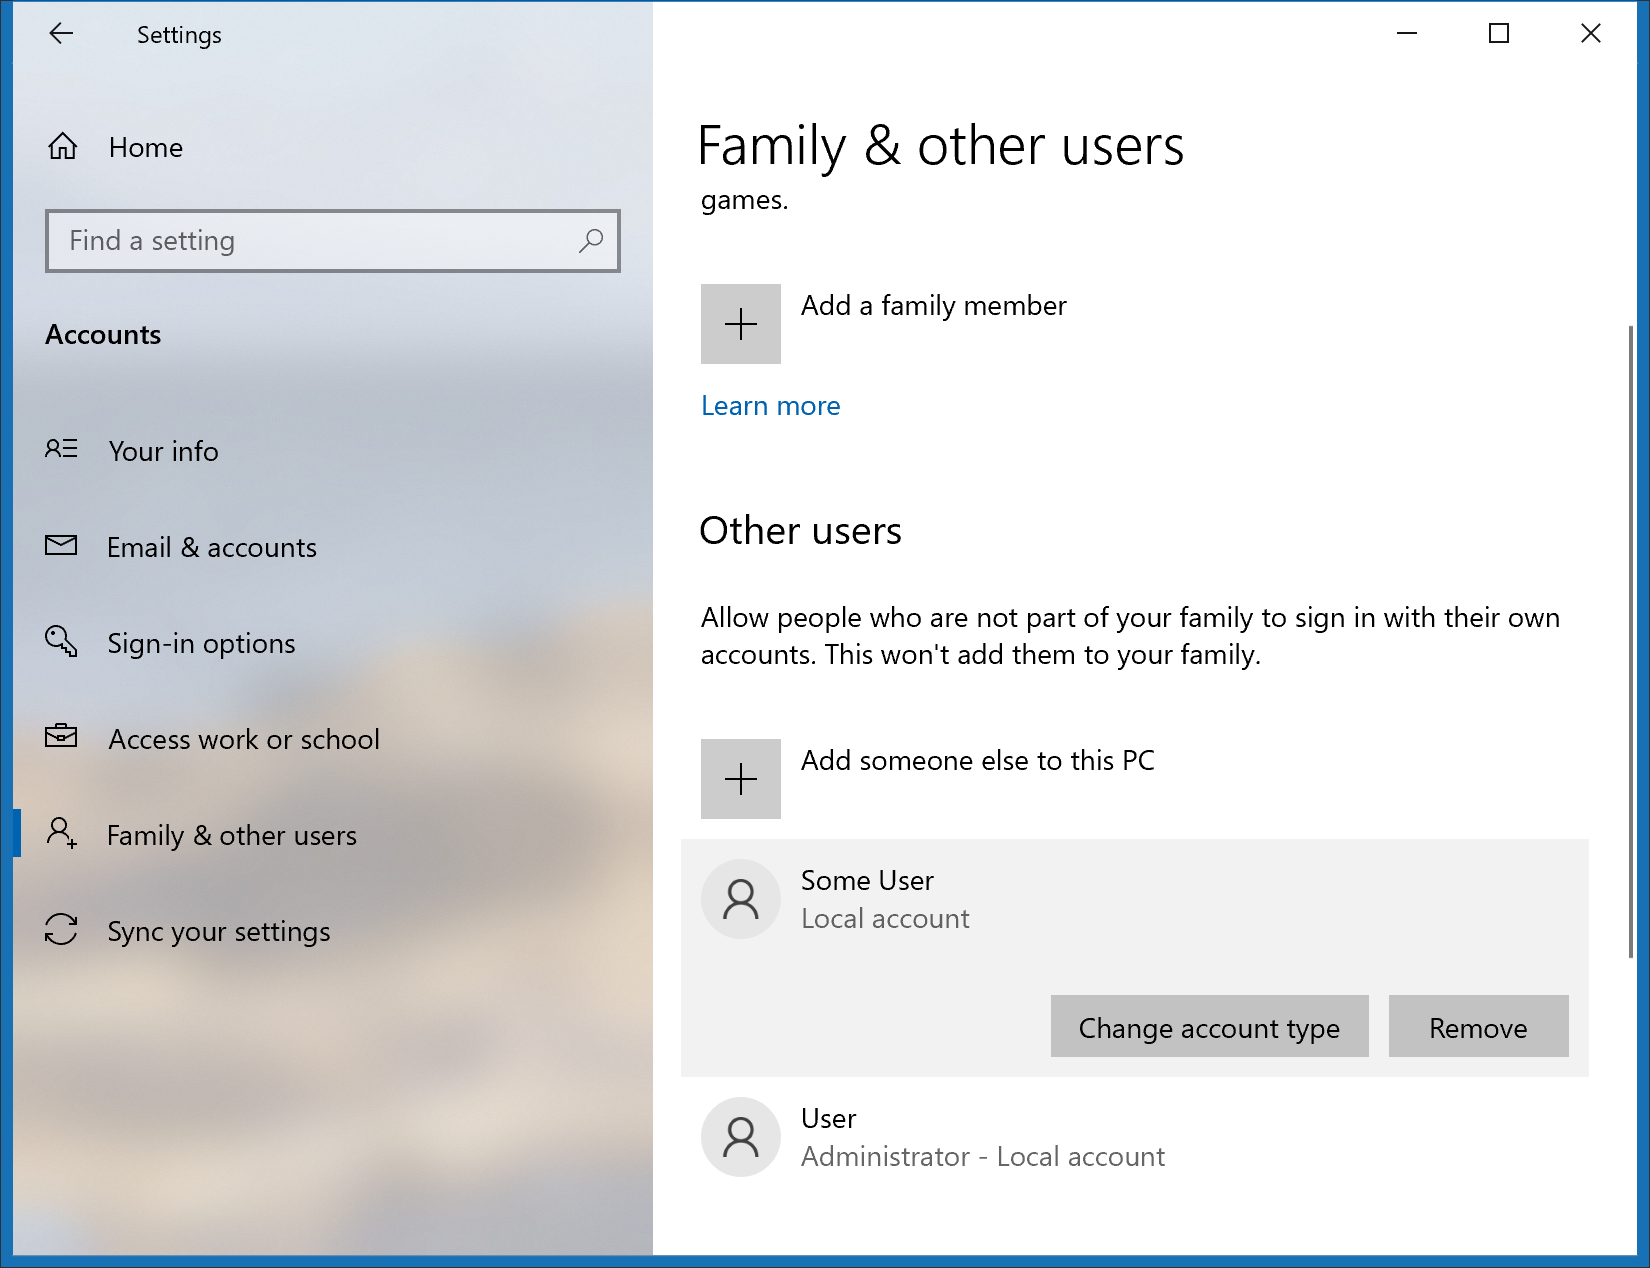
As soon as you've chosen your three questions and filled-in the answers, your user account - in this case 'Some User' - is created, and appears on the last of registered users for this computer:
Note that 'Some User' is listed as a Local account - it doesn't say so, but it's a Limited account, unlike the other account named User listed below it, which says it's also a Local account, but also an Administrator. If you want the new account to also be an Administrator (see above for why you might not want to do that), click on that new user's name - you'll see:
Clicking the Change account type button lets you change from Limited to Administrator. (Or vice versa).
Note that there's also a Remove button - if you're wanting to delete the user. If you click that, you're reminded that you'll be erasing all that user's local folders and files: Desktop, Documents, Pictures, etc.
You can't delete an account if that account is in use at the time - which is possible since more than one account can be logged in at the same time - even if no one is actually using the other account at the moment.
So - let's imagine the scenario where I'm trying to sell my old laptop.
I've created a new local account on it named User with a generic password, made it an Administrator, and used it to show off the computer to the wannabe purchaser. While I was logged into the User account, I deleted my own account - which erased all my user files.
When the new owner gets home with the laptop, they can boot it up, log in as User and create a new account with their name and preferred password - they can make it a Microsoft Account or a local account as they choose, but should set it as an Administrative account.
Then they should log out of User, log into their new account - the first time it runs, it will take a few moments to set itself up and ask the same questions that anyone gets when they start up a new Windows computer for the first time. When that's done, they should delete the User account.
Optionally, they could create a second account, set as a Limited user - and use that for their day-to-day computing for maximum security.
Got it?
Older blog postings....
| About This Blog... I've been writing about computers, software, Internet and the rest of technology since 1992, including a 17 year (1995-2012) stint as 'High Tech Office' columnist for Business in Vancouver. This blog includes thoughts on technology, society, and anything else that might interest me. Comments, emailed to alan@zisman.ca are welcome - and may be published in whole or part. You can follow me on Facebook for notice of new blog postings. |
 |