ALAN ZISMAN ON
TECHNOLOGY
Musicians want to play together over the Net - is it even possible?
By Alan Zisman © 2021-03-01
Over the past year or so, with pandemic lockdowns and restrictions on getting together, musicians have seen opportunities for gigs disappear, and even the ability to get together in a rehearsal space, basement or garage become restricted.
Here in Vancouver, BC (Canada), during the summer (2020), people were able to play music together outside - as long as no more than 50 people gathered. Groups I played with were able to practise - in backyards and covered car ports. As autumn moved in, though, both colder/wetter weather and increasing infection rates resulted in these options being no longer available.
Meanwhile, many people were managing to work from home. Many meetings, public events, and classes were taking place online, using platforms like Zoom. My wife Linda, for instance, an aspiring water painter, has been pretty happy with the classes she's taking online in place of in-person lessons. She notes that in some ways they're better online - everyone is able to see, close-up, what the instructor is painting.
You may have seen social media posts with video clips of choirs, orchestras, and other musical groups appearing to be performing together, with each individual in their own window, Zoom-style. The inference: it ought to be possible for musicians to get together online to make music, playing together in real-time across the Internet. (Those choir (etc) videos: they're not what they look like. Each individual has been filmed separately, and then the various video clips were assembled into a Brady Bunch-style mosaic that makes it appear as if they're all making music at the same time.See: Dear Music Teachers - please stop asking how to create a virtual choir video)
I host a monthly accordion drop-in, the Vancouver Squeezebox Circle. Lately, we've been getting together over Zoom - which works - as long as only one person is playing music at a time. Other people can play along at home - as long as their mikes are muted. In the Squeezebox Circle Zoom sessions, if other musicians forget to mute their mikes, the sound of them playing along quickly gets weird and difficult to listen to. (Worth checking: How to play music on Zoom)
So Zoom is not a workable option for a musical group trying to play together. In that case, everyone needs to be able to hear one another. Seeing one another is nice - but less necessary.
The problem - connections online involve lag - so-called latency. The Internet works by sending data. in small 'packets' over a complicated network, over a route that may hop through a dozen servers (or more) between the sender and recipient. While fast (most of the time), travel along this ever-changing route does take measureable time. And this lag time can affect trying to play music together.
Not surprisingly, connecting to a computer further away requires more hops than someone local - but even a local connection may make a bunch of hops if the destination is on a different network from you. While all of my bandmates are in Vancouver, they use a variety of different Internet service providers so it's a complex web of connections.
But that's not the only cause of delay. Sound is an analog signal - computers and the Internet work with digital signals. Your gear needs to take the sounds you create and convert them to digital equivalents that can be send over the Internet. When these are received, the reverse happens - the digital code is converted to analog sounds that you can hear through speakers or headphones. These analog to digital conversions (and the reverse) are quick, but take measureable time, adding to the delays.
Bottom line - there are going to be 'latency' issues for musicians trying to play together in 'real time' across the Internet.
Nevertheless, even before the pandemic, there were a number of attempts to create software services to allow this to happen. JamKazam, for instance, says they have 'spent the last 6 years building the best platform in the world to help musicians play together live and in-sync over the Internet from different locations with high quality audio and video.' Through the end of 2020, they offered free, beta software. Since 2021, they offer a free, audio-only low bandwidth service, along with several tiers of higher bandwidth services to monthly subscribers. For a band wanting to play together, every member would need to be subscribing. We tested JamKazam last year, and then again - using the free, low-bandwidth tier, but were unable to make it work to our satisfaction.
Later this winter, we also tried the free, audio-only SonoBus which promises to be 'an easy to use application for streaming high-quality, low-latency peer-to-peer audio between devices over the internet or a local network.' Early tests between pairs of musicians were promising, but then two of us had a session where we just couldn't get in sync. We moved on.
(You may want to give both of these a try - just because they didn't work for us doesn't mean they might not work for you. But note the caveats listed later on in this article - which are true regardless of what software you're trying to use).
The third app we tried out was Jamulus, describing itself as 'designed for high quality, low-latency sound, making it easy to play together remotely and in time.' Like the others, it offers versions for Mac, Windows and Linux (SonoBus also offers beta-tests of Android and iPhone/iPad versions).
(2021-03-03: I just found out about another platform, though I haven't tried it out: JackTrip - their website has some well-written information on the issues of latency and the hardware (etc) needed to try to minimize it - worth a look - note: it's Linux and Mac OS only. There's also the Canadian-made SyncSpace service, offering bands real-time virtual performance and rehearsal options).
Before going any further with any of these programs, though, you need to take some time and look at how you're going to connect. The issue is to get a high-quality audio signal from each user and to maximize the quality of the network connection.
Many of us have been reasonably happy with Zoom (or other services like Apple's iMessage/FaceTime) just using a laptop or tablet or phone - using the built-in mike, camera, and speakers and a WiFi connection to a broadband router. That works for Zoom (et al). But all of these services - and my own tests - suggest that doing this simply won't be good enough for musicians trying to play together.
What you need to do before you even try to get online
For a start, WiFi connections are not stable enough. You've probably watched streaming online video over WiFi. Much of the time it's fine. But sometimes, there are brief pauses or jitters. Sometimes the audio and video briefly get out of sync. Not so good if musicians are trying to play a song together.
Much better if everyone (everyone!) involved connects to their broadband router with a wired network (Ethernet) cable. Folks using recent-model Macbooks (and some Windows laptops) will need to purchase adapters ('dongles') to plug the network cable into their laptop. Make sure you get an adapter that's compatible with your laptop - many Macs can use adapters that plug into their Thunderbolt/video port, but newer Macs need adapters with USB-C/Thunderbolt 3 connectors. Very recent laptops (both Macs and Windows) have USB-C ports - some, but not all, USB-C hubs include network/Ethernet ports, which would be a bonus. Whatever it takes, get your computer connected to your home Internet with a wired, Ethernet connection!
(In some of our homes, the broadband router is in an awkward location - long Ethernet cables can be used to let you connect your laptop from another room).
 The
microphone built-into your laptop is handy, but its sound quality is
relatively low and its analog/digital conversion is not great. Do
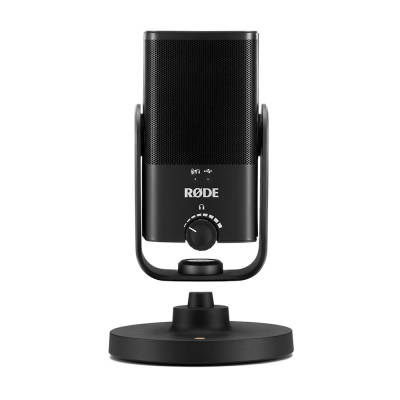
better. We've found two better options. One is condensor mikes with USB
connections, plugging directly into the computer. Two of the members of
my band are using RODE NT-USB MINI Studio Condenser USB Microphone
(link to Canadian music store Long & McQuade) - price is CDN$139,
about US $100. Good sound quality, and a pick up pattern that lets a
single mike be used both for vocals and an acoustic instrument such as
guitar or fiddle.
The
microphone built-into your laptop is handy, but its sound quality is
relatively low and its analog/digital conversion is not great. Do
better. We've found two better options. One is condensor mikes with USB
connections, plugging directly into the computer. Two of the members of
my band are using RODE NT-USB MINI Studio Condenser USB Microphone
(link to Canadian music store Long & McQuade) - price is CDN$139,
about US $100. Good sound quality, and a pick up pattern that lets a
single mike be used both for vocals and an acoustic instrument such as
guitar or fiddle.
This microphone includes a jack for plugging in headphones on the back - a good feature that you want to use. There's a volume knob on the front - also a handy feature. I'm not sure if it can be connected to a standard microphone stand - less good for some set ups.
Two of us already own microphones for recording studio or live performance... as well, it might be useful to be able to plug in more than one input, or to use the signal from an electric guitar or bass pickup or the pickup installed in an acoustic instrument. There are a variety of USB audio interfaces available - with a variety of latency times. A JamKazam forum post included lists of audio interfaces that were reported to work well with that program, or to work poorly or not at all. These results should be applicable to the other programs as well.
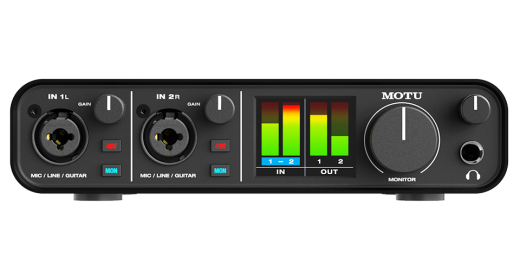 The two of us who already had our own microphones both purchased MOTU M2
USB audio interfaces (also Long & McQuade links) - CDN$239 (about
US$188), based on a combination of price, low latency, and features. It
works right out of the box for Windows users. Mac users will want to
download and install a driver from MOTU - while it will work on Macs
without the driver, latency is much improved. It lets you plug in up to
2 microphones or instrument pickups, with separate gain controls for
each. Again, there's a headphone port - with a volume control for
headphone.
The two of us who already had our own microphones both purchased MOTU M2
USB audio interfaces (also Long & McQuade links) - CDN$239 (about
US$188), based on a combination of price, low latency, and features. It
works right out of the box for Windows users. Mac users will want to
download and install a driver from MOTU - while it will work on Macs
without the driver, latency is much improved. It lets you plug in up to
2 microphones or instrument pickups, with separate gain controls for
each. Again, there's a headphone port - with a volume control for
headphone.
You don't want to use a live microphone - whether plugged directly into your computer or into an audio interface device - and the speakers built-into your laptop - feedback is almost certainly going to scream at you. Instead, plan on wearing headphones. Some things to note - over the ear, closed headphones will do a better job than the common sort of ear buds that many of us use with our smartphones. One more thing to invest in! You don't want to use wireless headphones with this - one more thing that adds to latency! The cables that are on your wired-headphones may be too short and get in the way; many dollar stores or electronics shops will be happy to sell you an extension for 1/8" stereo plugs in your wired headphones. And plug them into the headphone jack on your USB microphone or audio input device.
Both Windows and Mac users will need to check your sound settings. Windows users can right-click on the little speaker icon in the lower-right of the Taskbar and pick Open Sound Settings from the pop-up menu; Mac users should click the little speaker icon in the top-right of the menu bar, and pick Sound Preferences - in both case be sure that both the input and output settings show that you're using the proper device - in our cases, either the Rode or the M2.
One more thing for Jamulus...
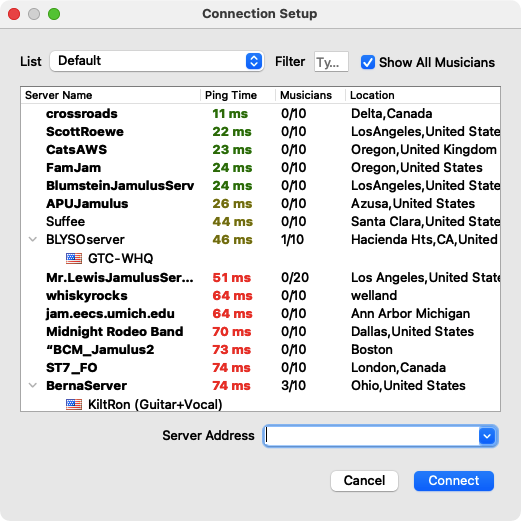
If you download and install Jamulus (and have done all the things mentioned above) and run the program and click the Connect button, you'll see something like this:
 A
long growing list of 'public' Jamulus servers... and if you're wanting
to jam with others, that may be what you want. Or - look for one close
to you with a relatively low 'ping time'. For me, in Vancouver BC, the
top one in Delta is close by - and currently, no one is actually
connected to it.
A
long growing list of 'public' Jamulus servers... and if you're wanting
to jam with others, that may be what you want. Or - look for one close
to you with a relatively low 'ping time'. For me, in Vancouver BC, the
top one in Delta is close by - and currently, no one is actually
connected to it.
If my bandmates and I wanted, we could connect to it and have it all to ourselves - at least for now. Someone else, though, could choose that server and join in with us.
Call us snooty if you like, but we want something more private. And for that - at least with Jamulus, that means setting up our own, private server.
Setting up a server sounds scary. Not something that you (or I) are likely to do. Or something that needs some sort of special, expensive, heavy duty computer hardware.
None of that's true in this case. Let me explain.
Jamulus runs in either client or server mode - to run your own server, you're best off doing it on a separate computer - presumably you can run server on a computer and connect to it running the server on the same computer, but performance will suffer. I used two older laptops - a 2014 Macbook Air and a 2015 HP, one for the server, the other for the client. Both should use a cabled connection to the Internet - if you don't have enough free ports on your router, get a network switch (not a router)... they're cheap... I paid CDN$25 for a new 5-port switch.
You don't need the various audio devices - microphone, audio interface, headphones, etc on the computer running the server. Just the wired Ethernet connection.
Setting up the server is pretty straightforward with a couple of things to know.
-- Jamulus has a pretty helpful help page: https://jamulus.io/wiki/Running-a-Server but a couple of things it described weren't the case in my experience.
For instance, it suggests that Windows users could start the Server by clicking a Start Menu item labelled Jamulus Server. Simple, straightforward, but when I installed Jamulus on my Windows system, it didn't create any Start Menu icons. (Update 2021-03-24 - Updated Jamulus version 3.7.0 fixes this and installs separate and working Jamulus and Jamulus server icons on both Windows and Mac).
I found the Jamulus software installed in the C:\Program Files (x86)\Jamulus folder, with a Jamulus.exe file (and a Jamulus-server-icon-2020 icon file). Double-clicking the Jamulus.exe file starts the program in client mode.
 I
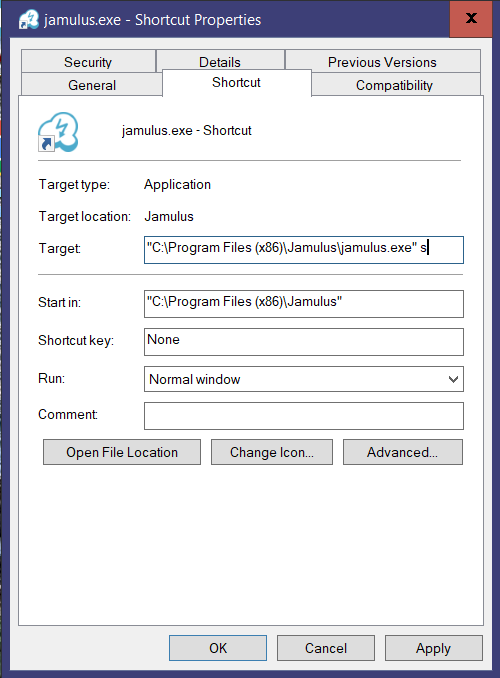
right-clicked the Jamulus.exe file icon, and picked Create Shortcut
from the popup menu. That created a shortcut on my Desktop that would
open the program in client mode. I did it again, to create a second
shortcut on the Desktop. Then I right-clicked (on either one of them)
and picked Properties from the popup menu.
I
right-clicked the Jamulus.exe file icon, and picked Create Shortcut
from the popup menu. That created a shortcut on my Desktop that would
open the program in client mode. I did it again, to create a second
shortcut on the Desktop. Then I right-clicked (on either one of them)
and picked Properties from the popup menu.
In the Target field, I added a letter 's' after what was already written - in this case, 's' is for 'server'... with this addition, double-clicking the shortcut icon will open Jamulus in Server mode.
If you want, click the Change Icon button, point it to that C:\Program Files (x86)\Jamulus folder and pick the Server Icon file - then if you have two shortcuts, they will have similar but different icons - with a blue lightning bolt for the Client program and a red lightning bolt for the Server. Click OK. Back to the icon - right-click on the icon's title and pick Rename from the pop-up menu, and rename it Jamulus Server.
A bit of a pain but not rocket science.
Meanwhile, that same Jamulus Server help page described having to do something like this on your Mac installation. Instead, in my case, installing on the Mac got me two icons in my Mac's Applications Folder - one named Jamulus (for the client application), the other named Jamulus Server. Easier than described!
If you want a private server, you can pretty much leave the Server settings alone. The only thing I did was add a bit of text - a welcome message to the Chat field, so that if anyone connects to my server, they immediately see the welcome message and know that they're in the right place. However, you need to do a bit more before anyone outside your home network can connect.
By default, your broadband router - installed by your cable or phone company - wisely is designed to keep outsiders from being able to access computers in your home. In general, this is a good thing. But when you're running a server. you want others to be able to access that computer - at least in a limited and controlled way.
As a result, you need to be prepared to mess with your broadband router's settings, and modify something called Port Forwarding. There's a Jamulus help page that describes that in a generic way.... it's a bit different for every make/model of router - so my detailed instructions may not be of much help to you.
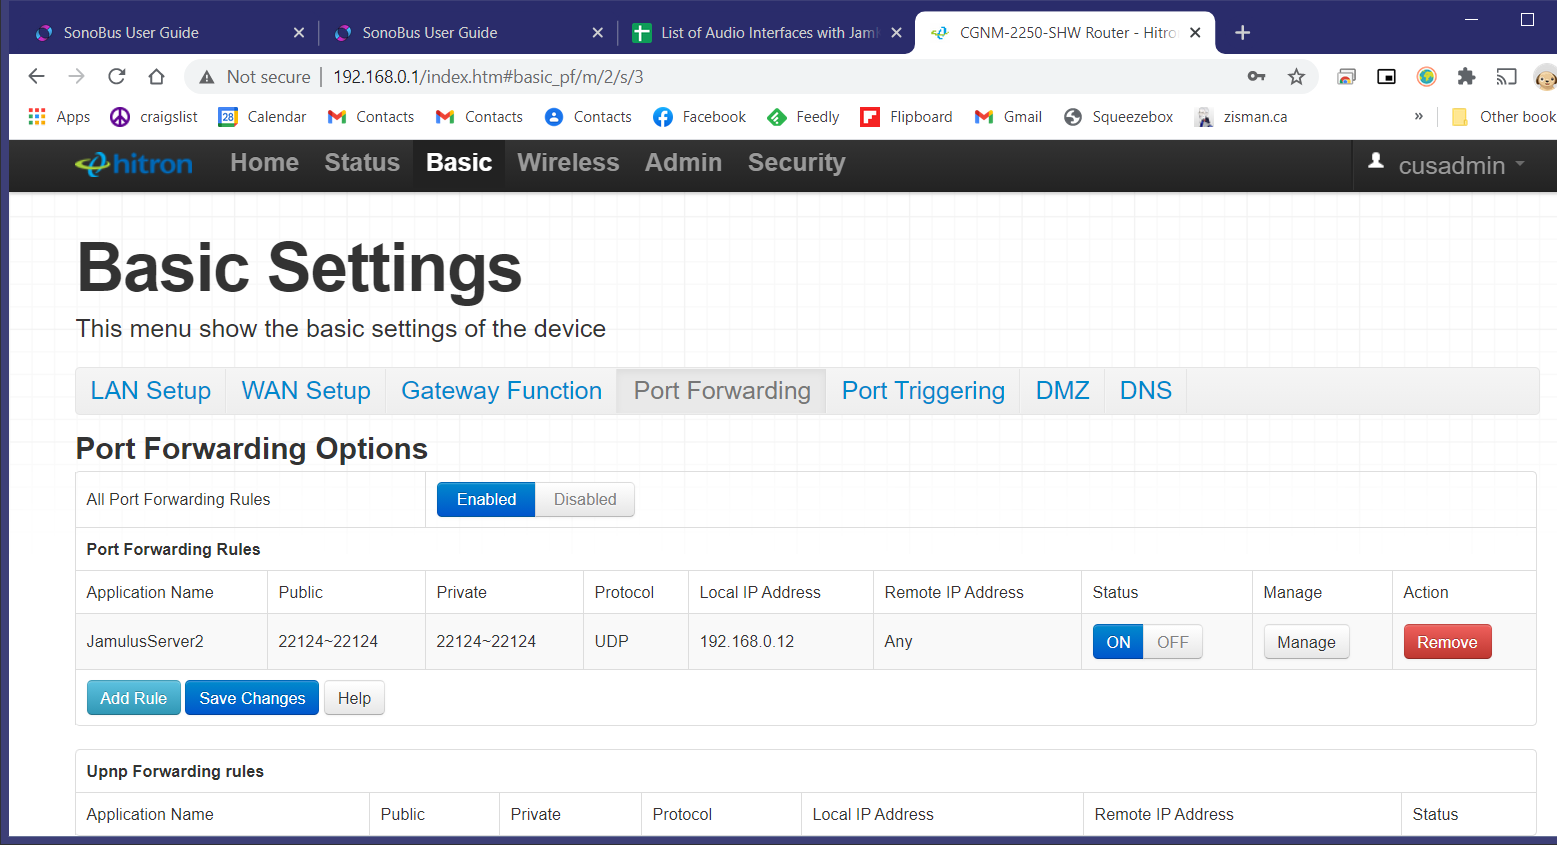
In my case, there's a label stuck on my router (aka 'cable modem') with the default IP address, log-in name, and password. When I type the IP address into a web browser (assuming I'm at home connected to my home broadband), I get prompted for the log-in name and password - entering those opens the router's configuration screen. In my case, there's a Basic Tab that has a Port Forwarding section. I've added the port number (22124) and UDP as described on the Jamulus help page. I had to find out my local IP address of the computer that is running the server from that computer's Network properties (whether it's a Windows or a Mac):
A bit geeky - but you can do it!
One more thing may be needed - the computer on which you installed the Server software may have a firewall running, which - like your broadband router - may be set to block anything trying to access the computer. Again, generally a good thing. And again, there's a way to make an exception for things you want.
On a Mac, open System Preferences, and go to the Security & Privacy item and then to the Firewall tab... click on the little Lock icon and enter your password to make changes as needed.
On my Windows 10 system, if I type 'Firewall' in the Taskbar's search, one of the items that comes up is 'Allow an app through Windows firewall'. Bingo! Clicking that gets me a window with a long list of allowed apps - scrolling it, I saw that Jamulus was already listed. Apparently, the installation process did that. If it hadn't, I could have clicked the Allow Another Appl button to add it.
One final thing - you need to know the Internet Protocol (IP) address to connect to your server. That's the IP address of your broadband router, not the IP address of the computer that's actually running the server app. (That's because the IP address of the computer is a private address only visible to other computers on your home broadband network - whether wired or WiFi). For anyone outside your home network, all they get to see if your broadband router via its IP address.
You can find your router's address by pointing your web browser (when you're at home) to https://whatismyipaddress.com/ - that will give you the address that you can share with your band mates to connect to your private Jamulus server.
Okay, you (or a band mate) have set up a private server, configured your broadband router to allow connections to it, and found the IP address needed for the connection.
Over to the Jamulus client
On a computer that's connected to the Internet using a wired Ethernet connection - and that has a USB audio device (microphone or audio interface) connected and headphones plugged in, open the Jamulus client.
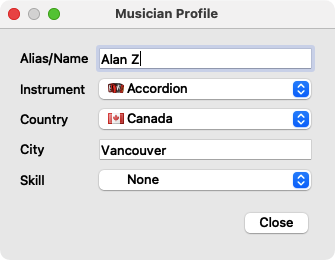 First
thing, click on the View menu, then on My Profile. Enter your name,
instrument, etc.... feel free to evaluate your skill level - or not.
First
thing, click on the View menu, then on My Profile. Enter your name,
instrument, etc.... feel free to evaluate your skill level - or not.
If you're playing with other musicians, it will be VERY helpful for each of you to be able to adjust levels for each musician (for your own mix in your headphones) - and to do that, you'll have to know which volume slider goes with which person!
Next, click on the Connect button - you'll see a window similar to the one shown above, with a big long list of Public Servers - all of which you can ignore (unless that's what you want to do, of course). Instead, look at the Server Address field at the lower-right of that window - and enter the IP address you discovered for your broadband router. (Even if you're at home)... then click Connect. (Nicely, it remembers what you entered so you don't have to enter it again the next time).
Since I've added a welcome message to my server, when I connect, a chat window opens up and displays the welcome message. So I know when I'm connected.
When everyone in the band connected, here's what it looked like:
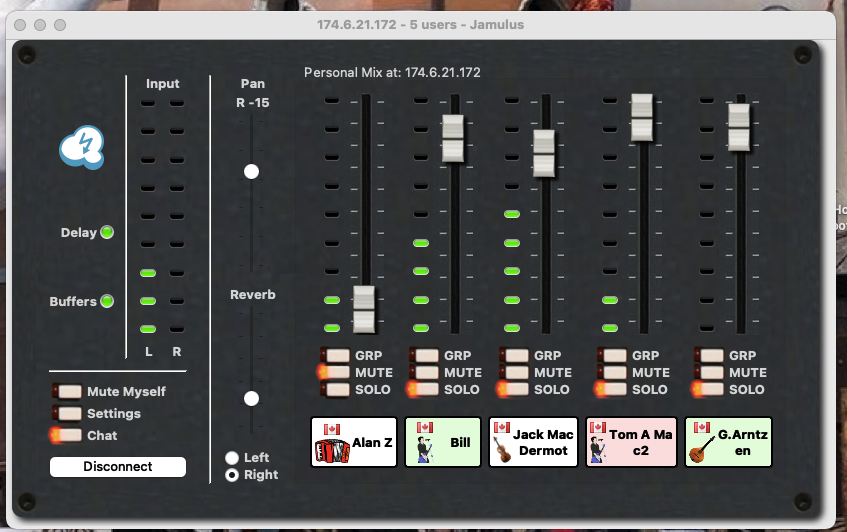
Before getting the whole band together virtually, we tested it in a series of duos - making sure that everyone had a wired connection and appropriate audio hardware, and knew how to connect the hardware and connect the software to the server. Only after we had working one-on-one sessions did we try it with everyone at once.
Pay attention to the sound in your headphones, not the sound of your instrument in the room - adjust sliders for each musician to create a mix that works for you, where you can hear everyone at appropriate levels. Changing the sliders on your screen doesn't affect the volume level that others hear - you can give the other people more or less volume with the physical volume knobs on your microphone or audio interface device.
The Windows version of the client had little 'Pan' knobs above each person's volume slider - this is a handy thing, letting you place each musician at a separate place in your headphones, making it easier to separate the sounds. The Mac version (pictured) doesn't seem to have that feature.
Playing together this way is different - and harder - than playing while being together in the same room... but so far, it seems to be working. Let me know if you have any questions - maybe I can help.
Older blog postings....
Musicians want to play together over the Net - is it even possible?
By Alan Zisman © 2021-03-01
Over the past year or so, with pandemic lockdowns and restrictions on getting together, musicians have seen opportunities for gigs disappear, and even the ability to get together in a rehearsal space, basement or garage become restricted.
Here in Vancouver, BC (Canada), during the summer (2020), people were able to play music together outside - as long as no more than 50 people gathered. Groups I played with were able to practise - in backyards and covered car ports. As autumn moved in, though, both colder/wetter weather and increasing infection rates resulted in these options being no longer available.
Meanwhile, many people were managing to work from home. Many meetings, public events, and classes were taking place online, using platforms like Zoom. My wife Linda, for instance, an aspiring water painter, has been pretty happy with the classes she's taking online in place of in-person lessons. She notes that in some ways they're better online - everyone is able to see, close-up, what the instructor is painting.
You may have seen social media posts with video clips of choirs, orchestras, and other musical groups appearing to be performing together, with each individual in their own window, Zoom-style. The inference: it ought to be possible for musicians to get together online to make music, playing together in real-time across the Internet. (Those choir (etc) videos: they're not what they look like. Each individual has been filmed separately, and then the various video clips were assembled into a Brady Bunch-style mosaic that makes it appear as if they're all making music at the same time.See: Dear Music Teachers - please stop asking how to create a virtual choir video)
I host a monthly accordion drop-in, the Vancouver Squeezebox Circle. Lately, we've been getting together over Zoom - which works - as long as only one person is playing music at a time. Other people can play along at home - as long as their mikes are muted. In the Squeezebox Circle Zoom sessions, if other musicians forget to mute their mikes, the sound of them playing along quickly gets weird and difficult to listen to. (Worth checking: How to play music on Zoom)
So Zoom is not a workable option for a musical group trying to play together. In that case, everyone needs to be able to hear one another. Seeing one another is nice - but less necessary.
The problem - connections online involve lag - so-called latency. The Internet works by sending data. in small 'packets' over a complicated network, over a route that may hop through a dozen servers (or more) between the sender and recipient. While fast (most of the time), travel along this ever-changing route does take measureable time. And this lag time can affect trying to play music together.
Not surprisingly, connecting to a computer further away requires more hops than someone local - but even a local connection may make a bunch of hops if the destination is on a different network from you. While all of my bandmates are in Vancouver, they use a variety of different Internet service providers so it's a complex web of connections.
But that's not the only cause of delay. Sound is an analog signal - computers and the Internet work with digital signals. Your gear needs to take the sounds you create and convert them to digital equivalents that can be send over the Internet. When these are received, the reverse happens - the digital code is converted to analog sounds that you can hear through speakers or headphones. These analog to digital conversions (and the reverse) are quick, but take measureable time, adding to the delays.
Bottom line - there are going to be 'latency' issues for musicians trying to play together in 'real time' across the Internet.
Nevertheless, even before the pandemic, there were a number of attempts to create software services to allow this to happen. JamKazam, for instance, says they have 'spent the last 6 years building the best platform in the world to help musicians play together live and in-sync over the Internet from different locations with high quality audio and video.' Through the end of 2020, they offered free, beta software. Since 2021, they offer a free, audio-only low bandwidth service, along with several tiers of higher bandwidth services to monthly subscribers. For a band wanting to play together, every member would need to be subscribing. We tested JamKazam last year, and then again - using the free, low-bandwidth tier, but were unable to make it work to our satisfaction.
Later this winter, we also tried the free, audio-only SonoBus which promises to be 'an easy to use application for streaming high-quality, low-latency peer-to-peer audio between devices over the internet or a local network.' Early tests between pairs of musicians were promising, but then two of us had a session where we just couldn't get in sync. We moved on.
(You may want to give both of these a try - just because they didn't work for us doesn't mean they might not work for you. But note the caveats listed later on in this article - which are true regardless of what software you're trying to use).
The third app we tried out was Jamulus, describing itself as 'designed for high quality, low-latency sound, making it easy to play together remotely and in time.' Like the others, it offers versions for Mac, Windows and Linux (SonoBus also offers beta-tests of Android and iPhone/iPad versions).
(2021-03-03: I just found out about another platform, though I haven't tried it out: JackTrip - their website has some well-written information on the issues of latency and the hardware (etc) needed to try to minimize it - worth a look - note: it's Linux and Mac OS only. There's also the Canadian-made SyncSpace service, offering bands real-time virtual performance and rehearsal options).
Before going any further with any of these programs, though, you need to take some time and look at how you're going to connect. The issue is to get a high-quality audio signal from each user and to maximize the quality of the network connection.
Many of us have been reasonably happy with Zoom (or other services like Apple's iMessage/FaceTime) just using a laptop or tablet or phone - using the built-in mike, camera, and speakers and a WiFi connection to a broadband router. That works for Zoom (et al). But all of these services - and my own tests - suggest that doing this simply won't be good enough for musicians trying to play together.
What you need to do before you even try to get online
For a start, WiFi connections are not stable enough. You've probably watched streaming online video over WiFi. Much of the time it's fine. But sometimes, there are brief pauses or jitters. Sometimes the audio and video briefly get out of sync. Not so good if musicians are trying to play a song together.
Much better if everyone (everyone!) involved connects to their broadband router with a wired network (Ethernet) cable. Folks using recent-model Macbooks (and some Windows laptops) will need to purchase adapters ('dongles') to plug the network cable into their laptop. Make sure you get an adapter that's compatible with your laptop - many Macs can use adapters that plug into their Thunderbolt/video port, but newer Macs need adapters with USB-C/Thunderbolt 3 connectors. Very recent laptops (both Macs and Windows) have USB-C ports - some, but not all, USB-C hubs include network/Ethernet ports, which would be a bonus. Whatever it takes, get your computer connected to your home Internet with a wired, Ethernet connection!
(In some of our homes, the broadband router is in an awkward location - long Ethernet cables can be used to let you connect your laptop from another room).
The
microphone built-into your laptop is handy, but its sound quality is
relatively low and its analog/digital conversion is not great. Do
better. We've found two better options. One is condensor mikes with USB
connections, plugging directly into the computer. Two of the members of
my band are using RODE NT-USB MINI Studio Condenser USB Microphone
(link to Canadian music store Long & McQuade) - price is CDN$139,
about US $100. Good sound quality, and a pick up pattern that lets a
single mike be used both for vocals and an acoustic instrument such as
guitar or fiddle.This microphone includes a jack for plugging in headphones on the back - a good feature that you want to use. There's a volume knob on the front - also a handy feature. I'm not sure if it can be connected to a standard microphone stand - less good for some set ups.
Two of us already own microphones for recording studio or live performance... as well, it might be useful to be able to plug in more than one input, or to use the signal from an electric guitar or bass pickup or the pickup installed in an acoustic instrument. There are a variety of USB audio interfaces available - with a variety of latency times. A JamKazam forum post included lists of audio interfaces that were reported to work well with that program, or to work poorly or not at all. These results should be applicable to the other programs as well.
The two of us who already had our own microphones both purchased MOTU M2
USB audio interfaces (also Long & McQuade links) - CDN$239 (about
US$188), based on a combination of price, low latency, and features. It
works right out of the box for Windows users. Mac users will want to
download and install a driver from MOTU - while it will work on Macs
without the driver, latency is much improved. It lets you plug in up to
2 microphones or instrument pickups, with separate gain controls for
each. Again, there's a headphone port - with a volume control for
headphone. You don't want to use a live microphone - whether plugged directly into your computer or into an audio interface device - and the speakers built-into your laptop - feedback is almost certainly going to scream at you. Instead, plan on wearing headphones. Some things to note - over the ear, closed headphones will do a better job than the common sort of ear buds that many of us use with our smartphones. One more thing to invest in! You don't want to use wireless headphones with this - one more thing that adds to latency! The cables that are on your wired-headphones may be too short and get in the way; many dollar stores or electronics shops will be happy to sell you an extension for 1/8" stereo plugs in your wired headphones. And plug them into the headphone jack on your USB microphone or audio input device.
Both Windows and Mac users will need to check your sound settings. Windows users can right-click on the little speaker icon in the lower-right of the Taskbar and pick Open Sound Settings from the pop-up menu; Mac users should click the little speaker icon in the top-right of the menu bar, and pick Sound Preferences - in both case be sure that both the input and output settings show that you're using the proper device - in our cases, either the Rode or the M2.
One more thing for Jamulus...
If you download and install Jamulus (and have done all the things mentioned above) and run the program and click the Connect button, you'll see something like this:
A
long growing list of 'public' Jamulus servers... and if you're wanting
to jam with others, that may be what you want. Or - look for one close
to you with a relatively low 'ping time'. For me, in Vancouver BC, the
top one in Delta is close by - and currently, no one is actually
connected to it. If my bandmates and I wanted, we could connect to it and have it all to ourselves - at least for now. Someone else, though, could choose that server and join in with us.
Call us snooty if you like, but we want something more private. And for that - at least with Jamulus, that means setting up our own, private server.
Setting up a server sounds scary. Not something that you (or I) are likely to do. Or something that needs some sort of special, expensive, heavy duty computer hardware.
None of that's true in this case. Let me explain.
Jamulus runs in either client or server mode - to run your own server, you're best off doing it on a separate computer - presumably you can run server on a computer and connect to it running the server on the same computer, but performance will suffer. I used two older laptops - a 2014 Macbook Air and a 2015 HP, one for the server, the other for the client. Both should use a cabled connection to the Internet - if you don't have enough free ports on your router, get a network switch (not a router)... they're cheap... I paid CDN$25 for a new 5-port switch.
You don't need the various audio devices - microphone, audio interface, headphones, etc on the computer running the server. Just the wired Ethernet connection.
Setting up the server is pretty straightforward with a couple of things to know.
-- Jamulus has a pretty helpful help page: https://jamulus.io/wiki/Running-a-Server but a couple of things it described weren't the case in my experience.
For instance, it suggests that Windows users could start the Server by clicking a Start Menu item labelled Jamulus Server. Simple, straightforward, but when I installed Jamulus on my Windows system, it didn't create any Start Menu icons. (Update 2021-03-24 - Updated Jamulus version 3.7.0 fixes this and installs separate and working Jamulus and Jamulus server icons on both Windows and Mac).
I found the Jamulus software installed in the C:\Program Files (x86)\Jamulus folder, with a Jamulus.exe file (and a Jamulus-server-icon-2020 icon file). Double-clicking the Jamulus.exe file starts the program in client mode.
I
right-clicked the Jamulus.exe file icon, and picked Create Shortcut
from the popup menu. That created a shortcut on my Desktop that would
open the program in client mode. I did it again, to create a second
shortcut on the Desktop. Then I right-clicked (on either one of them)
and picked Properties from the popup menu.In the Target field, I added a letter 's' after what was already written - in this case, 's' is for 'server'... with this addition, double-clicking the shortcut icon will open Jamulus in Server mode.
If you want, click the Change Icon button, point it to that C:\Program Files (x86)\Jamulus folder and pick the Server Icon file - then if you have two shortcuts, they will have similar but different icons - with a blue lightning bolt for the Client program and a red lightning bolt for the Server. Click OK. Back to the icon - right-click on the icon's title and pick Rename from the pop-up menu, and rename it Jamulus Server.
A bit of a pain but not rocket science.
Meanwhile, that same Jamulus Server help page described having to do something like this on your Mac installation. Instead, in my case, installing on the Mac got me two icons in my Mac's Applications Folder - one named Jamulus (for the client application), the other named Jamulus Server. Easier than described!
If you want a private server, you can pretty much leave the Server settings alone. The only thing I did was add a bit of text - a welcome message to the Chat field, so that if anyone connects to my server, they immediately see the welcome message and know that they're in the right place. However, you need to do a bit more before anyone outside your home network can connect.
By default, your broadband router - installed by your cable or phone company - wisely is designed to keep outsiders from being able to access computers in your home. In general, this is a good thing. But when you're running a server. you want others to be able to access that computer - at least in a limited and controlled way.
As a result, you need to be prepared to mess with your broadband router's settings, and modify something called Port Forwarding. There's a Jamulus help page that describes that in a generic way.... it's a bit different for every make/model of router - so my detailed instructions may not be of much help to you.
In my case, there's a label stuck on my router (aka 'cable modem') with the default IP address, log-in name, and password. When I type the IP address into a web browser (assuming I'm at home connected to my home broadband), I get prompted for the log-in name and password - entering those opens the router's configuration screen. In my case, there's a Basic Tab that has a Port Forwarding section. I've added the port number (22124) and UDP as described on the Jamulus help page. I had to find out my local IP address of the computer that is running the server from that computer's Network properties (whether it's a Windows or a Mac):
A bit geeky - but you can do it!
One more thing may be needed - the computer on which you installed the Server software may have a firewall running, which - like your broadband router - may be set to block anything trying to access the computer. Again, generally a good thing. And again, there's a way to make an exception for things you want.
On a Mac, open System Preferences, and go to the Security & Privacy item and then to the Firewall tab... click on the little Lock icon and enter your password to make changes as needed.
On my Windows 10 system, if I type 'Firewall' in the Taskbar's search, one of the items that comes up is 'Allow an app through Windows firewall'. Bingo! Clicking that gets me a window with a long list of allowed apps - scrolling it, I saw that Jamulus was already listed. Apparently, the installation process did that. If it hadn't, I could have clicked the Allow Another Appl button to add it.
One final thing - you need to know the Internet Protocol (IP) address to connect to your server. That's the IP address of your broadband router, not the IP address of the computer that's actually running the server app. (That's because the IP address of the computer is a private address only visible to other computers on your home broadband network - whether wired or WiFi). For anyone outside your home network, all they get to see if your broadband router via its IP address.
You can find your router's address by pointing your web browser (when you're at home) to https://whatismyipaddress.com/ - that will give you the address that you can share with your band mates to connect to your private Jamulus server.
Okay, you (or a band mate) have set up a private server, configured your broadband router to allow connections to it, and found the IP address needed for the connection.
Over to the Jamulus client
On a computer that's connected to the Internet using a wired Ethernet connection - and that has a USB audio device (microphone or audio interface) connected and headphones plugged in, open the Jamulus client.
First
thing, click on the View menu, then on My Profile. Enter your name,
instrument, etc.... feel free to evaluate your skill level - or not.If you're playing with other musicians, it will be VERY helpful for each of you to be able to adjust levels for each musician (for your own mix in your headphones) - and to do that, you'll have to know which volume slider goes with which person!
Next, click on the Connect button - you'll see a window similar to the one shown above, with a big long list of Public Servers - all of which you can ignore (unless that's what you want to do, of course). Instead, look at the Server Address field at the lower-right of that window - and enter the IP address you discovered for your broadband router. (Even if you're at home)... then click Connect. (Nicely, it remembers what you entered so you don't have to enter it again the next time).
Since I've added a welcome message to my server, when I connect, a chat window opens up and displays the welcome message. So I know when I'm connected.
When everyone in the band connected, here's what it looked like:
Before getting the whole band together virtually, we tested it in a series of duos - making sure that everyone had a wired connection and appropriate audio hardware, and knew how to connect the hardware and connect the software to the server. Only after we had working one-on-one sessions did we try it with everyone at once.
Pay attention to the sound in your headphones, not the sound of your instrument in the room - adjust sliders for each musician to create a mix that works for you, where you can hear everyone at appropriate levels. Changing the sliders on your screen doesn't affect the volume level that others hear - you can give the other people more or less volume with the physical volume knobs on your microphone or audio interface device.
The Windows version of the client had little 'Pan' knobs above each person's volume slider - this is a handy thing, letting you place each musician at a separate place in your headphones, making it easier to separate the sounds. The Mac version (pictured) doesn't seem to have that feature.
Playing together this way is different - and harder - than playing while being together in the same room... but so far, it seems to be working. Let me know if you have any questions - maybe I can help.
Older blog postings....
| About This Blog... I've been writing about computers, software, Internet and the rest of technology since 1992, including a 17 year (1995-2012) stint as 'High Tech Office' columnist for Business in Vancouver. This blog includes thoughts on technology, society, and anything else that might interest me. Comments, emailed to alan@zisman.ca are welcome - and may be published in whole or part. You can follow me on Facebook for notice of new blog postings. |
 |