Burning CDs from
LPs and Tapes
by Alan Zisman
(c) 2003
(Printer-friendly
version:Mac)
Part 1- Getting Connected
One
of
the
things
that many people want to do with the CD-burner on their
computer is create audio CDs from their library of cassette tapes,
8-tracks, and vinyl (LPs). While it's relatively straightforward to
copy audio CDs or create compilation CDs from tracks from other CDs, it
seems scarier to make CDs from other media. I'm not a pro, but here are
some tips that I've learned the hard way.
Assumptions
1)
I
assume
you
have a CD-burner (or DVD-burner) on a PC or Mac, and are
relatively familiar with burning an audio CD... I'm not going to focus
on this end of the process... instead, my emphasis is going to be on
getting burnable audio files onto your computer from your tapes and
LPs.
2) I'm assuming
that you have an audio system-- a stereo, with a turntable and a
tape-deck. Further, I'm assuming that your tape-deck or stereo has a
set of output plugs-- either Tape Out plugs on the back of a tape-deck,
a line-out plug on the stereo, or (worst-case scenario) a headphone
jack. If you can't get an audio signal out of your system, you can't
record anything into your computer!
3) I'm assuming
that you're comfortable enough with your computer and with software in
general that you can experiment... you're probably using different
hardware than I used, and different software. As a result, my
instructions and illustrations won't exactly match what you'll see in
real life. Be prepared to experiment! Feel free to e-mail me with
questions, if you're stuck... but I can't guarantee that I can help!
Getting
Set
Up
The first
thing you'll it is to be able to connect your audio components to your
computer. Obviously, this is going to be easiest to do if your audio
equipment and computer are reasonably close to each other-- at least in
the same room. There are a lot of variables here, so bear with me.
First, start at the audio-end.
- Do your audio gear have separate
components? If so, perhaps the easiest thing is to go from your tape
deck's Play or Line Out or Tape Out plugs to
your computer. Typically, these so-called RCA plugs .Your
computer uses a 1/8" Mini-stereo plug in the sound-card's Line-In
(preferably) or Mike-In jack. So get an adapter cable-- Radio
Shack, or most stores that sell audio or electronics parts or equipment
will have these. You may also need to get an extension cable to stretch
this further. (Make sure it's stereo!)
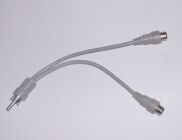
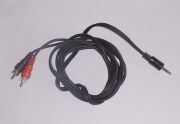 |
|
RCA to Mini cable
|
Mini extension cable
|
- If you don't have a separate tape
deck, but have a stereo receiver, connect to the Tape Out or Aux
Out connectors.
- Don't connect
directly to your turntable. Turntables require pre-amps to boost and
equalize the signal from the cartridge, and won't record properly if
connected directly to your computer. Instead, get the signal from your
turntable after it has been boosted and equalized through your
receiver-- either directly from the receiver, or through your tape
deck. I prefer connecting to the tape deck, as that way I can make CDs
from both tapes and vinyl LPs with a single connection. (Yes, if you
have a separate pre-amp, you can use this to boost the turntable's
signal)
- If you want, while you're buying
cables, pick up a pair of RCA-Y-connectors ... get ones with
one
male plug to two female plugs. Plugging these into your tape-deck's
Line
Out connectors will let you leave the tape deck plugged into your
stereo receiver while plugging into your computer as well-- this not
only saves time and hassle if you do this often, but lets you use your
home stereo to monitor the recording process.
RCA Y-connector
- Is your tape deck built-in? If so, it
probably doesn't have separate outputs. Better one-piece units will
still have a Line Outplug-- maybe a pair of RCA plugs,
or maybe a single 1/8" Miniplug. Again, get the appropriate
cable, with optional extension to connect to your computer's Line In
plug. Worst case scenario-- there's only a headphone jack, probably a
1/8" Mini plug, possibly a 1/4" Stereo plug. I say worst-case, because
the signal is amplified, and you'll need to be careful not to overdrive
your sound-card's input, causing distortion in your recording.
- Using a Walkman-style portable tape
player? Again, you're best-off if there's a Line Out plug, but if not,
you can connect from the headphone connector-- with care during
recording.
On the computer,
you'll see several 1/8" Mini connectors, either on the sound card on
the
back of the computer, or on the body of the case... most times, you'll
have a cord going from one connector to your computer's speakers, but
it's not always clear which one to use. You may have four (or more)
plugs:
- speaker out: for plugging in
speakers, using a relatively low-powered audio-amplifier on the sound
card. This is also used for plugging in a headphone.
- line out: for connecting to an
external stereo system or to speakers with their own amplifier. (On
higher-end sound cards, you may have two outputs-- for front and rear
pairs of speakers).
- mike in (aka mic-in): this is
for plugging a microphone into the computer; it expects a higher-level
signal than the line in circuit. It can be used in a pinch, but you may
have to adjust levels when recording.
- line in: this is for sending an
audio signal into the computer from audio-gear: home stereo, mixing
board, etc. This is the one we're looking for.
These plugs may
be identified with icons: a picture of speakers, a picture of a
microphone, and maybe an image with an arrow pointing in, and one
pointing out... these could refer to Line In and Line Out. For
better or worse, it may take some experimentation to find the right
place to plug the cable into your computer.
The
sound-quality of your recordings is limited by the quality of your
computer's sound card. This can be a relatively crappy component,
especially if built-into the motherboard of desktop PCs or notebooks.
An
alternative is a USB sound device, which can provide a cleaner, better
quality way to get sound into the computer. Moreover, some recent Mac
models had sound outputs but no built-in sound inputs. Two
examples of USB sound devices are the Creative Extigy
(http://www.soundblaster.com/products/extigy/),
a US$149 external sound unit (PC-only) If using this, connect the cord
from your stereo to the Extigy's Line-In plug on the front of the unit.
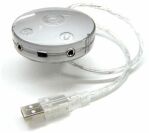
Simpler and more affordable, but still offering good sound quality is
the US$35 Griffin
Technology iMic (http://www.griffintechnology.com/audio/imic_main.html).
Despite
its
Apple-influenced
name, it works with both Macs and PCs
running Windows or Linux. Note if using an iMic... for reasons that
I don't understand, this unit has icons that work backwards from what I
would expect. Plug in to the plug labelled with a speaker icon,
not the microphone icon.
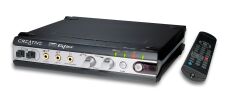
|
|
Creative Labs Extigy
|
Griffin Technology iMic
|
Part 2- Getting set on your Mac
Mac users
should make sure that the appropriate audio input and outputs are
selected. In Mac OS X, for example, the Sound system
preference may give you a choice between a built-in audio controller
and iMic USB audio system (assuming you have an iMic plugged
in!)
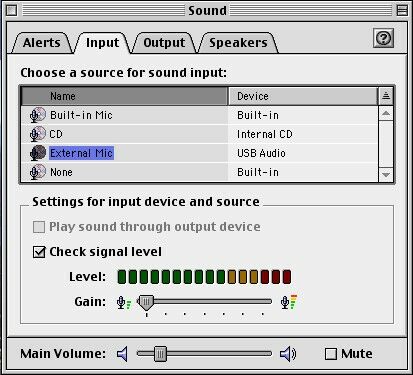
Similarly, in Classic Mac OS versions, go to the Sound control
panel, and go to the Input tab, and make sure the proper input
device (such as the iMic) is selected-- for the iMic, choose Line
In... USB Audio , or External Mic: USB Audio. Activate the Check
Signal
Level box, and send a signal in from your audio device,
testing that the signal level is showing up. Adjust the levels as
required to get a signal of reasonable strength, that is close to the
top of the green, flickering into the red. This makes sure that the
levels of the sound coming into the computer are neither too low nor
too loud, but just right.
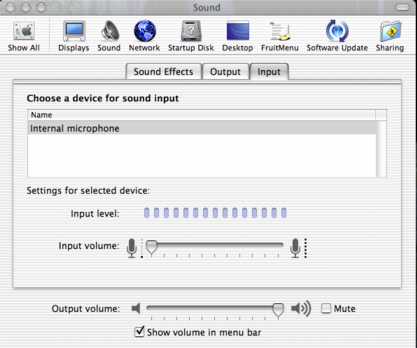
Mac OSX Sound system preference
Mac
(Classic)
Sound
control
panel
About signal
levels
The trick with
recording (not just in the case, but in all sorts of recordings) is to
get as hot a signal as possible that isn't too powerful. If
your
signal is too low, the quiet portions of the music can get lost in the
ever-present background hiss and noise. So you want to boost your music
signal as much as possible, relative to the background sound. However,
if the signal is too high, the loud portions will over-drive
the
recording circuitry, causing audible distortion and clipping. Most
recording software (and hardware) will include meters, (known in the
trade as VU Meters). Typically, the top portion will be
coloured
red. While playing or recording, you're best off if the signal is high,
going into the red momentarily. If it is in the red for extended
periods, you're probably getting a distorted signal. If it's never in
the red, you're probably too quiet.
You may be able to
adjust the level with a Gain or Level control (as in
the Mac Sound control panel or the Windows speaker controls), or with a
volume control on your stereo. (Depending how you're hooked up, your
stereo's volume controls may or may not affect the strength of the
signal being sent from your audio equipment to your computer). If you
can't control the levels at this stage, you're better off with a
lower-strength signal; you can boost a quiet sound later, but if you've
recorded a distorted signal, there's nothing you can do later to get
rid of the distortion. However, if your signal is too low, you'll get a
lot of background noise, and boosting the signal will also boost this
noise, sometimes making the music unlistenable.
(Note:
the
Mac
sound
Control Panel has both a level control and a meter so you
can see the effect of changing the level. This is a very good thing).
Part 3
Ready to Record (Mac)
You'll need some
software to record on your computer. Classic OS Macs include basic
recording software. SimpleSound is usable, if no-frills.
When it opens, you'll see a list of System Alert Sounds-- go to the Sound
menu to select CD Quality, then the File/New menu to
record a new sound. Click the Record button, and away you go!
When you're done, you can save the file with the name and location of
your choice. SimpleSound records in uncompressed AIFF format,
which can be later converted to CD Audio by your CD burning
application.
There's no equivalent to
Simple Sound built-into OS X. Better, though is the free Audio Recorder, a simple
recording application that saves in either uncompressed AIFF (use this
if making audio CDs) or compressed MP3 format.
Whether
using OSX or the classic Mac OS, you will want a more sophisticated
recording program. There are lots of options, many of which can be
downloaded-- though in most cases, users will need to buy a product
code
to continue to use a program after a trial period. On the Internet, you
may want to go to someplace like Download.com and search for recording.
Doing
so
got
me 131 Windows hits and 17 Mac hits-- though many
are for CD burning, 'ripping' audio from CDs inserted into your
computer, or other things that while interesting, may not be what you
want to do right now.
Well worth
checking out: Audacity,
a
very
capable
and free recording program, available in
versions
for Windows, Mac (both classic and OS X) and Linux.Unix. Plug-ins (to
the free, open-sounce Lame) are required to save in
the popular MP3 format; these are available for most (but not all)
versions on the site. Development of the classic Mac version has
stopped
with the 1.0 version release; OS X development is continuing.
The biggest
lack in Audacity is that (at least as of July 2003) it doesn't
provide VU meters-- a way to keep an eye on the levels while recording.
This makes it difficult to know in real-time whether you're recording
is
too loud (and distorting) or too quiet to be usable. There are
lots of other options-- though many downloadable programs are
demo-ware,
which will work for a limited amount of time, then may disable
themselves unless you purchase a serial number.
Stop the presses! The current
versions for Audacity now have VU meters, making this a very usable--
and free program. Check it out!
Among other
programs worth checking out are:
- Peak LE is the lite version
(US$99) of the full Bias Peak (US$199-699) application. There are
downloadable 14-day trial versions of both. I like Peak LE for
recording
on the Mac. The new 3.0 version is OS X-native.
- Coaster is a free
recorder
with a good set of options.
- Amadeus II runs
under
both
Mac
OS 8.6 and up or natively under OS X; it's a US$25
program that includes recording functions, sound repairing functions,
MP3 support and more. 15-day free trial version.
- Sound Studio
(free trial-- US$50 to buy). Lets users record and edit AIFF sound
files
on a Mac under OS X or OS 8.5 or later. Designed to record from a
stereo
system to computer, di
- gitize cassette tapes,
LP, on-air radio, or live
performances. It includes filters and effects like fades, reverb, and
graphic EQ. (I've purchased this one to use on my Mac-- it's very good!)
- SndSampler (shareware, US$30 to
buy) has both classic Mac (OS 8.5+) and OS X versions... lots of power
but a somewhat geeky interface.
- Analogue Ripper
(Mac OS X: $29)
is for recording from LP, cassette, etc-- any analog(ue) source.
Includes editing and playback tools for splitting long recordings into
tracks. A nice feature lets you record 33 1/3 rpm recordings at 45 or
78 to shorten recording time, then slow them down once they're on your
computer. You can also use this (in reverse) to record 78 rpm
recordings at 33 (or 45) using a turntable that lacks 78 rpm support.
Griffin Technology, makers of
the Mac-audio add-ons iMic and PowerWave has a free program: Final Vinyl
specifically for recording LPs and cassettes-- it requires that you be
using one of their products to operate, but if so, is simple and
powerful. It allows you to connect a turntable directly to your Mac
(via the iMic or PowerWave), without needing the rest of your stereo
connected (though it can also be used with your stereo as described
earlier in this tutorial).
A good place to
check for audio-software is Harmony Central (http://www.harmony-central.com/Software/),
with
resources
and
news for Windows, Mac, DOS, Atari, Amiga, BeOS, and
Unix. Or check http://www.mp3-mac.com/Pages/AudioRecorders.html
with brief reviews and links for a range of downloadable Mac recording
programs.
The one I use is Sound Studio...
I'm still using version 2.2.4; there's a new version 3 which I haven't
tried (2.2.4 is still available for download). I find Sound Studio
simple and reliable with some features that make it work very quickly,
especially if you've recorded entire sides of a tape or LP and are
splitting it into individual tracks. Highly recommended! (My second
choice is the free Audacity).
By now, you should
be hooked up to your audio hardware, and have software up and running.
It's time to put the vinyl on the turntable or the cassette tape in the
tape deck (or just turn on the radio), and load up your chosen
recording software.
When you get ready to
record, you may be asked what quality to make your recording... if you
aren't asked about this, check your software's Preferences or settings
to make sure they're what you want. Here's the Sound Quality dialogue
for Sound Studio:
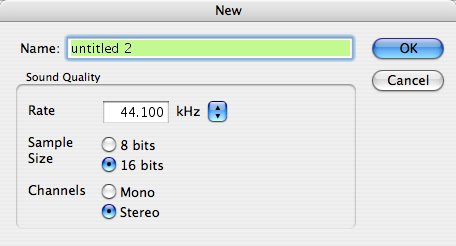
These choices-- a 44.100
kHz sample rate, 16-bit sample size, stereo, will provide CD-quality
recordings. Figure on needing about 1 MB of drive space for each minute
recorded.
Check your levels
Do a test-run,
recording something, just to make sure everything is connected properly
and your levels are at reasonable. 20 seconds or so of music ought to
do it (unless your music has very quiet and very loud portions, in
which case, you should check some of each)... Stop and play it back on
your computer. Hopefully, it worked and sounds good... if not, keep
fiddling with the level controls, both on your audio gear and on your
computer until you find that happy medium.
Part
4:
Making
the
recording
Note:
The
previous
two
sections had separate Mac and Windows pages; this time
around, I've just produced a single version-- using the Windows SoundForge XP software.
You
may
be
using a different program on a Windows system or on a Mac;
in that case the specific command-names and dialogue boxes will look
different. But there will be enough similarities that hopefully this
will prove usable. If you have any questions,, feel free to drop me a
line.
If you've
been following this series of tutorials, you've connected your audio
equipment to your computer, set your control panel or system prefence
for recording, gotten a better recording application than what came
with your computer, and set test levels for a recording. You're ready
to go!
What not
to
do!
You may want to press
record on your computer software, start up your LP or tape, check your
levels, and then go away until you've finished recording one side of
the LP or tape (about 20-45 minutes worth of music). After all, you can
always cut and paste to individual tracks later. This will
work,
but it turns out to be a very inefficient use of your time. Your
software takes a long time to process large files. Using SoundForge XP
5.0, for example, I recorded a 45minute file containing 18 songs.
It took about 6 minutes for the software to process the file when I
tried to select and cut out one 3 minute tune, in order to paste it as
a new, separate track. As the file got smaller and smaller (as I
removed each song individually), it took less and less time-- but there
was a lot of time wasted after I had the whole thing recorded.
(Here's a tip
suggested by reader David Bentley of Walnut Creek, CA, USA.
He says:
" The
trick is to start at the end. Then it takes Sound Forge very
little time to rework the remaining parts of the file. If you
need
something from the middle, first delete whatever follows it (or cut
& paste that to another file), then cut off the part you
want,
which is now on the end! If you want, of course you can always
use
undo to restore the file to what it had been, and this will probably be
faster too as it is adding things to the end, and doesn't have to
shuffle huge amounts of information forward to eliminate the gap.
I think that is what takes all the time."
-- Thanks David!)
Instead..
Best, in my
experience, is to record each track on the LP or tape individually,
saving it before going on to record the next track. Once it's saved,
you can clean it up later, but get each track recorded and saved
individually first. Try something like this:
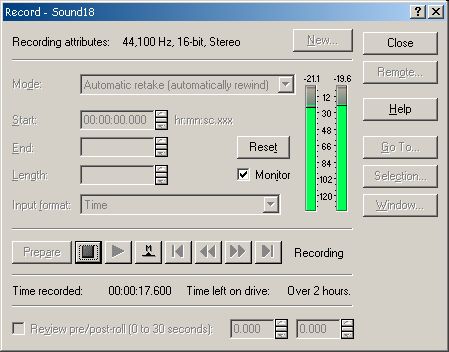
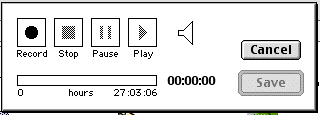
- Click the Record button on your software (often an icon
of a
button with a circle or square on it). Here's the screen you'll see in
SoundForge XP 5.0:
- With the software recording, scoot over to your audio equipment
and start to play the desired track. Try to start a little before the
exact starting point; it's easy to edit out the junk later, but you've
wasted everything if you miss the first few seconds of the track.
- Go back to your computer, and check that the levels are OK while
you're recording.
- When the track ends, go back to your audio equipment and pause
or
stop it.
- Go back to your computer and click the button to stop recording.
On SoundForge, you should then click the Close button. You'll
see something like:
- Save your sound file. If you're planning to burn an audio CD,
save in an uncompressed format such as Wave (*.Wav for Windows
users) or AIFF (for Mac users). If you're wanting to rip
MP3 files, your sound application may give you the option to save
directly as MP3... but don't do this if you want to make an audio CD--
though you may be able to convert these MP3s to CD Audio, you'll be
losing some sound-quality in the process.
- If you're planning to make an audio CD, a good idea is to start
your filename with the number of your track. In order to easily have
your computer sort the tracks in the proper order, for numbers 1- 9,
use '01', '02', etc... that way, '02' will be sorted prior to '10' or
'11'... so call your first track something like '01 I Love My Dog.wav'
or something similar.
- Once you've saved your track, you may want to record and save
the
next track, and continue that way until they are all recorded, cleaning
up all the tracks at the end. Or you may want to do a bit of processing
on each track after it's recorded. Either work-flow is fine. In any
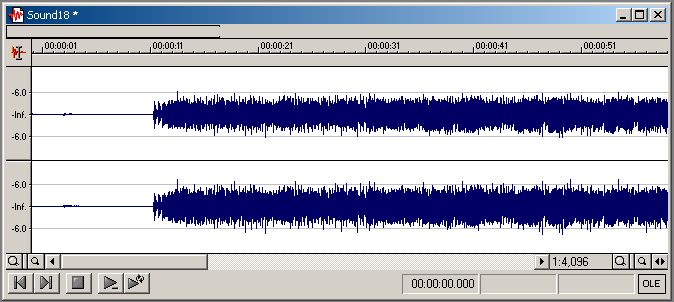
event, take a look at the picture of the sound file above. Note the
quiet in the first 10 or 11 seconds of the track. I can highlight and
delete it-- but I would suggest listening to it first, in case there is
some quiet instruments leading into the main sound. Delete the unneeded
portion, then listen again-- most software includes an Edit/Undo
if you cut out too much.
- Go to the end of the track, and again, listen... there's
probably
some that you can remove in the same way.
- If your recording levels were low, you can boost the volume. In
SoundForge XP 5.0, there's a Process/Volume menu item which
gives the following:
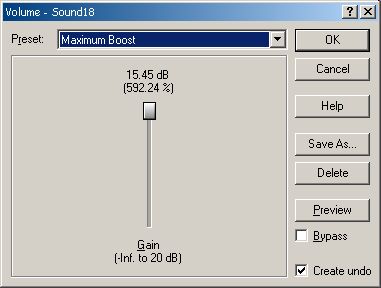
If nothing in the picture of the file is selected, the volume boost
will apply to the whole file. If a section is selected, only the
selection will be boosted. When you boost the volume, however, you also
boost the background noise. And if you recorded with your levels set
too high, you may hear audible distortion. In this case, lowering the
volume will simply give you quieter distortion. Better to re-record,
with your levels adjusted to a more optimal setting.
Most of your software
will have lots more bells and whistles you can play with, but
personally, I'd recommend using as little as possible, to get as clean
a recorded sound as you can. Even software that promises to remove pops
and scratches when recording old LPs does so by altering the sound of
all the music. You may be better off keeping the scratches in the
recording.
When you've got a set of usable recordings, you're ready to burn them
to CD. The software that came with your CD burner will do fine
for
this, though deluxe commercial versions will again offer more
features. For example, Roxio
Easy CD Creator Pro (http://www.roxio.com/en/products/ecdc/ecdcfeatures.jhtml)
or
Platinum editions, unlike the Basic version that is often
packages with PC CD-burner hardware, includes a SpinDoctor module which
includes features to remove clicks, pops, and hisses, and normalize
(balance) levels between tracks recorded from different sources. Mac
users can get similar SpinDoctor features from Roxio
Toast Titanium (http://www.roxio.com/en/products/toast/features.jhtml)
.
These
are
not (legally) downloadable, but can be purchased online
(http://www.roxio.com/en/store/index.jhtml US$99).
Last updated: 25 April 2006