Customize your OpenOffice.org setup
by Alan Zisman (c) 2005
Introduction:
Like most pieces of software, OpenOffice.org comes with a series of default settings chosen by the programmers. Inevitably, your needs may vary from those the programmers imagined would be typical- and if so, you may spend lots of time 'fighting' the software. Instead, learning to feel comfortable altering those defaults can make you more productive with your computer.
Have no fear of altering default settings- if your needs change, you can always reset them; at the worst, you can uninstall the software, and reinstall it. And the reason they call it a 'personal computer' is because you can set it to match your personal needs and style of working.
In this tutorial, I am going to focus on setting up OpenOffice.org 2.0 to match my needs. This is just to get you started-- explore the various options and make it work around your needs!
(Note that while I based this tutorial on OpenOffice.org 2.0, the various settings are almost identical in both older and newer versions of OpenOffice.org, LibreOffice and NeoOffice - Windows, Linux, and Mac versions - and with a little imagination, can be extended to other pieces of software as well.
During installation:
While installing OpenOffice.org, there are a few screens of questions. In this case, I opted for the default Complete Installation. You may want to check out the various options in the Custom Installation.
If you're in the habit of simply clicking OK or Next for every dialogue, watch out... for instance, if you're installing it on a WIndows system that lacks a copy of Microsoft Office, but does have Microsoft's anemic WordPad installed, you may see:
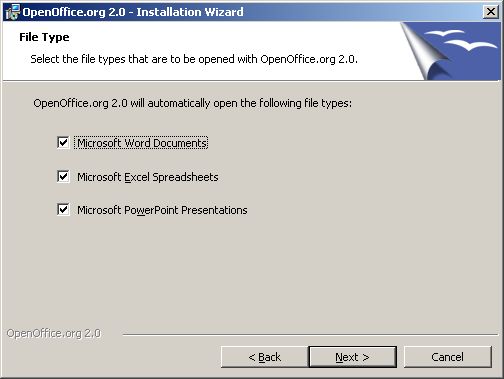
-- except that there's no checkmark beside the [ ] Microsoft Word Documents. Quickly clicking Next without first adding the missing checkmark will leave you with Wordpad automatically opening word processor documents. Pay attention!
Once it's installed...
The first time you start up one of the OpenOffice.org applications, you'll see a series of dialogue boxes, asking for (among other things), a user name, agreement to a (thankfully short) user agreement, and an optional registration. You can choose not to register at this time, or tell it that you're 'already registered' (whether you are or not) without problem. Finally, a blank word processor, spreadsheet, or presentation screen will start up.
The first thing I do, when faced with a blank word processor document, is adjust the zoom. By default, this is set to 1.0, but isn't centred on the screen. Instead, I right-click on the 100% along the bottom of the screen. This pops up a menu full of choices:
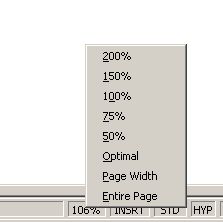
I prefer Optimal, which centres the work area in the window, and zooms it to the largest size that will fit comfortably on your screen. On a display set to 800x600 resolution, this is at 106%, a small magnification. On a 1024x768 display, it's at 136%.
Auto-what?
One of OpenOffice.org's 'features' is Word Completion... as you type in the word processor, you'll see it suggesting the word that it thinks you're trying to write. Maybe you like this or find it helpful... I find it annoying-- and on older computers, it can help slow everything down. To turn it off: click on the Tools menu and pick Auto-correct. In this dialogue box, you'll find a bunch of settings-- take a moment to check them out. (Microsoft Word users often find themselves wanting to turn off some of the features in that program's version of this dialogue). Personally, I leave everything alone except for Word Completion. Click on that tab, and remove the checkmark beside [x] Enable word completion and below that, beside [x] Collect words. Click OK.

Edit your toolbar
Toolbars can be a very handy way to quickly get to commonly-used commands without having to dig through menus and dialogue boxes. But a toolbar filled with icons that you never use is just visual clutter; and if there are commands you do anticipate using frequently, it's nice to be able to add them to the appropriate toolbar. In OpenOffice.org's word processing module (OpenOffice.org Writer), I make a few changes to the second toolbar- the Formatting toolbar, To do this, click on the Tools menu, and then on Customize. A dialogue box opens up that allows you to make changes to the actual menu items, and to keyboard shortcuts. I skip those (feel free to play around if you like!) but click on the Toolbars tab.
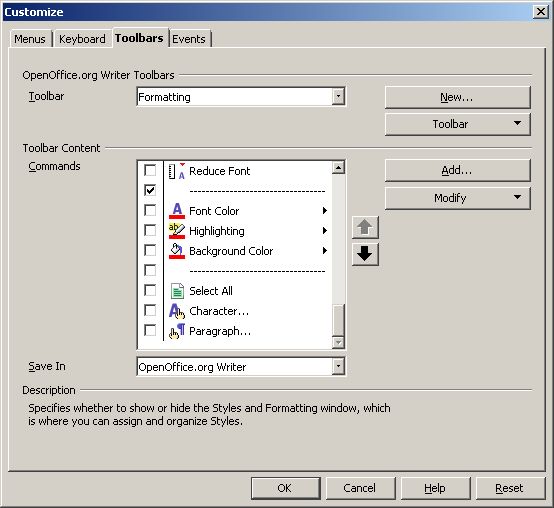
First, drop down the list labelled Toolbar. There are a lot of toolbars among the various modules! I only make changes to the toolbar in the Writer module. (In OO.org 1.x, this is referred to as the Text Object toolbar). Scrolling down the list of icons, I remove the checkmarks beside the first several items all referring to Styles. Styles are a powerful tool, allowing users to customize the fonts and other settings associated with normal text, headlines, lists, etc... but I don't use them. (Do you?) And the drop-down list of style names takes up a large hunk of toolbar real estate. Notice that the toolbar changes as you uncheck items.
Scrolling down the list, I remove the checkmark beside the Justified text alignment item-- fully justified text simply looks ugly in word processors. I add checkmarks beside the three line spacing items-- there are times when I want to be able to switch between single and double-spacing, and this makes it easy.
Finally, I remove the checkmarks beside the Font Color, Highlighting, and Background Color items. When I'm finished, I click OK.
Lots of Options
Then I open the Tools/Options dialogue box. There are lots of options... you'll see a collapsed outline on the left- clicking the [+] beside a section opens it up, allowing you to select sub-sections to see the actual options. For instance, if you want to by default store files in a non-default location, open up the top section, and click on the Paths option. I open up the Load/Save section and then go to its General object:
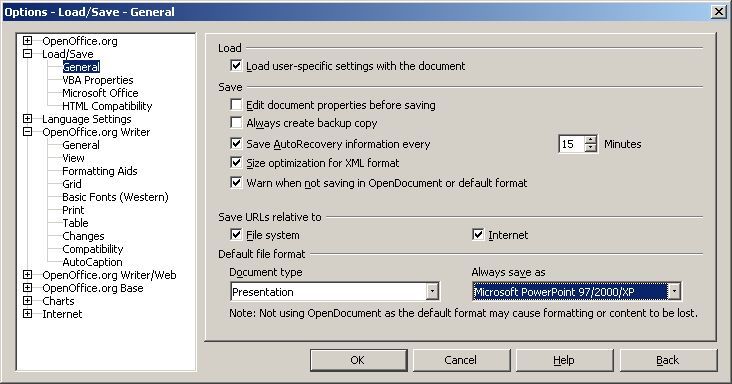
By default, OpenOffice.org wants to save its files in one of two OpenOffice.org-specific sets of file types. OO.o ver 1.x uses a set of OpenOffice.org file types that can only be read by OpenOffice.org or Sun's Star Office... OO.o ver 2.x defaults to a new set of Open Document file types that may become a world-wide standard. But for now, most of the world uses Microsoft Office (Word, Excel, and Powerpoint) file types as de facto standards. Rather than fighting this, I go with the flow.
As a result, I make the default Word Processor file type: Microsoft Word 97/2000, default Spreadsheet: Microsoft Excel 97/2000/XP, and default Presentation file format: Microsoft PowerPoint 97/2000/XP.
Before I click OK, I open up the OpenOffice.org Writer options and click on the Basic Fonts (Western) item. On slower computers, this takes a moment or two to display:

The Default font (on Windows systems at least) is Times New Roman. I prefer to change this to Comic Sans MS. Note that when you change this top one, the other default fonts change as well. (To do the same thing in MS Word, by the way, is a major pain, involving editing the hidden and protected Normal.dot template... kudos to OpenOffice.org for making it much easier).
At this point, I click OK. I'm done customizing the OO.org word processor. If I close the blank document, I'm asked to save my changes... I can choose not to save without losing any of my customizations.
One more thing: Open Impress
OpenOffice.org Impress (also referred to as OpenOffice.org Presentation in some older versions) is for creating screen shows, similar to Microsoft Office's Powerpoint. I make one change-- to the default printing behaviour. Most often, when I'm printing a presentation, I want to make audience handouts, with multiple slides to a page. Since I do that most often, I make it the default. To do so:
Open Imprint. Ignore the would-be helpful opening screens by clicking on the Create button on the first screen. Then click (once again) on the Tools/Options menu item, click beside the OpenOffice.org Impress item, and choose Print. (Note in OO.org 1.x, you can get there even with a word processor document open):
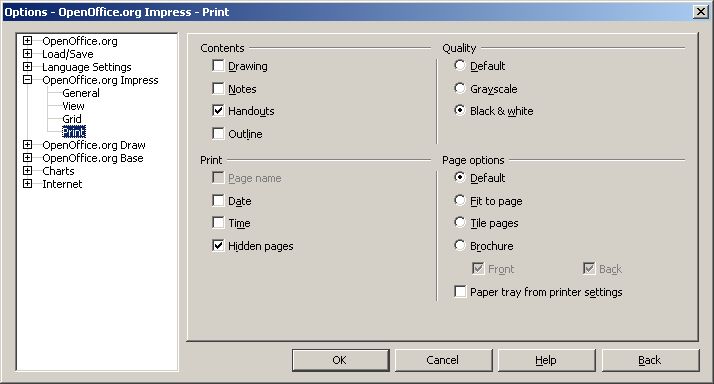
I add a checkmark for [x] Handouts and remove the one beside [x] Drawing. I change the Quality to Black & White and set the Page options to Fit to page. With these settings, I get (by default) four slides to a printed page, in a quality that photocopies well.
Other
While I'm making changes, I also customize desktop icons and Start Menu options. I've created an Applications folder within the Start Menu items, and move the OpenOffice.org 2.0 start menu folder within it, for instance. To learn how to tidy up your desktop and Start Menu, check my tutorial: http://www.zisman.ca/simple95/
Conclusion
This introduction highlights the changes that I make to a default OpenOffice.org installation. They fit my needs. Your needs may (and probably will!) vary. Explorer the various AutoCorrect, Customize, and Options dialogue box features.
by Alan Zisman (c) 2005
Introduction:
Like most pieces of software, OpenOffice.org comes with a series of default settings chosen by the programmers. Inevitably, your needs may vary from those the programmers imagined would be typical- and if so, you may spend lots of time 'fighting' the software. Instead, learning to feel comfortable altering those defaults can make you more productive with your computer.
Have no fear of altering default settings- if your needs change, you can always reset them; at the worst, you can uninstall the software, and reinstall it. And the reason they call it a 'personal computer' is because you can set it to match your personal needs and style of working.
In this tutorial, I am going to focus on setting up OpenOffice.org 2.0 to match my needs. This is just to get you started-- explore the various options and make it work around your needs!
(Note that while I based this tutorial on OpenOffice.org 2.0, the various settings are almost identical in both older and newer versions of OpenOffice.org, LibreOffice and NeoOffice - Windows, Linux, and Mac versions - and with a little imagination, can be extended to other pieces of software as well.
During installation:
While installing OpenOffice.org, there are a few screens of questions. In this case, I opted for the default Complete Installation. You may want to check out the various options in the Custom Installation.
If you're in the habit of simply clicking OK or Next for every dialogue, watch out... for instance, if you're installing it on a WIndows system that lacks a copy of Microsoft Office, but does have Microsoft's anemic WordPad installed, you may see:
-- except that there's no checkmark beside the [ ] Microsoft Word Documents. Quickly clicking Next without first adding the missing checkmark will leave you with Wordpad automatically opening word processor documents. Pay attention!
Once it's installed...
The first time you start up one of the OpenOffice.org applications, you'll see a series of dialogue boxes, asking for (among other things), a user name, agreement to a (thankfully short) user agreement, and an optional registration. You can choose not to register at this time, or tell it that you're 'already registered' (whether you are or not) without problem. Finally, a blank word processor, spreadsheet, or presentation screen will start up.
The first thing I do, when faced with a blank word processor document, is adjust the zoom. By default, this is set to 1.0, but isn't centred on the screen. Instead, I right-click on the 100% along the bottom of the screen. This pops up a menu full of choices:
I prefer Optimal, which centres the work area in the window, and zooms it to the largest size that will fit comfortably on your screen. On a display set to 800x600 resolution, this is at 106%, a small magnification. On a 1024x768 display, it's at 136%.
Auto-what?
One of OpenOffice.org's 'features' is Word Completion... as you type in the word processor, you'll see it suggesting the word that it thinks you're trying to write. Maybe you like this or find it helpful... I find it annoying-- and on older computers, it can help slow everything down. To turn it off: click on the Tools menu and pick Auto-correct. In this dialogue box, you'll find a bunch of settings-- take a moment to check them out. (Microsoft Word users often find themselves wanting to turn off some of the features in that program's version of this dialogue). Personally, I leave everything alone except for Word Completion. Click on that tab, and remove the checkmark beside [x] Enable word completion and below that, beside [x] Collect words. Click OK.
Edit your toolbar
Toolbars can be a very handy way to quickly get to commonly-used commands without having to dig through menus and dialogue boxes. But a toolbar filled with icons that you never use is just visual clutter; and if there are commands you do anticipate using frequently, it's nice to be able to add them to the appropriate toolbar. In OpenOffice.org's word processing module (OpenOffice.org Writer), I make a few changes to the second toolbar- the Formatting toolbar, To do this, click on the Tools menu, and then on Customize. A dialogue box opens up that allows you to make changes to the actual menu items, and to keyboard shortcuts. I skip those (feel free to play around if you like!) but click on the Toolbars tab.
First, drop down the list labelled Toolbar. There are a lot of toolbars among the various modules! I only make changes to the toolbar in the Writer module. (In OO.org 1.x, this is referred to as the Text Object toolbar). Scrolling down the list of icons, I remove the checkmarks beside the first several items all referring to Styles. Styles are a powerful tool, allowing users to customize the fonts and other settings associated with normal text, headlines, lists, etc... but I don't use them. (Do you?) And the drop-down list of style names takes up a large hunk of toolbar real estate. Notice that the toolbar changes as you uncheck items.
Scrolling down the list, I remove the checkmark beside the Justified text alignment item-- fully justified text simply looks ugly in word processors. I add checkmarks beside the three line spacing items-- there are times when I want to be able to switch between single and double-spacing, and this makes it easy.
Finally, I remove the checkmarks beside the Font Color, Highlighting, and Background Color items. When I'm finished, I click OK.
Lots of Options
Then I open the Tools/Options dialogue box. There are lots of options... you'll see a collapsed outline on the left- clicking the [+] beside a section opens it up, allowing you to select sub-sections to see the actual options. For instance, if you want to by default store files in a non-default location, open up the top section, and click on the Paths option. I open up the Load/Save section and then go to its General object:
By default, OpenOffice.org wants to save its files in one of two OpenOffice.org-specific sets of file types. OO.o ver 1.x uses a set of OpenOffice.org file types that can only be read by OpenOffice.org or Sun's Star Office... OO.o ver 2.x defaults to a new set of Open Document file types that may become a world-wide standard. But for now, most of the world uses Microsoft Office (Word, Excel, and Powerpoint) file types as de facto standards. Rather than fighting this, I go with the flow.
As a result, I make the default Word Processor file type: Microsoft Word 97/2000, default Spreadsheet: Microsoft Excel 97/2000/XP, and default Presentation file format: Microsoft PowerPoint 97/2000/XP.
Before I click OK, I open up the OpenOffice.org Writer options and click on the Basic Fonts (Western) item. On slower computers, this takes a moment or two to display:
The Default font (on Windows systems at least) is Times New Roman. I prefer to change this to Comic Sans MS. Note that when you change this top one, the other default fonts change as well. (To do the same thing in MS Word, by the way, is a major pain, involving editing the hidden and protected Normal.dot template... kudos to OpenOffice.org for making it much easier).
At this point, I click OK. I'm done customizing the OO.org word processor. If I close the blank document, I'm asked to save my changes... I can choose not to save without losing any of my customizations.
One more thing: Open Impress
OpenOffice.org Impress (also referred to as OpenOffice.org Presentation in some older versions) is for creating screen shows, similar to Microsoft Office's Powerpoint. I make one change-- to the default printing behaviour. Most often, when I'm printing a presentation, I want to make audience handouts, with multiple slides to a page. Since I do that most often, I make it the default. To do so:
Open Imprint. Ignore the would-be helpful opening screens by clicking on the Create button on the first screen. Then click (once again) on the Tools/Options menu item, click beside the OpenOffice.org Impress item, and choose Print. (Note in OO.org 1.x, you can get there even with a word processor document open):
I add a checkmark for [x] Handouts and remove the one beside [x] Drawing. I change the Quality to Black & White and set the Page options to Fit to page. With these settings, I get (by default) four slides to a printed page, in a quality that photocopies well.
Other
While I'm making changes, I also customize desktop icons and Start Menu options. I've created an Applications folder within the Start Menu items, and move the OpenOffice.org 2.0 start menu folder within it, for instance. To learn how to tidy up your desktop and Start Menu, check my tutorial: http://www.zisman.ca/simple95/
Conclusion
This introduction highlights the changes that I make to a default OpenOffice.org installation. They fit my needs. Your needs may (and probably will!) vary. Explorer the various AutoCorrect, Customize, and Options dialogue box features.