Operation Neptune is a classic educational math game for ages 9-14 from The Learning Company with DOS, Windows, and Mac versions. Developed in the late 1980s/early 1990s, it doesn't require much in the way of hardware. The plot is that an alien space ship has crashed in the ocean; you are on a mini-submarine, travelling around the ocen floor searching for pieces of debris, and returning them to your underwater mothership.
Along the way, you are asked to solve math problems of relevance to your mission: adjusting ballast, locating objects from longitude and latitude, speed problems, food supply, and more. All problems are written as word problems; an on-screen calculator is included and can be used as needed. Some problems involve reading a chart.
(Note: Operation Neptune is no longer listed on The Learning Company's website; a Google search will find many vendors still selling it. My school purchased multiple copies of the program on CD for CDN$5 each from Vancouver BC retailer Multimedia Technologies (http://www.softwarebc.com).
One practical issue with the game: the game automatically saves when players exit the program; I haven't found a way to control where it saves to-- it always saves onto the local computer even though it may have been installed across a network. That means that in a computer lab setting, students need to return to the same computer each time. It also means that if schools are using software that 'locks' the local computer hard drive (our district uses Deep Freeze: http://www.faronics.com/main.asp) that software needs to turned off -- a tedious process on multiple systems -- in order to allow the game to be saved.
There are often problems using
educational
software designed for home use ('edutainment') in a school setting:
students
will see it as fun, and rush through (or turn off) the learning
components.
Operation Neptune doesn't include the ability to turn off the math
problems.
In order to have students be more accountable for their work, I ask
students
to write down each problem they do in the following format:
Problem Type: ______________________
Math Calculation: ____________________
Answer Entered: ____________________
Correct? ________
I print up sheets and sheets of these.
As well, one of the goals at my school this year is to encourage oral language related to math. To help with this goal, I divide students into groups of 2-3, so that they can talk amongst themselves about the math problems.
When students are first signing onto the game, they are asked to choose a level: Voyager or Expert. Problems get progressively harder as they continue; each game has 5 levels. The Voyager game includes some problems involving fractions. The Expert game assumes familiarity with decimals and percentages.
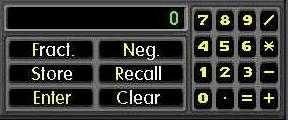
Students may need an introduction to some aspects of the on-screen calculator. In particular, many students need to learn to use the asterix key (*) for multiplication and the slash key (/) for division. As well, the calculator includes buttons labelled Negative and Fraction. Pressing the Negative key prior to typing a number makes that a negative number, which will be useful in some of the problems involving a thermometer. As the name suggests, the Fraction key is used to indicate a fraction, rather than a division. Type " 1 / 2" and the calculator will display "0.5". Type "Fraction 1 / 2" and the calculator will display "1/2". To display the mixed number "2 1/2", type "2" then "Fraction 1 / 2".
Another problem for students outside the USA (like mine) are that the program uses US measurements. In some cases, this is no big deal-- students can do the same operations whether the thermometer measures degrees F or degrees C. But some other problems assume that students can convert between feet and inches (remember, 12 inches to a foot) or feet and yards (3 feet to a yard). And I suspect even most US students don't know that there are six feet to a fathom! (I print a sheet with these conversions and leave it on the board).
Luckily, if students make a mistake on a word problem, they get a second chance while a help screen is visible. Many students, however, need to practice reading the help screen carefully!
Luckily, if students make a mistake on a word problem, they get a second chance while a help screen is visible.
I've identified 22 different problem types at the beginning "Voyager" level, with the Expert level adding several more problem types as well as more complex versions of the of the Voyager-level problems.
In order to help my students (and cut down on kids barraging me with questions), I've made posters illustrating samples of each problem type, with a brief description of how to solve it. I ask students to check the posters before coming to me for help.
(On a Windows system, you can copy a screen to the clipboard by pressing the PrtScn key, which then allows you to paste the image into any graphics-friendly program, including most word processors. Then you can print it out. On Macs, you can get a screen-capture saved to the hard drive by pressing Command+Option+Shift+3).
I am including the screen captures and descriptions below:
Voyager Game:
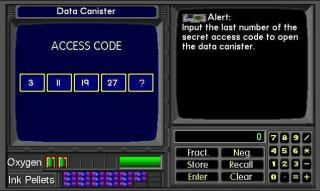
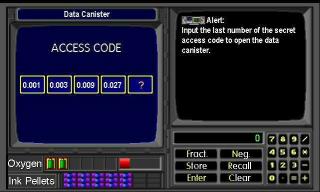
Data Canister: If the numbers are
getting bigger, they are either adding or multiplying by the same
number.
Compare the first two numbers... in this case, to go from 3 to 11, they
are probably adding 8. Check by adding 8 to 11... you get the next
number:
19. If adding doesn't work, try multiplying. When you've found the
pattern,
use it to get the missing number.
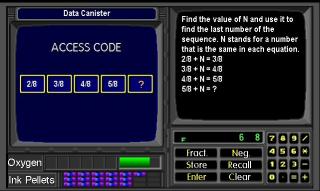
As students continue, the Data Cannister
problems start to include patterns with fractions. In this example, the
denominators are all the same, (8), while the numerators are increasing
in a recognizable pattern, so the missing number is 6/8. As these get
harder,
students may need to convert some of the fractions to get a common
denominator.
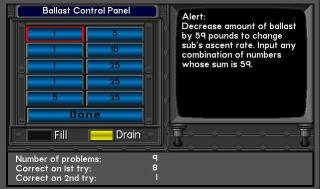
Ballast Control Panel: click on
numbers until they add up to the amount of ballast you need. For
instance,
to get 59 pounds, you could click on 25, then another 25, then 5, then
on four 1s. Click Done when you're finished.
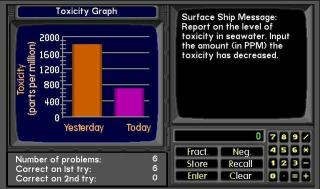
Toxicity Graph: To find how much
the toxicity has decreased or increased over two days, find the amounts
for each day and subtract. Note that in this example, the amount for
Yesterday
was 1800-- in between the 1600 and 2000 lines.
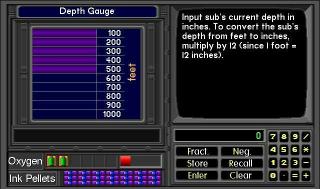
Depth Gauge: Depth Gauge: You have
to convert between feet and inches or feet and yards, which are US
measurements.
There are 12 inches in one foot, and three feet in one yard. And there
are six feet in one fathom! If your measure is in feet and you want
inches,
multiply by 12. If it's in inches and you want feet, divide by 12. If
it's
in feet and you want yards, divide by 3; to change yards to feet,
multiply
by 3.
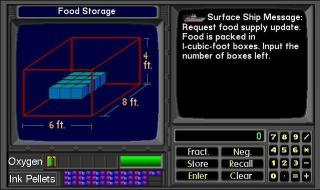
Food Storage: You could count the
number of blue boxes, but it might be easier to could the number in a
row,
and the number of rows, and multiply:
3 * 4 = 12 If there are more
than one level of boxes, multiply by the number of levels.

Toxicity Level Graph: Look along
the bottom of the graph to find the time (in this case, 1000 hours)...
go up to the graph line to find the value at that time (in this case
1600).
Subtract the value of the Normal line.
In this example, 1600 – 1200 = 400
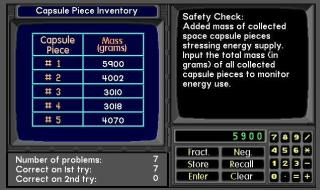
Capsule Piece Inventory: Use the
calculator to add up the total of all five pieces.
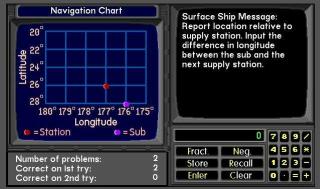
Navigation Chart: Check whether
the problem asks for longitude or latitude.
Then find the proper longitude or latitude values for the two dots. To
find a difference, subtract those values! Later, students will be asked
to find values where the dots are in between two lines on a graph that
are labelled every 2 degrees.
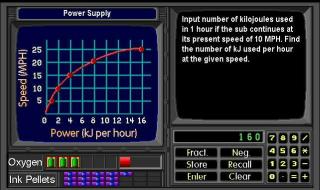
Power Supply: Find the speed up
the left-hand edge of the graph; then go straight across to the red
line,
then go straight down to find how much power is being used at that
speed.
Easy!
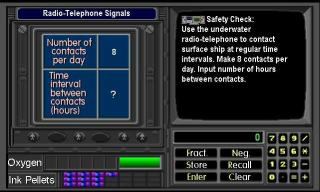
Radio Telephone Signal: You need
to know how many hours there are in a day (24) or how many minutes in
an
hour (60). In the example, you are making 8 contacts in a day- which is
the same as 8 contacts in 24 hours. If your divide 24 by 8, you will
find
out how many hours between each contact.
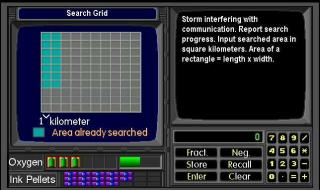
Search Grid: multiply the
length times the width of the area already searched (the light blue
squares).
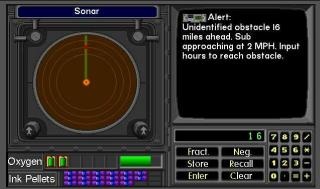
Sonar: Divide the distance by the
speed to get the number of hours it will take to reach it. In this
case,
16 / 2 = 8.
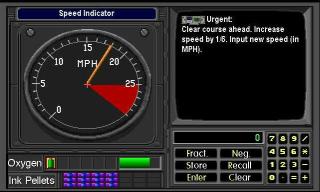
Speed Indicator: There are several
steps for this. First find your current speed (18). Find out how much
to
increase it by multiplying it by 1/6. (To do that, type 18, then *,
then
Fraction 1 / 6 = ). To get your new speed, add that answer (3) to your
original speed (18). 18 + 3 = 21
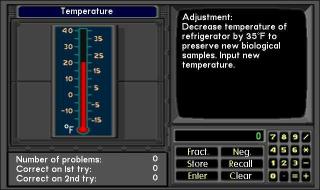
Temperature: subtract to decrease
temperature, add to increase temperature. If you need to get a negative
number, click the Neg button then type the number.
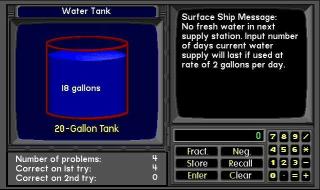
Water Tank: divide the total amount
of water by the amount you use each day. For instance, 18 gallons
divided
by 2 gallons per day: 18 / 2 = 9. You can use the calculator.
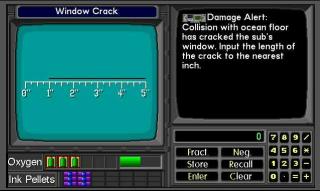
Window Crack: subtract the
right-hand
and left-hand ends of the crack. In this case, 5 – 1 = 4
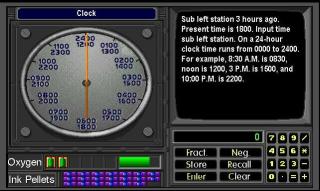
Clock: To find a time in the past,
imagine moving the hour hand that many hours backwards... to find a
time
in the future, move the hour hand that many hours forwards.
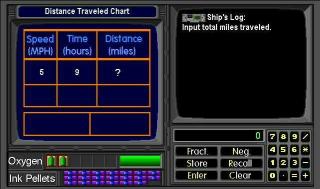
Distance Traveled Chart: Speed
times Time equals Distance.
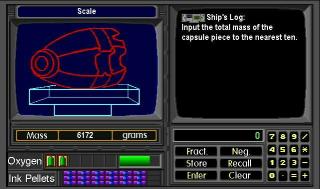
Scale: round off the weight of
the capsule. In this example, round off 6172 to the nearest 10: 6170
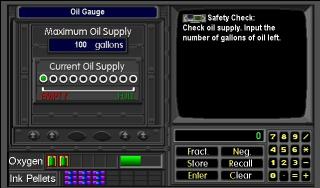
Oil Gauge: The oil supply is 100
gallons; the gauge is representing it by 10 dots (count them to be
sure!).
So each dot represents how many gallons? How many dots are green?
Multiply
to get the total oil remaining.
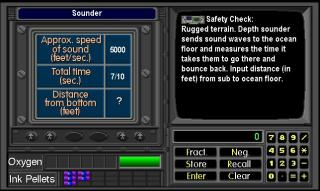
Sounder: Your sonar sends sound
waves from the top of the water-- they hit the bottom and bounce back.
To get the distance, multiply the speed times the time (notice that
time
may include a fraction!) But that's the distance from the top to the
bottom
and back up again-- twice what you want. So divide your first answer by
2 to get the final answer.
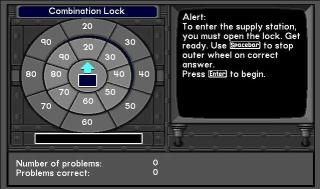
Combination Lock: You have to do
the adding or subtracting in your head! Press the space bar when the
answer
appears on the top. If you're too slow, wait for it to come around
again.
Expert Level:
The Expert Level uses the same problem types as the Voyager Level, but using decimals and percentages. As well, several new problem types appear. (I haven't had as many students playing this level, so there are probably more problem types still be discovered!)
Data Cannister: This example is
similar to the one from the Voyager Level except it is using decimal
numbers.
In this case, the pattern is that each number is multiplied by 3 to get
the following number.
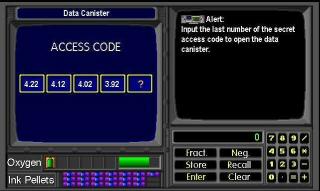
As well as using decimal numbers, this
time the numbers are decreasing, so students need to recognize that
they
will need to subtract or divide by a constant amount-- in this example,
subtracting 0.10 each time.
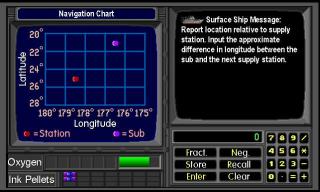
Navigation Chart: Again, similar
to the Voyager Level problem, but requiring estimating decimal
fractions.
In this example, 178.5 - 176.5 = 2
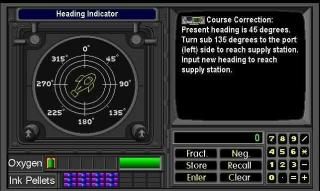
Heading Indicator: Count (starting
from zero degrees) how many lines it is to the degrees indicated-- in
this
example, 135 º is three lines. Starting from where the sub is
pointing
now (45º), move your finger that far to the left or the right. In
this example, you move to the left, to 270º.
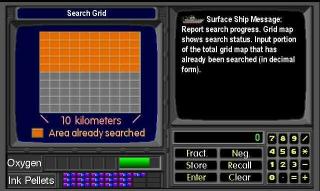
Search Grid: The grid is ten rows
across and ten rows up. 10 * 10 = 100 squares. Five rows (50 squares)
are
coloured orange. 50/100 = 0.50
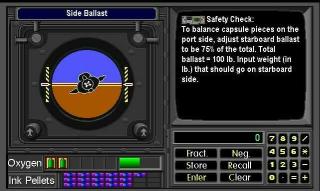
Side Ballast: Convert the
percentage
(in this example 75%) to a decimal (0.75) and multiply it by the total
ballast (100 pounds). 0.75 * 100 = 75

Speed Graph: This assumes students
understand how to calculate averages. Use the calculator to add up the
values of each bar on the graph. In the example: 25 + 25 + 15 + 25 + 20
+ 25 = 135. Divide by the number of entries (6) to get the average. 135
/ 6 = 22.5
Ending the game... when students get to the very end of the game, it may not be apparent how to finish the game. Here's what some dedicated students told me:
"At
the end of the level there's a box with an 'X' on it. While it's open
you have to shoot it with the ink pellets and then get to the surface
as quickly as you can, before you die!
If you die you have to destroy the box again. (Don't get hit by the mutated puffer fish!)"
All screen captures from Operation Neptune are copyright by The Learning Company. This tutorial is (c) 2004 by Alan Zisman. I would appreciate hearing from you, especially if you find this helpful in using Operation Neptune in a school setting, or if you have any comments, questions, or criticisms of this tutorial. Feel free to email me at alan at zisman dot ca. (It's a sad state of affairs that I have to spell out my email address in order to confuse spam-harvesters!)
-- AZ