GETTING STARTED WITH MICROSOFT PUBLISHER
Note: this tutorial was made in 2006 working with Microsoft Publisher 2000. If you are using newer (or older) versions of MS Pub, some details may appear different, but the essence should remain the same.
MS Publisher is a page layout program (also known as desktop publishing or DTP). As such, it occupies a grey-area between a word processor and a graphics program, having some things in common with each, but also working somewhat differently than you might expect if you are used to, say a word processor.
Other page layout programs include Quark Xpress, Adobe Pagemaker, and Adobe InDesign. These three are more expensive, higher-end programs, aimed at graphics and design professionals—with more features, but harder to use. MS Publisher is aimed more at amateurs—people that don’t do design for a living, but sometimes need to make attractive brochures, menus, newsletters, etc. It can be used to design websites, but tends to create awkward websites that load slowly.
Microsoft Publisher has been included in some editions of Microsoft Office (sometimes, but not always, as part of the Small Business Edition), and is available on its own; it shares Microsoft Office tools such as clipart, spell check and thesaurus, (and in Publisher 2000, the annoying talking paperclip). As of this writing, list price for Microsoft Publisher 2003 is US$169.
Getting started
 When
you start it up, it may start up offering a set of pre-made templates
for various categories of publications… while you can use these,
we’re going to ignore them (by clicking on the Exit Catalog button), and look at a
blank sheet.
When
you start it up, it may start up offering a set of pre-made templates
for various categories of publications… while you can use these,
we’re going to ignore them (by clicking on the Exit Catalog button), and look at a
blank sheet.
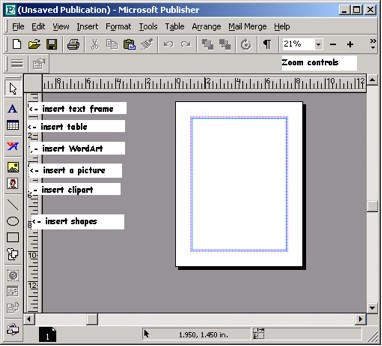
Notice that it is showing a reduced-size picture of a page. Here’s the first, and most vital Publisher secret… Press the F9 key (on the top row of your keyboard). You’ll switch to a full-sized view of the page. Pressing F9 again, returns you to the miniature Whole Page view. You can also select a variety of sizes from the zoom control on the tool bar.
Unlike a word processor, if you just type, nothing happens. Instead, the second Publisher secret is that you need to make frames – rectangular spaces to contain text or pictures. You do this with tools from the toolbar along the left. If you want a frame to contain text, use the text tool (*it looks like a letter A) to make a rectangular shape where you want the text to go. Don’t worry—you can move it around or make it larger or smaller later if needed.
If you want to add a graphic, use the picture frame tool—the one with the picture of a mountain. Again, you can move it or resize it… you can even move a picture on top of text, and the text will move out of the way, wrapping around the picture.
Working with text frames
Make a frame to hold some text… you can type in it, just like with a word processor. You can change fonts, size, alignment, etc… in many ways, Publisher works like Microsoft Word. The same icons do the same things, many commands are in the same menus. It even shares real-time spell checking with Microsoft Word.
Typing directly into a frame makes sense for headlines, brief captions, etc… but often, you’re working with large blocks of text from a saved word processor document. You can import that text into a text frame in a couple of ways.
• Open your document in your word processor, select some or all of it, and copy it to the clipboard. Move to Publisher, click in the text frame where you want it to appear, and paste. There’s your text!
• In Publisher, click in the text frame where you want your imported text to start, and from the Insert menu, select Text File… you’ll be prompted for the name and location of the file to import; when it’s chosen, Publisher pours the text into the frame.
Either way, if there’s more text than will fit into your frame, you’ll see:
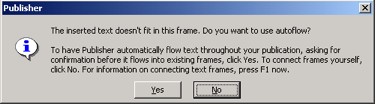
Autoflow creates new frames (and new pages) as needed, and dumps the excess text into it. However, this won’t necessarily fit in with your idea of how you want your publication to look. You may prefer to say No to this kindly offer.
 In
that case, you’ll see a little box with A… at the bottom
of the text frame, to indicate that there’s more text waiting to
be placed.
In
that case, you’ll see a little box with A… at the bottom
of the text frame, to indicate that there’s more text waiting to
be placed.
Choose a frame for the text to flow into- if necessary, create a new one. Then, click on the Link Frames icon on the top toolbar (it looks like two links of a chain), and click into your target frame. Cutely, when you click on the Link icon, your mouse cursor changes into a pitcher, ready to ‘pour’ in your text.
(If you need to make additional pages, click on the Insert menu, then select the last item: Pages. Add as many pages as you think you’ll need. If you want, you can automatically duplicate all the items on the previous page—clever if you’re making a template with text and graphics frames, headers and footers the same on each page).
When you link frames, text can flow back and forth between them as needed… if, for instance, you add a picture that pushes some of the text in the first frame out of the way, it can flow as needed into the second frame. If your second frame runs out of room, you can always link the text to a third frame, and so on as needed.
Working with graphics frames
After you’ve made a frame for a graphic, Publisher gives you several ways to get a graphic. You can work with digital photos, from a digital camera or saved from online or other sources, pictures made in a paint program like Photoshop or KidPix or Windows Paint, or clipart that ships with MS Office, Publisher, or lots of other programs. Again, there are a number of ways to get the content into the frame:
• Open the graphic in your graphic program, select it, copy, and paste into Publisher.
• Double-click in your graphics frame (in Publisher)… you’ll be prompted to select a saved graphic file. Nicely, you’ll see a preview of the graphic before you click the Insert button.
• The same thing will happen if you click on the Insert menu, then click Picture then From File (Note: your saved file will be much larger if you copy/paste graphics rather than choosing the image in one of the latter two methods)
 •
Alternatively,
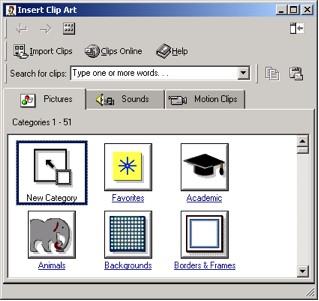
you can use Publisher’s built-in clipart (which it shares with
any other MS Office programs installed). Click on the Insert menu, then Picture, then Clipart. The Insert Clipart
dialogue box will pop up, letting you select clipart by category, or
search—for instance, for basketball girls. You’ll end up
with images that the computer thinks match your search—though
some odd choices often appear. Select one.
•
Alternatively,
you can use Publisher’s built-in clipart (which it shares with
any other MS Office programs installed). Click on the Insert menu, then Picture, then Clipart. The Insert Clipart
dialogue box will pop up, letting you select clipart by category, or
search—for instance, for basketball girls. You’ll end up
with images that the computer thinks match your search—though
some odd choices often appear. Select one.
Unfortunately, most of the clipart images aren’t installed by default, but reside on your Publisher CD… you do remember where that is, don’t you? Or you can try pictures until you hit on one that’s installed onto your hard drive, so it can be inserted into your publication.
You can use your mouse to resize the picture or to move the entire picture frame (and picture) around the page… text underneath will move out of the way to accommodate your change. Handy, but often forgotten, is the ability to crop a picture, cutting out the parts that you don’t need. To do this, click on the picture to select it. Then click on the cropping tool, on the very left of the second row of toolbar buttons (notice how your toolbar changes depending on whether you’re working with text or graphics). It looks like a pair of XXs at a 45º angle.
With the cropping button selected, your cursor changes to a pair of scissors… move to one of the black boxes at the corners of the picture, and drag with the mouse. Instead of shrinking the size of the picture, you’ll be getting rid of parts of it. Don’t worry, if you pull the corner back out, those parts of the picture will return. Much handier than using real scissors!
Other tools on the graphics toolbar let you rotate pictures, flipping them to the left or right (only by 90º, though), or flipping them horizontally or vertically. (There’s also a Custom Rotate button).
Also be aware that you may get items on top or behind other items… if this isn’t working the way you want, look for the Bring to Front or Send to Back buttons on the toolbar, or the various items of the Arrange menu.
Play around!
That’s about it!
Note: this tutorial was made in 2006 working with Microsoft Publisher 2000. If you are using newer (or older) versions of MS Pub, some details may appear different, but the essence should remain the same.
MS Publisher is a page layout program (also known as desktop publishing or DTP). As such, it occupies a grey-area between a word processor and a graphics program, having some things in common with each, but also working somewhat differently than you might expect if you are used to, say a word processor.
Other page layout programs include Quark Xpress, Adobe Pagemaker, and Adobe InDesign. These three are more expensive, higher-end programs, aimed at graphics and design professionals—with more features, but harder to use. MS Publisher is aimed more at amateurs—people that don’t do design for a living, but sometimes need to make attractive brochures, menus, newsletters, etc. It can be used to design websites, but tends to create awkward websites that load slowly.
Microsoft Publisher has been included in some editions of Microsoft Office (sometimes, but not always, as part of the Small Business Edition), and is available on its own; it shares Microsoft Office tools such as clipart, spell check and thesaurus, (and in Publisher 2000, the annoying talking paperclip). As of this writing, list price for Microsoft Publisher 2003 is US$169.
Getting started
When
you start it up, it may start up offering a set of pre-made templates
for various categories of publications… while you can use these,
we’re going to ignore them (by clicking on the Exit Catalog button), and look at a
blank sheet.Notice that it is showing a reduced-size picture of a page. Here’s the first, and most vital Publisher secret… Press the F9 key (on the top row of your keyboard). You’ll switch to a full-sized view of the page. Pressing F9 again, returns you to the miniature Whole Page view. You can also select a variety of sizes from the zoom control on the tool bar.
Unlike a word processor, if you just type, nothing happens. Instead, the second Publisher secret is that you need to make frames – rectangular spaces to contain text or pictures. You do this with tools from the toolbar along the left. If you want a frame to contain text, use the text tool (*it looks like a letter A) to make a rectangular shape where you want the text to go. Don’t worry—you can move it around or make it larger or smaller later if needed.
If you want to add a graphic, use the picture frame tool—the one with the picture of a mountain. Again, you can move it or resize it… you can even move a picture on top of text, and the text will move out of the way, wrapping around the picture.
Working with text frames
Make a frame to hold some text… you can type in it, just like with a word processor. You can change fonts, size, alignment, etc… in many ways, Publisher works like Microsoft Word. The same icons do the same things, many commands are in the same menus. It even shares real-time spell checking with Microsoft Word.
Typing directly into a frame makes sense for headlines, brief captions, etc… but often, you’re working with large blocks of text from a saved word processor document. You can import that text into a text frame in a couple of ways.
• Open your document in your word processor, select some or all of it, and copy it to the clipboard. Move to Publisher, click in the text frame where you want it to appear, and paste. There’s your text!
• In Publisher, click in the text frame where you want your imported text to start, and from the Insert menu, select Text File… you’ll be prompted for the name and location of the file to import; when it’s chosen, Publisher pours the text into the frame.
Either way, if there’s more text than will fit into your frame, you’ll see:
Autoflow creates new frames (and new pages) as needed, and dumps the excess text into it. However, this won’t necessarily fit in with your idea of how you want your publication to look. You may prefer to say No to this kindly offer.
In
that case, you’ll see a little box with A… at the bottom
of the text frame, to indicate that there’s more text waiting to
be placed. Choose a frame for the text to flow into- if necessary, create a new one. Then, click on the Link Frames icon on the top toolbar (it looks like two links of a chain), and click into your target frame. Cutely, when you click on the Link icon, your mouse cursor changes into a pitcher, ready to ‘pour’ in your text.
(If you need to make additional pages, click on the Insert menu, then select the last item: Pages. Add as many pages as you think you’ll need. If you want, you can automatically duplicate all the items on the previous page—clever if you’re making a template with text and graphics frames, headers and footers the same on each page).
When you link frames, text can flow back and forth between them as needed… if, for instance, you add a picture that pushes some of the text in the first frame out of the way, it can flow as needed into the second frame. If your second frame runs out of room, you can always link the text to a third frame, and so on as needed.
Working with graphics frames
After you’ve made a frame for a graphic, Publisher gives you several ways to get a graphic. You can work with digital photos, from a digital camera or saved from online or other sources, pictures made in a paint program like Photoshop or KidPix or Windows Paint, or clipart that ships with MS Office, Publisher, or lots of other programs. Again, there are a number of ways to get the content into the frame:
• Open the graphic in your graphic program, select it, copy, and paste into Publisher.
• Double-click in your graphics frame (in Publisher)… you’ll be prompted to select a saved graphic file. Nicely, you’ll see a preview of the graphic before you click the Insert button.
• The same thing will happen if you click on the Insert menu, then click Picture then From File (Note: your saved file will be much larger if you copy/paste graphics rather than choosing the image in one of the latter two methods)
•
Alternatively,
you can use Publisher’s built-in clipart (which it shares with
any other MS Office programs installed). Click on the Insert menu, then Picture, then Clipart. The Insert Clipart
dialogue box will pop up, letting you select clipart by category, or
search—for instance, for basketball girls. You’ll end up
with images that the computer thinks match your search—though
some odd choices often appear. Select one.Unfortunately, most of the clipart images aren’t installed by default, but reside on your Publisher CD… you do remember where that is, don’t you? Or you can try pictures until you hit on one that’s installed onto your hard drive, so it can be inserted into your publication.
You can use your mouse to resize the picture or to move the entire picture frame (and picture) around the page… text underneath will move out of the way to accommodate your change. Handy, but often forgotten, is the ability to crop a picture, cutting out the parts that you don’t need. To do this, click on the picture to select it. Then click on the cropping tool, on the very left of the second row of toolbar buttons (notice how your toolbar changes depending on whether you’re working with text or graphics). It looks like a pair of XXs at a 45º angle.
With the cropping button selected, your cursor changes to a pair of scissors… move to one of the black boxes at the corners of the picture, and drag with the mouse. Instead of shrinking the size of the picture, you’ll be getting rid of parts of it. Don’t worry, if you pull the corner back out, those parts of the picture will return. Much handier than using real scissors!
Other tools on the graphics toolbar let you rotate pictures, flipping them to the left or right (only by 90º, though), or flipping them horizontally or vertically. (There’s also a Custom Rotate button).
Also be aware that you may get items on top or behind other items… if this isn’t working the way you want, look for the Bring to Front or Send to Back buttons on the toolbar, or the various items of the Arrange menu.
Play around!
That’s about it!