Upgrading to a Solid State Drive Rejuvenates My 4-Year-Old
MacBook
by Alan Zisman (c) 2012 First published in Low End Mac September 4, 2012
The Mac I mostly use is a Late 2008 13" aluminum MacBook laptop. Powered by a 2.0 GHz Core 2 Duo CPU, it's had its original 2 GB of memory upgraded to 4 GB and its original 160 GB hard drive replaced with a 512 GB drive.
Following that model's late 2008 release, Apple has released multiple upgraded MacBooks with faster processors and added SD memory card slots, Thunderbolt ports, and non-removable batteries while making them part of the MacBook Pro line. While these newer models are all fine, none has seemed compelling enough to make me want to replace my MacBook despite some cosmetic wear and tear.
Along with that MacBook, I also have a Dell Mini 9 netbook purchased in 2009. I got that model at the time to be able to experiment with 'hackintoshing' it - putting Mac OS X onto non-Apple hardware - something I wrote about in Low End Mac (see OS X on My Dell Mini 9: Success at Last!). The Mini 9 - unlike many later netbooks - uses a solid-state drive (SSD) for its onboard storage. While the SSDs offered by Dell were fairly low capacity (4-32 GB), the performance impressed me - running OS X 10.6 Snow Leopard, my Mini booted from system chime to usable desktop in about 15-20 seconds, for example.
SSDs are built around flash RAM - similar to the now commonplace USB memory sticks (also called "flash drives" or "memory keys"). The technology offers a number of advantages over the spinning metal disks of traditional hard disk drives - besides speed, SSDs are more robust than traditional hard drives. With no moving parts, there's much less that can break or go wrong - and too many laptop owners have suffered from crashed hard drives.
A disadvantage of SSDs - a limited number of write cycles, meaning that they will fail eventually. However, there are some estimates suggesting that with normal use an SSD ought to outlast the rest of my laptop.
 I checked around for options for SSDs
for my MacBook. Crucial.com makes it easy - download and run a little
utility for your Mac, and it reports on the currently installed memory
and drive along with potential replacements supported by that model. A
512 GB SSD was available, costing about $400 - much cheaper than
Apple's SSD upgrade for the new MacBook Pro, but still more than I
wanted to spend to upgrade this older model.
I checked around for options for SSDs
for my MacBook. Crucial.com makes it easy - download and run a little
utility for your Mac, and it reports on the currently installed memory
and drive along with potential replacements supported by that model. A
512 GB SSD was available, costing about $400 - much cheaper than
Apple's SSD upgrade for the new MacBook Pro, but still more than I
wanted to spend to upgrade this older model.
My 512 GB hard drive was about half full - I could (more or less) squeeze everything onto a 256 GB drive, but that would leave me no room for anything else. But as I inspected what was actually on the drive, I realized that I could make space with a relatively small amount of house cleaning. Leaving out the contents of my Downloads folder and the various (rarely used) VMware Fusion and Parallels virtual computers saved over 50 GB of space, for instance.
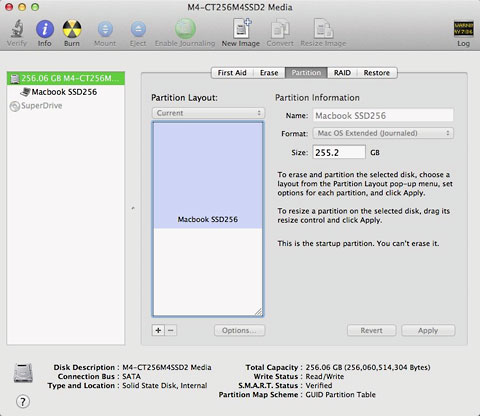 Using the connection
cable, I plugged the SSD into one of my Mac's USB ports, opened Disk
Utility, and created a Mac OS Extended (Journaled) partition on the
SSD. Then I downloaded the OS X 10.8 Mountain Lion installer from
Apple's Mac App Store - since I'd previously purchased Mountain Lion on
the App Store, I was able to download it again without charge. That let
me cleanly install the current Mac operating system version onto the
SSD.
Using the connection
cable, I plugged the SSD into one of my Mac's USB ports, opened Disk
Utility, and created a Mac OS Extended (Journaled) partition on the
SSD. Then I downloaded the OS X 10.8 Mountain Lion installer from
Apple's Mac App Store - since I'd previously purchased Mountain Lion on
the App Store, I was able to download it again without charge. That let
me cleanly install the current Mac operating system version onto the
SSD.
Afterwards, rebooting my Mac with the Option key held down allowed me to choose the boot disk - I could boot to the hard drive still physically installed inside the Mac or to the SSD plugged into a USB port. Booting to the SSD, I ran Apple's Migration Assistant, which I'd used successfully in the past to transfer everything from an old Mac to a new one or when upgrading to a larger hard drive.
This time, though, it didn't do what I wanted. Migration Assistant would have let me transfer Users, Applications, Settings, and Other Files and Folders from the old hard drive to the new - but it wouldn't let me pick and choose which applications or files and folders.
 Instead,
I found it easier to simply choose what I wanted to select using the
Finder. Nicely, after copying my iTunes folder from the old hard drive
to the SSD, all my music and playlists appeared when I opened iTunes on
the new drive. The same thing happened with iPhoto.
Instead,
I found it easier to simply choose what I wanted to select using the
Finder. Nicely, after copying my iTunes folder from the old hard drive
to the SSD, all my music and playlists appeared when I opened iTunes on
the new drive. The same thing happened with iPhoto.
I copied over those Documents folders and files that I actually used - and reinstalled applications that I actually made use of. The result - instead of a half-full 512 GB drive, I now had a 256 GB SSD with 125 GB free.
But it was still hanging on a cable plugged into my computer's USB port. Time to open up the MacBook, remove the hard drive and install the SSD.
Even with apparently very similar models, Apple seems to flip-flop between making it very easy or very difficult for users to upgrade their own RAM and hard drive. On my MacBook, the hard drive is easily accessed by simply popping open the battery cover. To get to the RAM, however, you need to remove multiple screws to open up the whole bottom.
On its following-generation 13" aluminum laptop (renamed MacBook Pro), the RAM is easily accessed while getting at the hard drive takes more work. And on later-generation models, there's no easily accessible battery cover, making it harder to access anything.
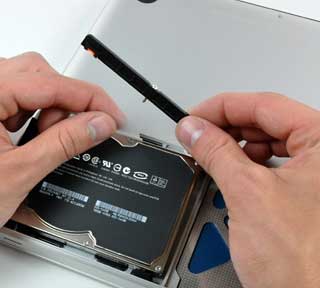
 But on
my model replacing the hard drive only took a few moments:
But on
my model replacing the hard drive only took a few moments:
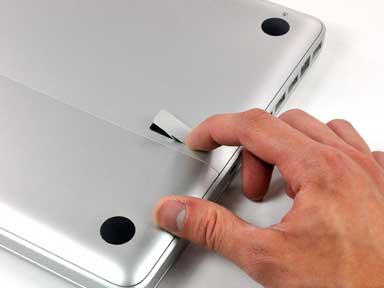
* Unlatching the battery cover.
* Unlatch the battery cover and remove the battery. The hard drive is visible right beside the battery
* The hard drive is held down by a single screw attaching a plastic retainer
* With that removed, it's easy to lift out and unplug the hard drive cable
* There are four little posts screwed into the sides of the drives to keep it securely in place - these are easily removed with pliers
* Install the new drive by reversing these steps.
Nothing to it!
Before removing the traditional hard drive, I timed a few events later repeating with the new solid state drive installed:
 Original Hard
Drive/Solid State Drive
Original Hard
Drive/Solid State Drive
* Boot (chime to cursor): 2:30 minutes/35-22 seconds*
* Opening Word 2011 (to being able to type) 52 seconds/5 seconds
* Opening iTunes 13 seconds/2-3 seconds
* Opening iPhoto 24 seconds/4 seconds
Both boot times and application start times are dramatically improved with the SSD.
Note, however, that this isn't a scientific comparison - the configurations are not identical with additional start up items being loaded on the original drive. Simply clean-installing the operating and applications on the original hard drive would probably have improved boot time, though probably nowhere near the extent measured.
Operations that make more intensive use of the CPU than of the disk - such as creating a video DVD from raw movie footage - would not see improvement - but most of us open documents and applications far more often.
There's a pleasant side-effect that I hadn't been expecting: It's quiet.
I hadn't realized how many little sounds a traditional hard drive makes until, with the SSD, my computer was no longer making them. The laptop's internal fan comes on, but only when I'm copying multiple gigabytes of data - very rarely. Aside from that, the computer is totally silent.
Using the Crucial Data Transfer cable, I can quickly and easily plug in my old hard drive any time I need any of the files or folders that I didn't transfer only.
The result - for the $200 investment in an SSD, my 4-year-old MacBook feels like a new computer; it's much more responsive. And did I mention that it's quiet?
* Boot time with the SSD has been improving with each reboot - I assume Mountain Lion is optimizing the boot process.
Jan 2013 - a reader added: "One thing I did differently was to install a data doubler (from Macsales: http://eshop.macsales.com/item/OWC/DDAMBS0GB/) since my SuperDrive had failed long ago. This let me keep my stock 250G as a secondary hard drive for storage with the SSD as my primary boot drive. The data doubler install was a bit more complicated, but there are instructions online that make it easy. Although I did have to purchase a torx screwdriver to do it as well."
Buy from Amazon: Crucial m4 256GB 2.5-Inch Solid State Drive SATA 6Gb/s CT256M4SSD2
by Alan Zisman (c) 2012 First published in Low End Mac September 4, 2012
The Mac I mostly use is a Late 2008 13" aluminum MacBook laptop. Powered by a 2.0 GHz Core 2 Duo CPU, it's had its original 2 GB of memory upgraded to 4 GB and its original 160 GB hard drive replaced with a 512 GB drive.
Following that model's late 2008 release, Apple has released multiple upgraded MacBooks with faster processors and added SD memory card slots, Thunderbolt ports, and non-removable batteries while making them part of the MacBook Pro line. While these newer models are all fine, none has seemed compelling enough to make me want to replace my MacBook despite some cosmetic wear and tear.
Along with that MacBook, I also have a Dell Mini 9 netbook purchased in 2009. I got that model at the time to be able to experiment with 'hackintoshing' it - putting Mac OS X onto non-Apple hardware - something I wrote about in Low End Mac (see OS X on My Dell Mini 9: Success at Last!). The Mini 9 - unlike many later netbooks - uses a solid-state drive (SSD) for its onboard storage. While the SSDs offered by Dell were fairly low capacity (4-32 GB), the performance impressed me - running OS X 10.6 Snow Leopard, my Mini booted from system chime to usable desktop in about 15-20 seconds, for example.
SSDs are built around flash RAM - similar to the now commonplace USB memory sticks (also called "flash drives" or "memory keys"). The technology offers a number of advantages over the spinning metal disks of traditional hard disk drives - besides speed, SSDs are more robust than traditional hard drives. With no moving parts, there's much less that can break or go wrong - and too many laptop owners have suffered from crashed hard drives.
A disadvantage of SSDs - a limited number of write cycles, meaning that they will fail eventually. However, there are some estimates suggesting that with normal use an SSD ought to outlast the rest of my laptop.
I checked around for options for SSDs
for my MacBook. Crucial.com makes it easy - download and run a little
utility for your Mac, and it reports on the currently installed memory
and drive along with potential replacements supported by that model. A
512 GB SSD was available, costing about $400 - much cheaper than
Apple's SSD upgrade for the new MacBook Pro, but still more than I
wanted to spend to upgrade this older model.My 512 GB hard drive was about half full - I could (more or less) squeeze everything onto a 256 GB drive, but that would leave me no room for anything else. But as I inspected what was actually on the drive, I realized that I could make space with a relatively small amount of house cleaning. Leaving out the contents of my Downloads folder and the various (rarely used) VMware Fusion and Parallels virtual computers saved over 50 GB of space, for instance.
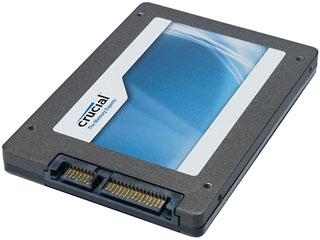
| Crucial offers several 256
GB SSD models at around the $200 price point: an older v4 model with
read and write speeds rated around 200 MB/sec and a newer m4 model
promising read speeds of 500 MB/sec. While Crucial notes that older
systems (pre-2011) may not be able to make full use of the faster
speeds the cost difference between the two models is low - I opted for
the faster model with "data transfer kit". The data transfer kit consists of a CD with Mac and Windows backup software (which I ignored) and a cable with SATA connectors on one end and a USB plug on the other, making it an easy way to connect either a bare SSD or hard drive to your computer, which was very useful. |
Using the connection
cable, I plugged the SSD into one of my Mac's USB ports, opened Disk
Utility, and created a Mac OS Extended (Journaled) partition on the
SSD. Then I downloaded the OS X 10.8 Mountain Lion installer from
Apple's Mac App Store - since I'd previously purchased Mountain Lion on
the App Store, I was able to download it again without charge. That let
me cleanly install the current Mac operating system version onto the
SSD.Afterwards, rebooting my Mac with the Option key held down allowed me to choose the boot disk - I could boot to the hard drive still physically installed inside the Mac or to the SSD plugged into a USB port. Booting to the SSD, I ran Apple's Migration Assistant, which I'd used successfully in the past to transfer everything from an old Mac to a new one or when upgrading to a larger hard drive.
This time, though, it didn't do what I wanted. Migration Assistant would have let me transfer Users, Applications, Settings, and Other Files and Folders from the old hard drive to the new - but it wouldn't let me pick and choose which applications or files and folders.
Instead,
I found it easier to simply choose what I wanted to select using the
Finder. Nicely, after copying my iTunes folder from the old hard drive
to the SSD, all my music and playlists appeared when I opened iTunes on
the new drive. The same thing happened with iPhoto.I copied over those Documents folders and files that I actually used - and reinstalled applications that I actually made use of. The result - instead of a half-full 512 GB drive, I now had a 256 GB SSD with 125 GB free.
But it was still hanging on a cable plugged into my computer's USB port. Time to open up the MacBook, remove the hard drive and install the SSD.
Even with apparently very similar models, Apple seems to flip-flop between making it very easy or very difficult for users to upgrade their own RAM and hard drive. On my MacBook, the hard drive is easily accessed by simply popping open the battery cover. To get to the RAM, however, you need to remove multiple screws to open up the whole bottom.
On its following-generation 13" aluminum laptop (renamed MacBook Pro), the RAM is easily accessed while getting at the hard drive takes more work. And on later-generation models, there's no easily accessible battery cover, making it harder to access anything.
But on
my model replacing the hard drive only took a few moments:* Unlatching the battery cover.
* Unlatch the battery cover and remove the battery. The hard drive is visible right beside the battery
* The hard drive is held down by a single screw attaching a plastic retainer
* With that removed, it's easy to lift out and unplug the hard drive cable
* There are four little posts screwed into the sides of the drives to keep it securely in place - these are easily removed with pliers
* Install the new drive by reversing these steps.
Nothing to it!
Before removing the traditional hard drive, I timed a few events later repeating with the new solid state drive installed:
Original Hard
Drive/Solid State Drive* Boot (chime to cursor): 2:30 minutes/35-22 seconds*
* Opening Word 2011 (to being able to type) 52 seconds/5 seconds
* Opening iTunes 13 seconds/2-3 seconds
* Opening iPhoto 24 seconds/4 seconds
Both boot times and application start times are dramatically improved with the SSD.
Note, however, that this isn't a scientific comparison - the configurations are not identical with additional start up items being loaded on the original drive. Simply clean-installing the operating and applications on the original hard drive would probably have improved boot time, though probably nowhere near the extent measured.
Operations that make more intensive use of the CPU than of the disk - such as creating a video DVD from raw movie footage - would not see improvement - but most of us open documents and applications far more often.
There's a pleasant side-effect that I hadn't been expecting: It's quiet.
I hadn't realized how many little sounds a traditional hard drive makes until, with the SSD, my computer was no longer making them. The laptop's internal fan comes on, but only when I'm copying multiple gigabytes of data - very rarely. Aside from that, the computer is totally silent.
Using the Crucial Data Transfer cable, I can quickly and easily plug in my old hard drive any time I need any of the files or folders that I didn't transfer only.
The result - for the $200 investment in an SSD, my 4-year-old MacBook feels like a new computer; it's much more responsive. And did I mention that it's quiet?
* Boot time with the SSD has been improving with each reboot - I assume Mountain Lion is optimizing the boot process.
Jan 2013 - a reader added: "One thing I did differently was to install a data doubler (from Macsales: http://eshop.macsales.com/item/OWC/DDAMBS0GB/) since my SuperDrive had failed long ago. This let me keep my stock 250G as a secondary hard drive for storage with the SSD as my primary boot drive. The data doubler install was a bit more complicated, but there are instructions online that make it easy. Although I did have to purchase a torx screwdriver to do it as well."
Buy from Amazon: Crucial m4 256GB 2.5-Inch Solid State Drive SATA 6Gb/s CT256M4SSD2